


Resources
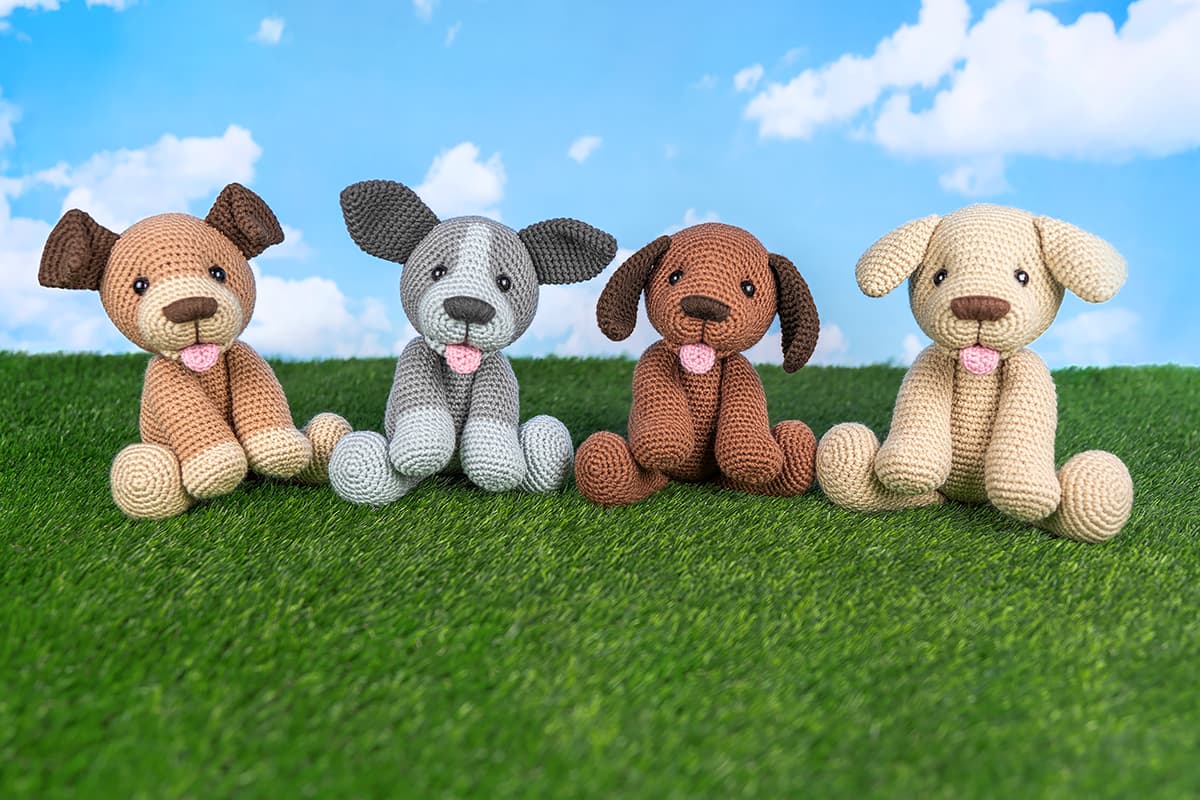
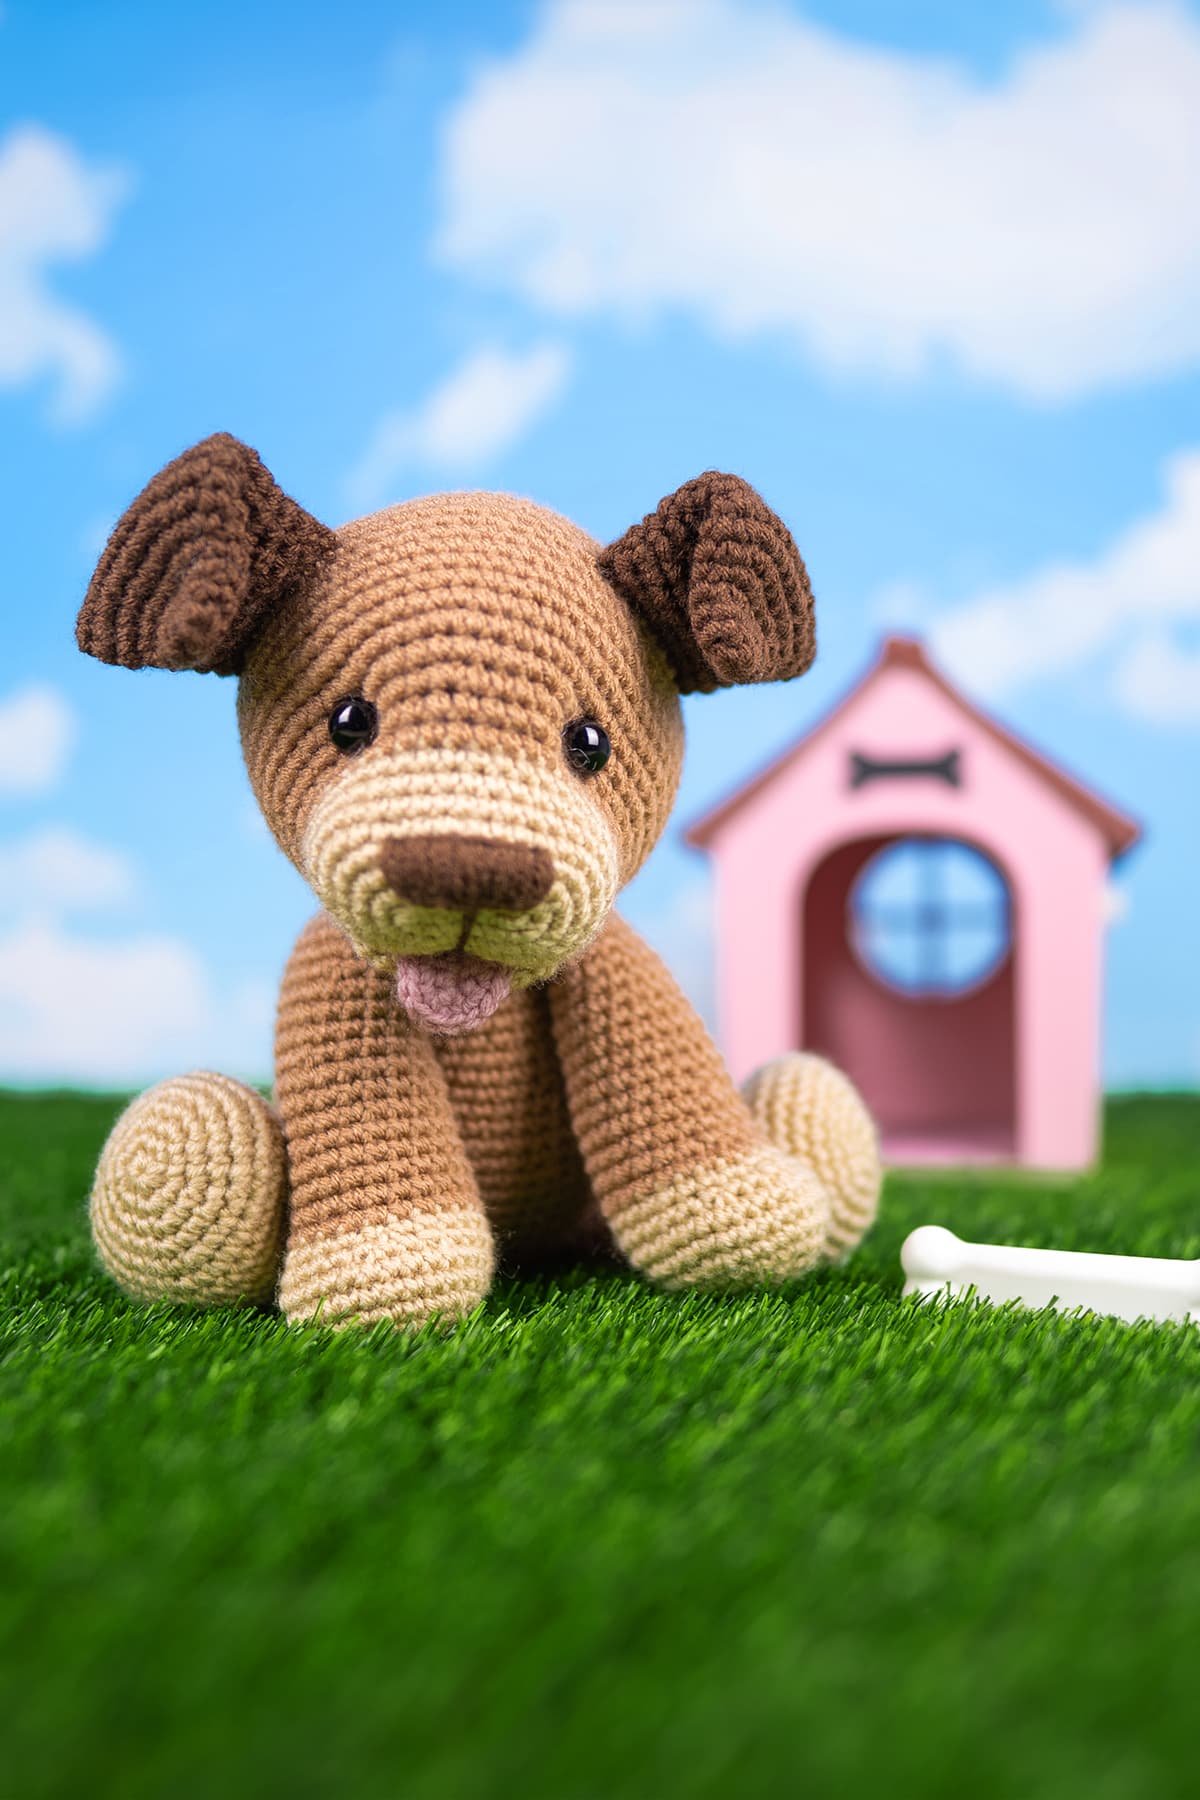
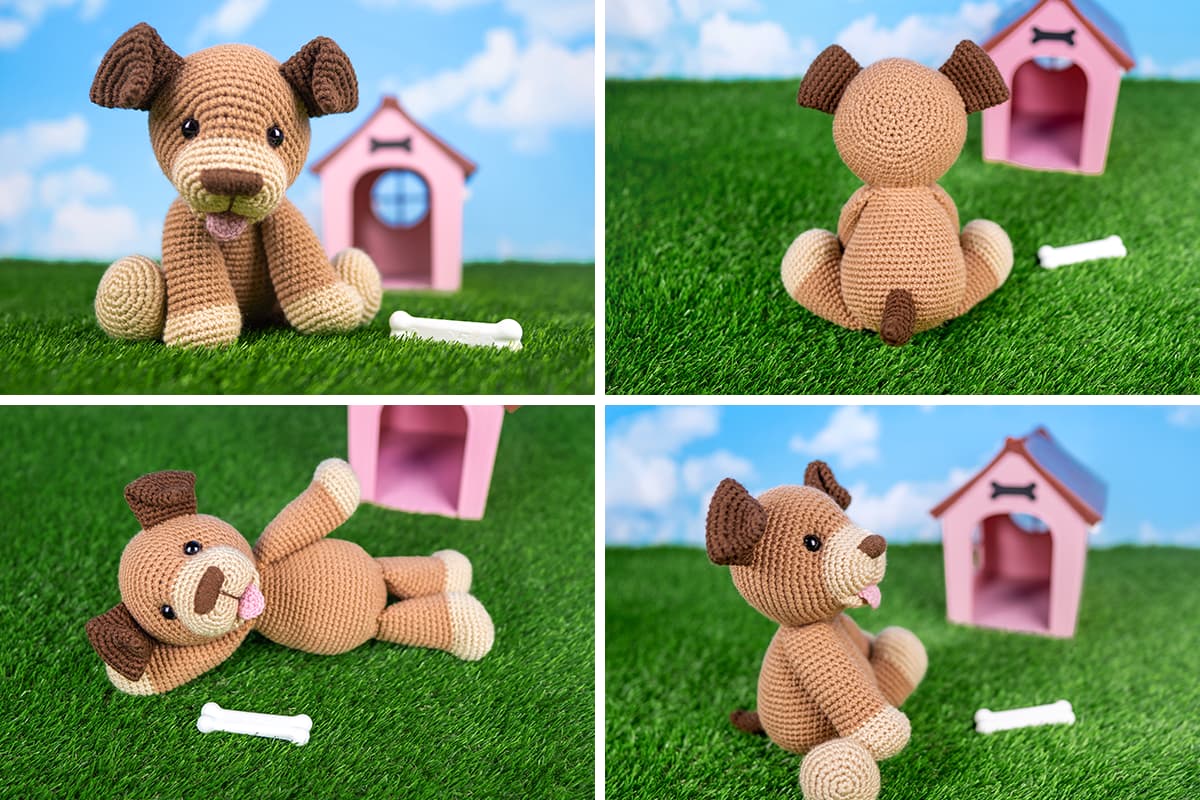
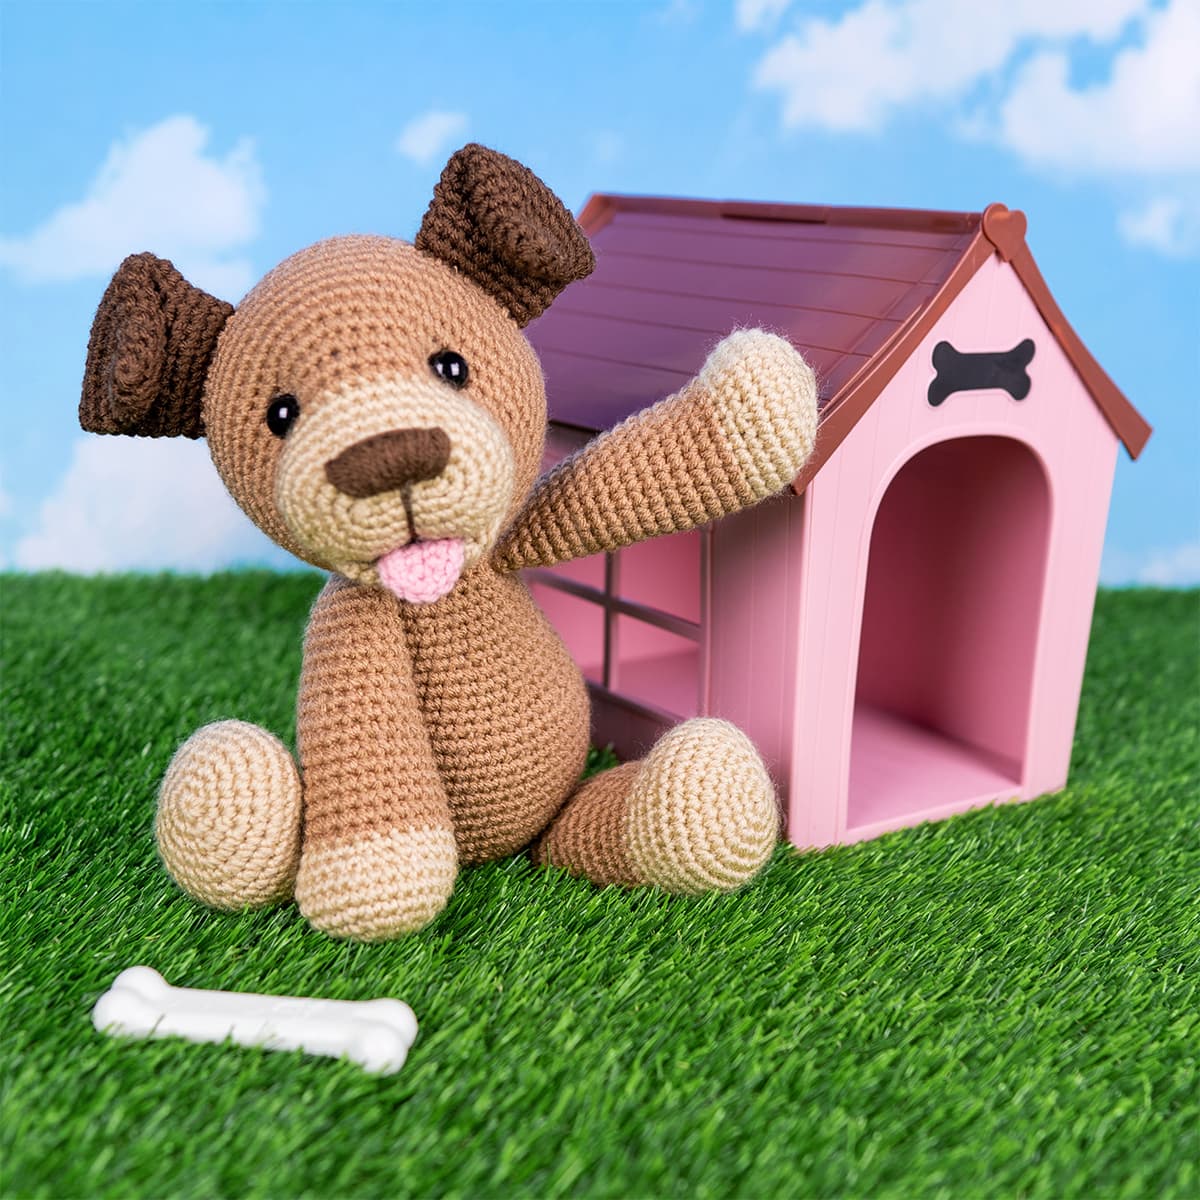
Daisy the Dog
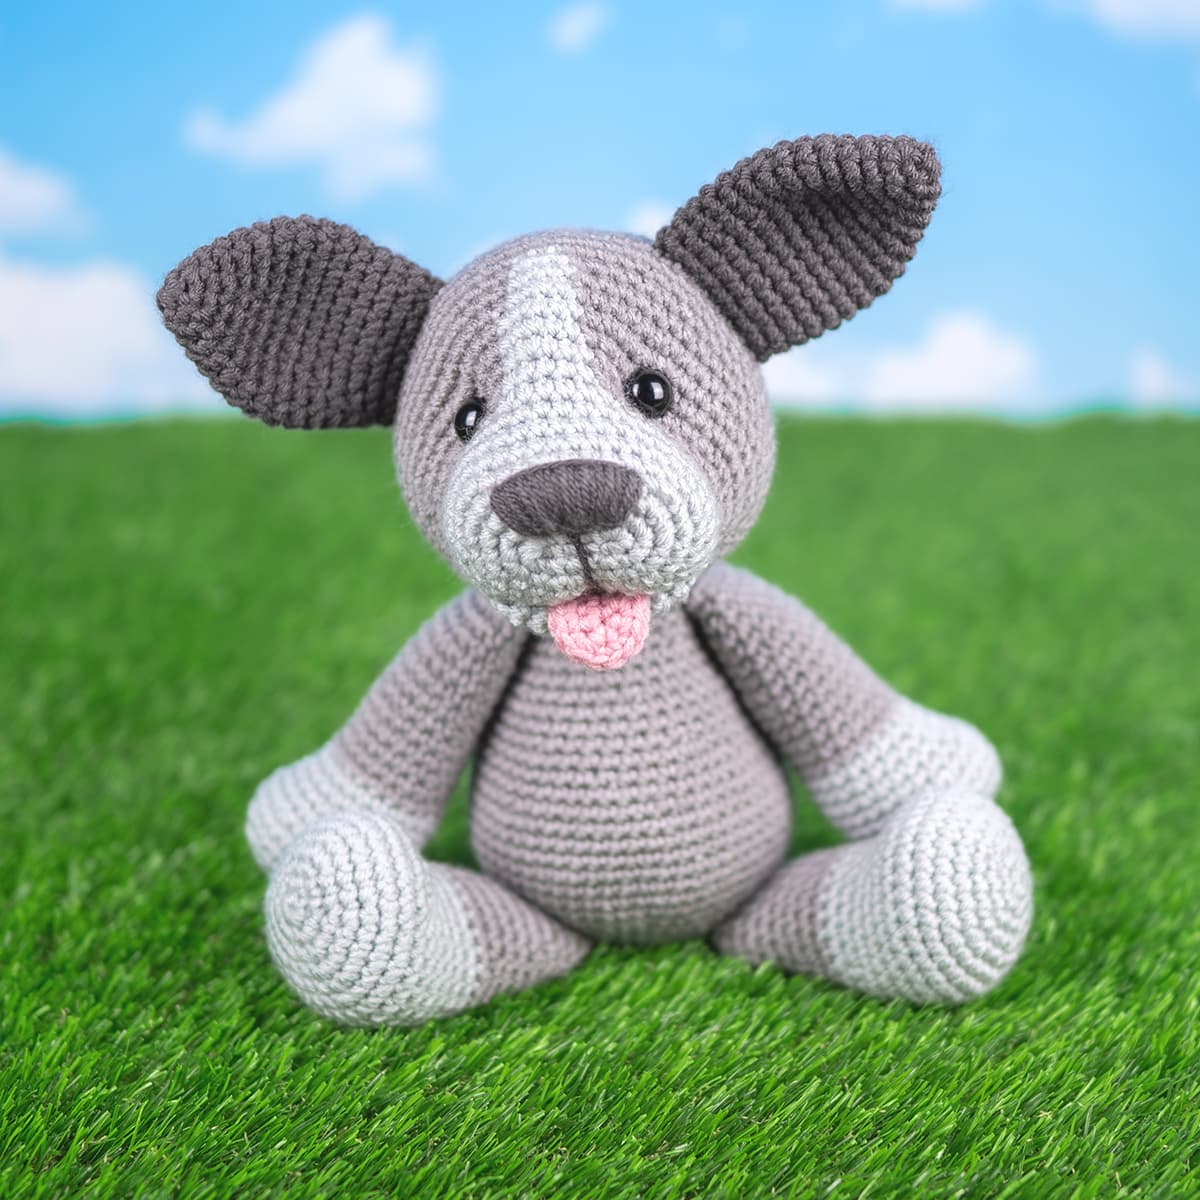
Cody the Cattle Dog
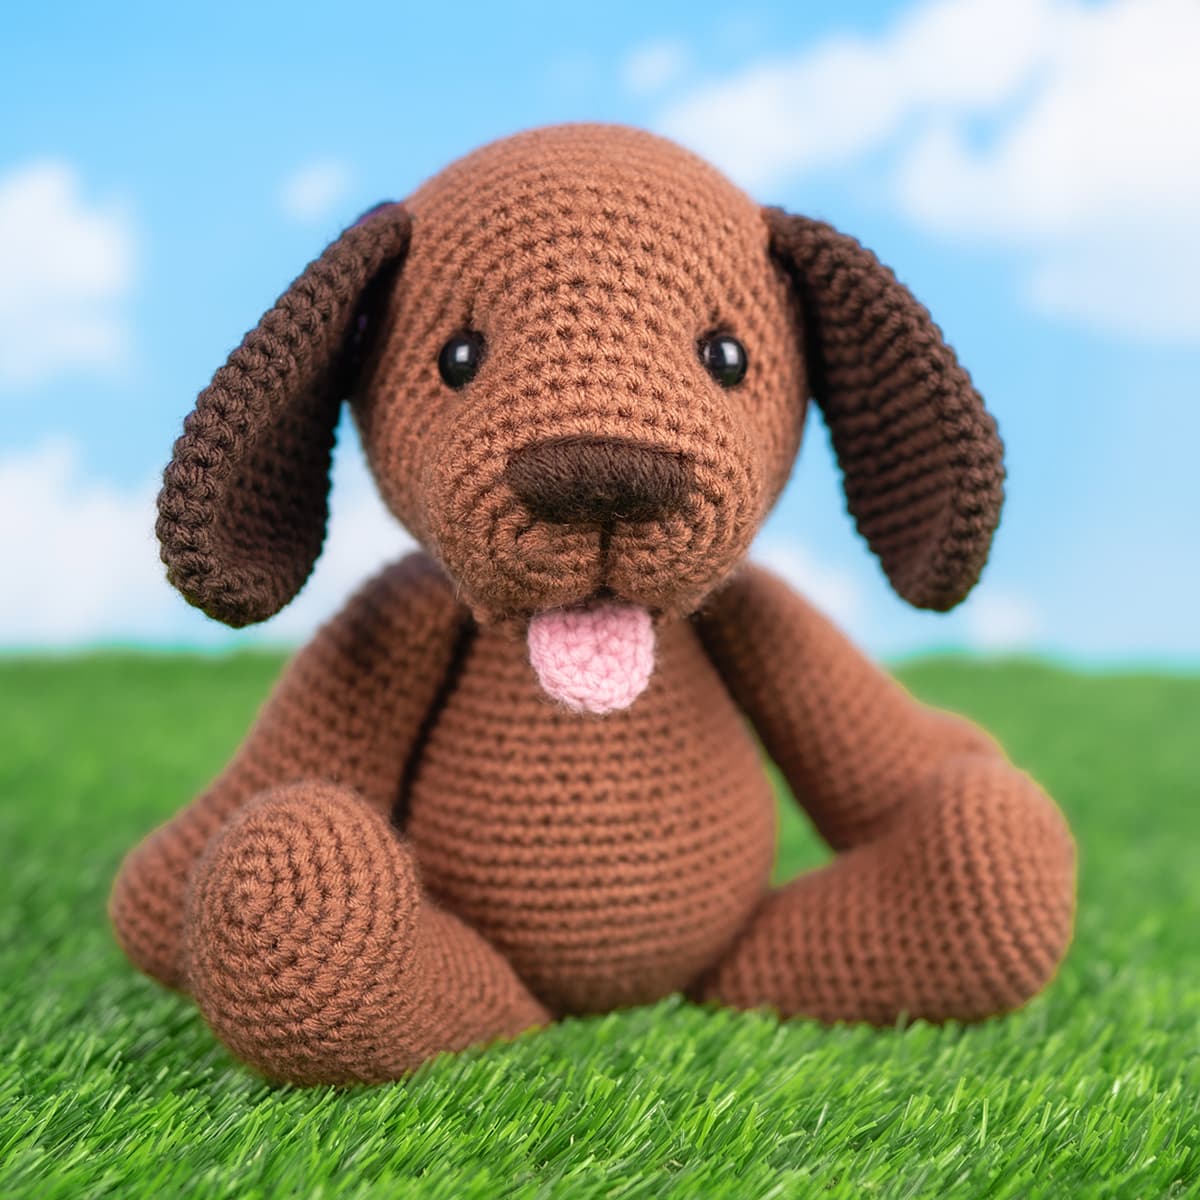
Henry the Hound
Lulu the Labrador
I’m so excited to share this free dog crochet pattern with you!
After I released my free cat crochet patterns, many of you requested their canine counterparts. I’m happy to say my dog amigurumi pattern is finally here!
I’ve created four variations of this pattern: Daisy the Dog, Cody the Cattle Dog, Henry the Hound, and Lulu the Labrador. While not every dog breed is represented, I did my best to provide options for the majority.
Feel free to mix and match the pattern pieces to best resemble your pooch.
The pattern variations include four options for different types of dog ears, as well as some options for the color markings on the dogs’ bodies.
I saw someone make an adorable Cocker Spaniel using my Henry the Hound pattern. The only change they had to make was to complete the ears as written using a Loop Stitch. I can’t wait to see what you come up with!
Resources


Video Tutorials

Daisy the Dog
Height: 13.5 inches (34 cm) standing Skill Level: Intermediate Terms: US 🇺🇸Daisy’s floppy ears and waggly tail will have you paws-itively smitten. She loves playing fetch, and is always down for a good belly rub. You’ll never have a ruff day with this furry friend by your side!
Supplies
- 3.5mm (E-4) hook
- (2) 15mm safety eyes
- Stitch markers
- Yarn needle
- Scissors
- Straight pins
- Fiber fill
- Disappearing ink marker
258 yards of acrylic (weight 4) yarn:
- Pink – 3 yards (3m / 2g)
- Beige – 58 yards (53m / 32g)
- Medium Brown – 167 yards (153m / 93g)
- Dark Brown – 30 yards (27m / 17g)
Notes
Steps to complete this pattern
- Crochet the Tongue
- Crochet the Bottom Lip
- Crochet the Ears
- Crochet the Snout & Head
- Embroider the Nose
- Tack down the Ears
- Crochet the Legs
- Crochet the Arms
- Crochet the Body
- Crochet the Tail
- Sew the Head to the Body
- Sew the Tail to the Body
Abbreviations
- ch – chain
- sc – single crochet
- inc – complete two single crochets within the same stitch
- dec – combine two stitches into one with an invisible decrease
- *sc x* – repeat the instructions between asterisks(*) the indicated number of times
- (sc x) – attach a body part while completing the stitches inside parentheses as instructed by the pattern
General Instructions
- This pattern is worked in continuous rounds without joining.
- Use a stitch marker to mark the end of each round. Move the marker up each round.
Video Tutorials
I’ve made lots of video tutorials that will be referenced throughout this pattern. They will be marked with a clickable play button symbol. A full list of tutorials can be found in the video tutorials section of the pattern.
Instructions
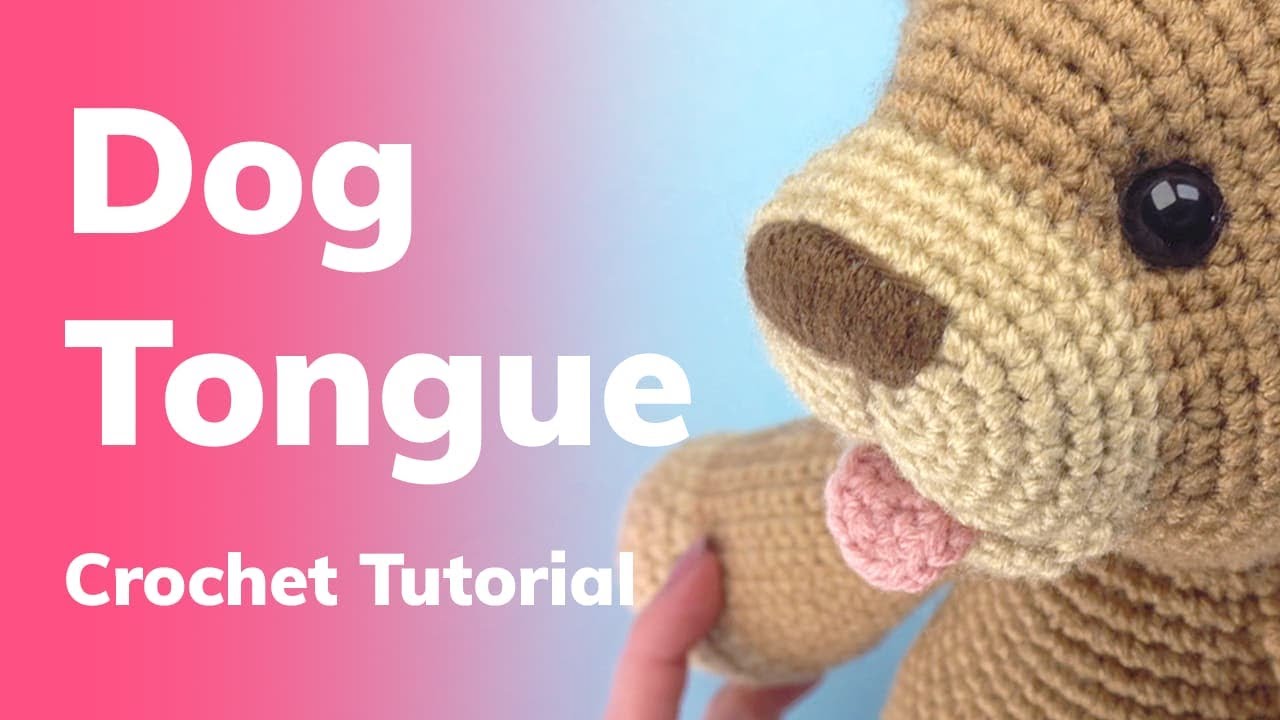
Tongue
With pink yarn, leaving a 6-inch (15 cm) yarn tail, create a slip knot on your hook:
01. ch 4, sc in 2nd ch from hook, sc in next ch, sc 5 in last ch. Working on opposite side of chain base: sc in last 2 ch [9]
02. ch 1, turn, sc 3, *inc* 3 times, sc 3 [12]
03. ch 1, and without turning, sc 4 across top flat edge of tongue [4]
To view a tutorial, watch my Dog Tongue video.
Fasten off, leaving a 6-inch (15 cm) yarn tail. Using a yarn needle, weave the beginning yarn tail into the work, and tie it off with the ending yarn tail. Cut both tails to 1.5 inches (4 cm). The tongue is now ready to attach as you crochet the head at a later step.
Bottom Lip
With beige yarn:
01. start 6 sc into a Magic Ring [6]
02. inc in each st around [12]
03. *sc, inc* 6 times [18]
04. sc, inc, *sc 2, inc* 5 times, sc [24]
Fasten off, leaving a 12-inch (30 cm) yarn tail. Fold the circle in half and slip stitch closed.
To view a tutorial, watch my Attach Bottom Lip & Tongue video. It covers how to fasten off and Slip Stitch Closed.
Hide the remaining yarn tail inside the work. The bottom lip is now ready to attach as you crochet the head at a later step.
Ears (make 2)
With dark brown yarn:
01. start 6 sc into a Magic Ring [6]
02. *sc, inc* 3 times [9]
03. sc, inc, *sc 2, inc* 2 times, sc [12]
04. *sc 3, inc* 3 times [15]
05. sc 2, inc, *sc 4, inc* 2 times, sc 2 [18]
06. *sc 5, inc* 3 times [21]
07. sc 3, inc, *sc 6, inc* 2 times, sc 3 [24]
08. sc in each st around [24]
09. sc 11, dec, sc 11 [23]
10. sc 21, dec [22]
11. sc 10, dec, sc 10 [21]
12. sc 19, dec [20]
13. sc 9, dec, sc 9 [19]
14. sc 17, dec [18]
15. *sc 7, dec* 2 times [16]
Do not stuff. Fasten off, leaving a 12-inch (30 cm) tail. Press the final round together and Slip Stitch Closed. Hide the remaining yarn tail inside the work. The ears are now ready to attach as you crochet the head at a later step.
Snout & Head
With beige yarn:
01. Chain 5 Start: inc in 2nd ch from hook, sc 2, sc 5 in last ch. Working on opposite side of chain base: sc 2, sc 3 in last ch [14]
02. inc, sc 4, *inc* 3 times, sc 4, *inc* 2 times [20]
03. inc, sc 6, *inc* 2 times, sc, inc, sc 6, *inc* 2 times, sc [26]
04. inc, sc 8, *inc, sc* 2 times, inc, sc 8, *inc, sc* 2 times [32]
05. *sc 7, inc* 4 times [36]
06 – 07. sc in each st around [36]
Attaching the Bottom Lip & Tongue: Attach the bottom lip & tongue as you crochet the next round. To view a tutorial, watch my Attach Bottom Lip & Tongue video.
08. sc 2, start attaching the bottom lip: (sc 4), attach the tongue + bottom lip: (sc 4), finish attaching the bottom lip: (sc 4), sc 22 [36]
09. sc 2, switch to medium brown yarn: sc 34 [36]
10. *sc 5, inc* 6 times [42]
11. sc 3, inc, *sc 6, inc* 5 times, sc 3 [48]
12. *sc 7, inc* 6 times [54]
Marking Stitches for the Eyes: Insert two markers 16 stitches apart between rounds 11 & 12. These markers will show you where to place your safety eyes at a later step.
13. sc 4, inc, *sc 8, inc* 5 times, sc 4 [60]
14 – 18. sc in each st around [60]
Attaching the Ears: Attach the ears as you crochet the next round. To view a tutorial, watch my How to Attach Ears video. You do not need to use stitch markers as shown in the video.
19. sc 32, attach the first ear: (sc 8), sc 11, attach the second ear: (sc 8), sc [60]
At the end of round 19, the ears should appear centered on the top of the head. If your ears appear off center, redo the round and adjust the placement of the ears as necessary.
20 – 23. sc in each st around [60]
24. sc 4, dec, *sc 8, dec* 5 times, sc 4 [54]
25. *sc 7, dec* 6 times [48]
26. sc 3, dec, *sc 6, dec* 5 times, sc 3 [42]
27. *sc 5, dec* 6 times [36]
28. sc 2, dec, *sc 4, dec* 5 times, sc 2 [30]
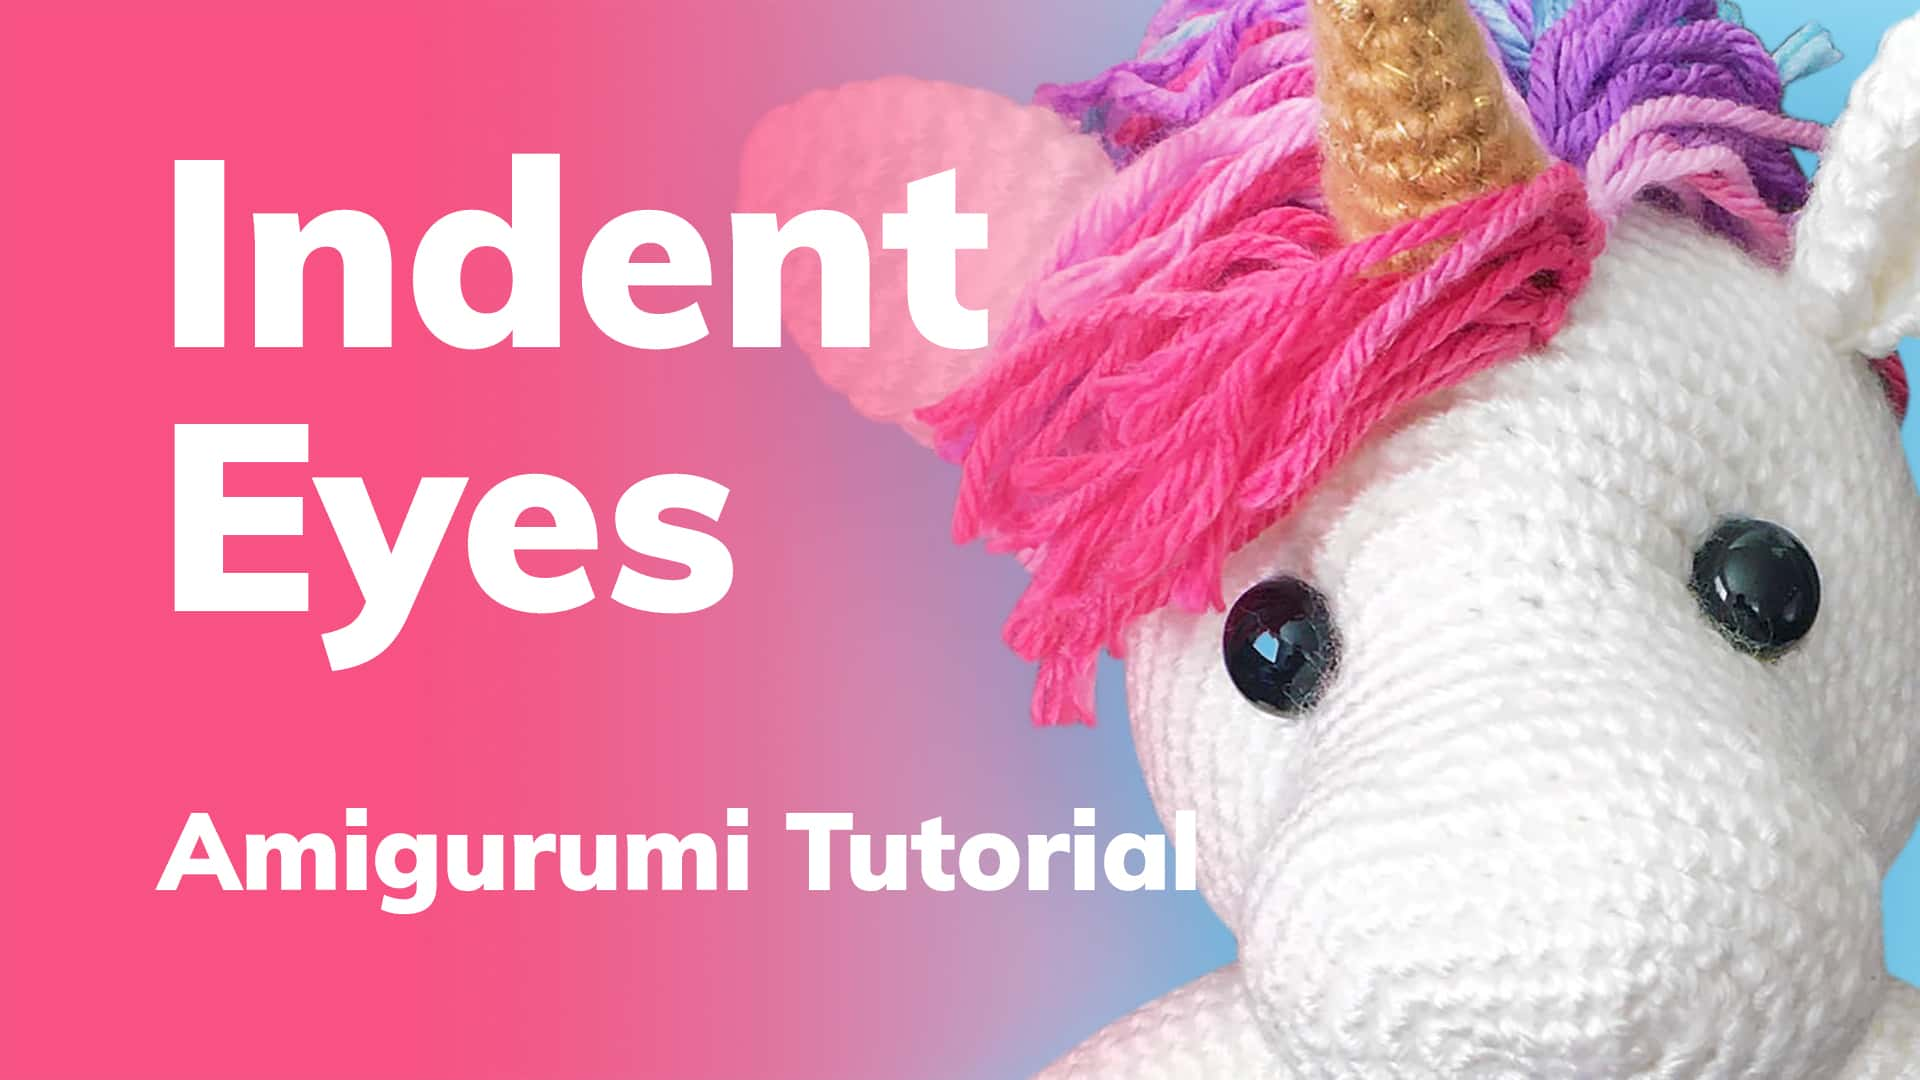
Stuff head ¾ full and create indents for the eyes. Insert your safety eyes and secure the backings. To view a tutorial, watch my Indent Eyes video.
29. *sc 3, dec* 6 times [24]30. sc, dec, *sc 2, dec* 5 times, sc [18]
31. *sc, dec* 6 times [12]
Finish stuffing.
32. *dec* 6 times [6]
Close with an Ultimate Finish.
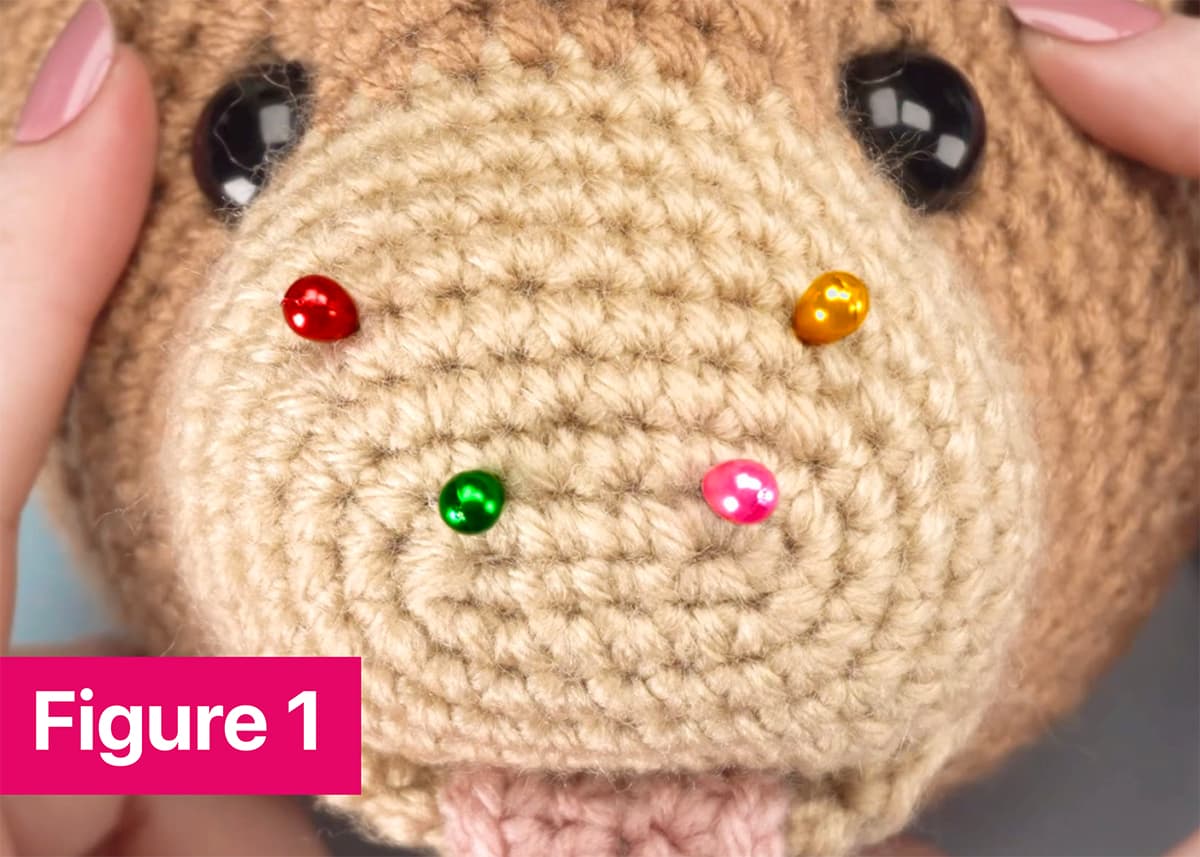
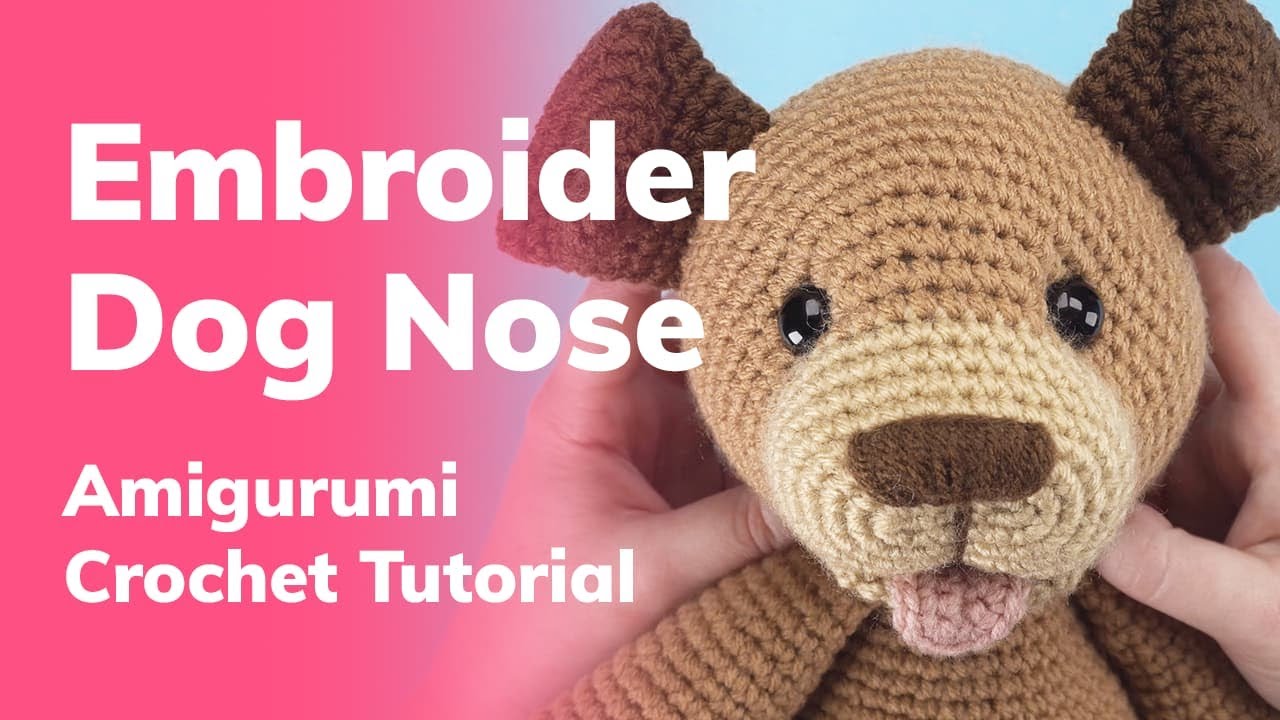
Embroidering the Nose: Using straight pins, mark the four corners of the nose (see Figure 1). The bottom should be four stitches across between rounds 1 & 2, centered above the Chain 5 Start. The top should be eight stitches across between rounds 4 & 5 (see Figure 1).
Using a 36-inch (90 cm) strand of dark brown yarn and a yarn needle, embroider the nose working through each stitch along the bottom a total of six times, and each stitch along the top a total of three times (see Figure 2).
To view a tutorial, watch my Embroider Dog Nose video.
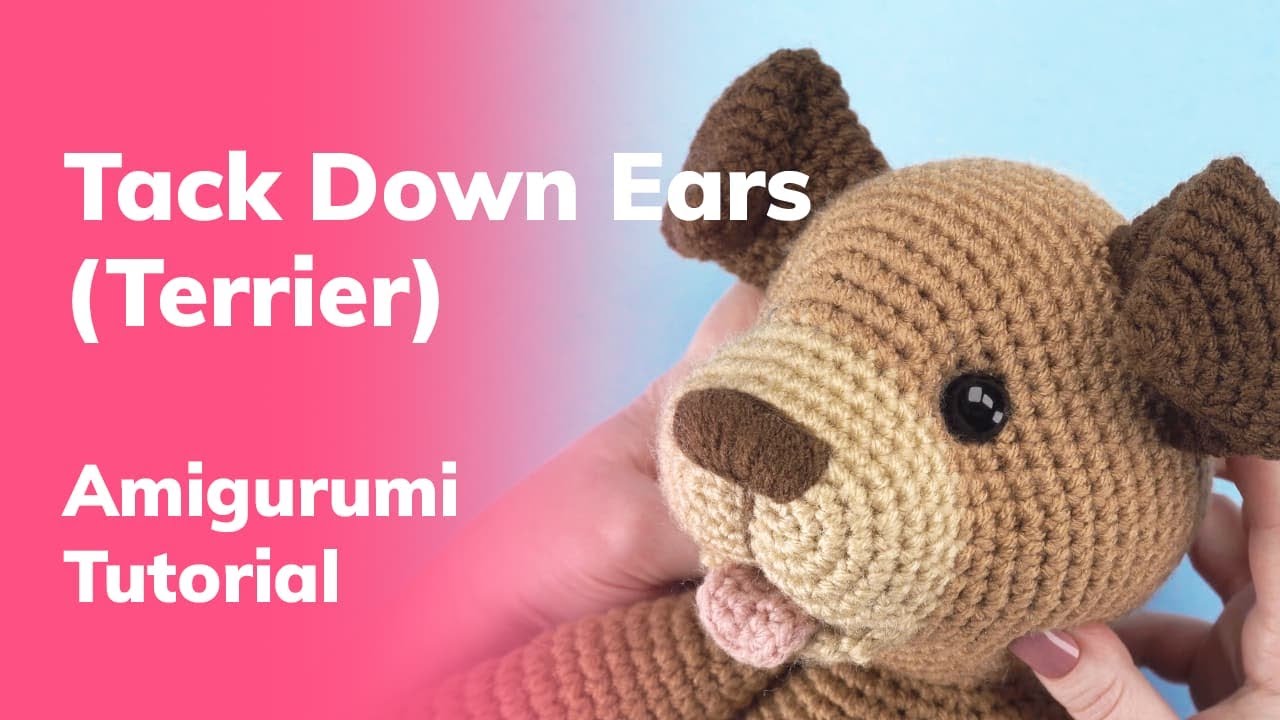
Tacking Down the Ears: Fold the dog’s ears forward. With matching yarn, tack them down on the underside to keep them in place. To view a tutorial, watch my Tack Down Ears (Terrier) video.
Legs (make 2)
With beige yarn:
01. start 6 sc into a Magic Ring [6]
02. inc in each st around [12]
03. *sc, inc* 6 times [18]
04. sc, inc, *sc 2, inc* 5 times, sc [24]
05. *sc 3, inc* 6 times [30]
06. sc 2, inc, *sc 4, inc* 5 times, sc 2 [36]
07 – 08. sc in each st around [36]
09. sc 34, dec [35]
10. dec, *sc, dec, dec* 2 times, sc 23 [30]
11. *dec, sc* 3 times, sc 11, switch to medium brown yarn: sc 10 [27]
12. sc in each st around [27]
13. sc 10, dec, sc 15 [26]
14. sc 15, dec, sc 9 [25]
15. sc 21, dec, sc 2 [24]
16. sc 3, dec, sc 19 [23]
17. sc 10, dec, sc 11 [22]
18. sc 14, dec, sc 6 [21]
19. sc 19, dec [20]
20. sc 3, dec, sc 15 [19]
21. sc 9, dec, sc 8 [18]
22. *sc 7, dec* 2 times [16]
23. *sc 2, dec* 4 times [12]
Fasten off and leave a 12-inch (30 cm) yarn tail. Stuff the leg. Press the final round together and Slip Stitch Closed, then hide the remaining yarn tail inside the work. The legs are now ready to attach as you crochet the body at a later step.
Arms (make 2)
With beige yarn:
01. start 6 sc into a Magic Ring [6]
02. inc in each st around [12]
03. *sc, inc* 6 times [18]
04. sc, inc, *sc 2, inc* 5 times, sc [24]
05. *sc 3, inc* 6 times [30]
06 – 07. sc in each st around [30]
08. sc 4, dec, sc 2, dec, sc 3, dec, sc 2, dec, sc 11 [26]
09. sc 6, dec, sc 3, dec, sc 8, switch to medium brown yarn: sc 5 [24]
10. sc in each st around [24]
11. sc 11, dec, sc 11 [23]
12. sc 21, dec [22]
13. sc in each st around [22]
14. sc 10, dec, sc 10 [21]
15. sc in each st around [21]
16. sc 19, dec [20]
17. sc in each st around [20]
18. sc 9, dec, sc 9 [19]
19. sc in each st around [19]
20. sc 17, dec [18]
21. sc in each st around [18]
22. sc 8, dec, sc 8 [17]
23. sc in each st around [17]
24. sc 15, dec [16]
25. sc in each st around [16]
26. *sc 2, dec* 4 times [12]
Fasten off and leave a 12-inch (30 cm) yarn tail. Stuff the arm. Press the final round together and Slip Stitch Closed, then hide the remaining yarn tail inside the work. The arms are now ready to attach as you crochet the body at a later step.
Body
With medium brown yarn:
01. start 6 sc into a Magic Ring [6]
02. inc in each st around [12]
03. *sc, inc* 6 times [18]
04. sc, inc, *sc 2, inc* 5 times, sc [24]
05. *sc 3, inc* 6 times [30]
06. sc 2, inc, *sc 4, inc* 5 times, sc 2 [36]
Attaching the Legs: Attach the legs as you crochet the next round. To view a tutorial, watch my How to Attach Legs | No-Sew Method video.
07. attach the first leg: (sc 5, inc), sc 5, inc, attach the second leg: (sc 5, inc), *sc 5, inc* 3 times [42]
08. sc 3, inc, *sc 6, inc* 5 times, sc 3 [48]
09. *sc 7, inc* 6 times [54]
10. sc 4, inc, *sc 8, inc* 5 times, sc 4 [60]
11 – 17. sc in each st around [60]
18. sc 4, dec, *sc 8, dec* 5 times, sc 4 [54]
19. sc in each st around [54]
20. *sc 7, dec* 6 times [48]
21. sc in each st around [48]
22. sc 3, dec, *sc 6, dec* 5 times, sc 3 [42]
23 – 24. sc in each st around [42]
25. *sc 5, dec* 6 times [36]
26 – 27. sc in each st around [36]
28. sc 2, dec, *sc 4, dec* 5 times, sc 2 [30]
29. sc in each st around [30]
Attaching the Arms: Attach the arms as you crochet the next round. To view a tutorial, watch my How to Attach Arms | No-Sew Method video.
30. sc, attach the first arm: (sc 6), sc 8, attach the second arm: (sc 6), sc 9 [30]
At the end of round 30, the arms should appear centered above the legs. If your arms appear off center, redo the round and adjust the placement of the arms as necessary.
Stuff the body.
31. *sc 3, dec* 6 times [24]
Fasten off and leave a tail the length of your arm span (~65 in / ~165 cm).
Sewing the Body to the Head: To view a tutorial, watch my How to Sew Body to Head video.
Tail
With dark brown yarn:
01. start 6 sc into a Magic Ring [6]
02. sc in each st around [6]
03. *sc, inc* 3 times [9]
04. sc in each st around [9]
05. sc, inc, *sc 2, inc* 2 times, sc [12]
06. dec, sc 3, *inc* 2 times, sc 3, dec [12]
07. sc in each st around [12]
08. dec, sc 3, *inc* 2 times, sc 3, dec [12]
09. sc in each st around [12]
10. dec, sc 4, *inc* 2 times, sc 2, dec [12]
11. sc in each st around [12]
Fasten off and leave a 12-inch (30 cm) yarn tail. Stuff the tail. Sew the tail to your dog centered over round 11 on the back side of the body. Secure with a knot, then hide the remaining yarn tail inside the work.
Cody the Cattle Dog
Height: 14.5 inches (37 cm) standing Skill Level: Intermediate Terms: US 🇺🇸Cody the Cattle Dog is ready to round up some fun and roam until the cows come home. Whether it’s a game of frisbee or a long hike, Cody will keep you on your paws and make every moment a doggone delight.
Supplies
- 3.5mm (E-4) hook
- (2) 15mm safety eyes
- Stitch markers
- Yarn needle
- Scissors
- Straight pins
- Fiber fill
- Disappearing ink marker
256 yards of acrylic (weight 4) yarn:
- Pink – 3 yards (3m / 2g)
- Light Gray – 72 yards (66m / 40g)
- Medium Gray – 151 yards (138m / 84g)
- Dark Gray – 30 yards (27m / 17g)
Notes
Steps to complete this pattern
- Crochet the Tongue
- Crochet the Bottom Lip
- Crochet the Ears
- Crochet the Snout & Head
- Embroider the Nose
- Crochet the Legs
- Crochet the Arms
- Crochet the Body
- Crochet the Tail
- Sew the Head to the Body
- Sew the Tail to the Body
Abbreviations
- ch – chain
- sc – single crochet
- inc – complete two single crochets within the same stitch
- dec – combine two stitches into one with an invisible decrease
- *sc x* – repeat the instructions between asterisks(*) the indicated number of times
- (sc x) – attach a body part while completing the stitches inside parentheses as instructed by the pattern
General Instructions
- This pattern is worked in continuous rounds without joining.
- Use a stitch marker to mark the end of each round. Move the marker up each round.
Video Tutorials
I’ve made lots of video tutorials that will be referenced throughout this pattern. They will be marked with a clickable play button symbol. A full list of tutorials can be found in the video tutorials section of the pattern.
Instructions
Tongue
With pink yarn, leaving a 6-inch (15 cm) yarn tail, create a slip knot on your hook:
01. ch 4, sc in 2nd ch from hook, sc in next ch, sc 5 in last ch. Working on opposite side of chain base: sc in last 2 ch [9]
02. ch 1, turn, sc 3, *inc* 3 times, sc 3 [12]
03. ch 1, and without turning, sc 4 across top flat edge of tongue [4]
To view a tutorial, watch my Dog Tongue video.
Fasten off, leaving a 6-inch (15 cm) yarn tail. Using a yarn needle, weave the beginning yarn tail into the work, and tie it off with the ending yarn tail. Cut both tails to 1.5 inches (4 cm). The tongue is now ready to attach as you crochet the head at a later step.
Bottom Lip
With light gray yarn:
01. start 6 sc into a Magic Ring [6]
02. inc in each st around [12]
03. *sc, inc* 6 times [18]
04. sc, inc, *sc 2, inc* 5 times, sc [24]
Fasten off, leaving a 12-inch (30 cm) yarn tail. Fold the circle in half and slip stitch closed.
To view a tutorial, watch my Attach Bottom Lip & Tongue video. It covers how to fasten off and Slip Stitch Closed.
Hide the remaining yarn tail inside the work. The bottom lip is now ready to attach as you crochet the head at a later step.
Ears (make 2)
With dark gray yarn:
01. start 6 sc into a Magic Ring [6]
02. *sc, inc* 3 times [9]
03. sc, inc, *sc 2, inc* 2 times, sc [12]
04. *sc 3, inc* 3 times [15]
05. sc 2, inc, *sc 4, inc* 2 times, sc 2 [18]
06. *sc 5, inc* 3 times [21]
07. sc 3, inc, *sc 6, inc* 2 times, sc 3 [24]
08. sc in each st around [24]
09. sc 11, dec, sc 11 [23]
10. sc 21, dec [22]
11. sc 10, dec, sc 10 [21]
12. sc 19, dec [20]
13. sc 9, dec, sc 9 [19]
14. sc 17, dec [18]
15. *sc 7, dec* 2 times [16]
Do not stuff. Fasten off, leaving a 12-inch (30 cm) tail. Press the final round together and Slip Stitch Closed. Hide the remaining yarn tail inside the work. The ears are now ready to attach as you crochet the head at a later step.
Snout & Head
LG = with light gray yarn; MG = with medium gray yarn
01. LG Chain 5 Start: inc in 2nd ch from hook, sc 2, sc 5 in last ch. Working on opposite side of chain base: sc 2, sc 3 in last ch [14]
02. inc, sc 4, *inc* 3 times, sc 4, *inc* 2 times [20]
03. inc, sc 6, *inc* 2 times, sc, inc, sc 6, *inc* 2 times, sc [26]
04. inc, sc 8, *inc, sc* 2 times, inc, sc 8, *inc, sc* 2 times [32]
05. *sc 7, inc* 4 times [36]
06 – 07. sc in each st around [36]
Attaching the Bottom Lip & Tongue: Attach the bottom lip & tongue as you crochet the next round. To view a tutorial, watch my Attach Bottom Lip & Tongue video.
08. sc 2, start attaching the bottom lip: (sc 4), attach the tongue + bottom lip: (sc 4), finish attaching the bottom lip: (sc 4), sc 22 [36]
09. sc 2, MG: sc 21, LG: sc 6, MG: sc 7 [36]
10. MG: *sc 5, inc* 4 times, LG: sc 5, MG: inc, sc 5, inc [42]
11. MG: sc 3, inc, *sc 6, inc* 3 times, sc 3, LG: sc 3, inc, sc, MG: sc 5, inc, sc 3 [48]
12. MG: *sc 7, inc* 4 times, sc, LG: sc 5, MG: sc, inc, sc 7, inc [54]
Marking Stitches for the Eyes: Insert two markers 16 stitches apart between rounds 11 & 12. These markers will show you where to place your safety eyes at a later step.
13. MG: sc 4, inc, *sc 8, inc* 3 times, sc 5, LG: sc 3, inc, sc, MG: sc 7, inc, sc 4 [60]
14 – 15. MG: sc 42, LG: sc 4, MG: sc 14 [60]
16. MG: sc 43, LG: sc 3, MG: sc 14 [60]
17 – 18. MG (for remainder of head): sc in each st around [60]
Attaching the Ears: Attach the ears as you crochet the next round. To view a tutorial, watch my How to Attach Ears video. You do not need to use stitch markers as shown in the video.
19. sc 32, attach the first ear: (sc 8), sc 11, attach the second ear: (sc 8), sc [60]
At the end of round 19, the ears should appear centered on the top of the head. If your ears appear off center, redo the round and adjust the placement of the ears as necessary.
20 – 23. sc in each st around [60]
24. sc 4, dec, *sc 8, dec* 5 times, sc 4 [54]
25. *sc 7, dec* 6 times [48]
26. sc 3, dec, *sc 6, dec* 5 times, sc 3 [42]
27. *sc 5, dec* 6 times [36]
28. sc 2, dec, *sc 4, dec* 5 times, sc 2 [30]
Stuff head ¾ full and create indents for the eyes. Insert your safety eyes and secure the backings. To view a tutorial, watch my Indent Eyes video.
29. *sc 3, dec* 6 times [24]
30. sc, dec, *sc 2, dec* 5 times, sc [18]
31. *sc, dec* 6 times [12]
Finish stuffing.
32. *dec* 6 times [6]
Close with an Ultimate Finish.
Embroidering the Nose: Using straight pins, mark the four corners of the nose (see Figure 1). The bottom should be four stitches across between rounds 1 & 2, centered above the Chain 5 Start. The top should be eight stitches across between rounds 4 & 5 (see Figure 1).
Using a 36-inch (90 cm) strand of dark brown yarn and a yarn needle, embroider the nose working through each stitch along the bottom a total of six times, and each stitch along the top a total of three times (see Figure 2).
To view a tutorial, watch my Embroider Dog Nose video.
Legs (make 2)
With light gray yarn:
01. start 6 sc into a Magic Ring [6]
02. inc in each st around [12]
03. *sc, inc* 6 times [18]
04. sc, inc, *sc 2, inc* 5 times, sc [24]
05. *sc 3, inc* 6 times [30]
06. sc 2, inc, *sc 4, inc* 5 times, sc 2 [36]
07 – 08. sc in each st around [36]
09. sc 34, dec [35]
10. dec, *sc, dec, dec* 2 times, sc 23 [30]
11. *dec, sc* 3 times, sc 21 [27]
12. sc in each st around [27]
13. sc 10, dec, sc 15 [26]
14. sc 15, dec, switch to medium gray: sc 9 [25]
15. sc 21, dec, sc 2 [24]
16. sc 3, dec, sc 19 [23]
17. sc 10, dec, sc 11 [22]
18. sc 14, dec, sc 6 [21]
19. sc 19, dec [20]
20. sc 3, dec, sc 15 [19]
21. sc 9, dec, sc 8 [18]
22. *sc 7, dec* 2 times [16]
23. *sc 2, dec* 4 times [12]
Fasten off and leave a 12-inch (30 cm) yarn tail. Stuff the leg. Press the final round together and Slip Stitch Closed, then hide the remaining yarn tail inside the work. The legs are now ready to attach as you crochet the body at a later step.
Arms (make 2)
With light gray yarn:
01. start 6 sc into a Magic Ring [6]
02. inc in each st around [12]
03. *sc, inc* 6 times [18]
04. sc, inc, *sc 2, inc* 5 times, sc [24]
05. *sc 3, inc* 6 times [30]
06 – 07. sc in each st around [30]
08. sc 4, dec, sc 2, dec, sc 3, dec, sc 2, dec, sc 11 [26]
09. sc 6, dec, sc 3, dec, sc 13 [24]
10. sc in each st around [24]
11. sc 11, dec, sc 11 [23]
12. sc 21, dec [22]
13. switch to medium gray: sc in each st around [22]
14. sc 10, dec, sc 10 [21]
15. sc in each st around [21]
16. sc 19, dec [20]
17. sc in each st around [20]
18. sc 9, dec, sc 9 [19]
19. sc in each st around [19]
20. sc 17, dec [18]
21. sc in each st around [18]
22. sc 8, dec, sc 8 [17]
23. sc in each st around [17]
24. sc 15, dec [16]
25. sc in each st around [16]
26. *sc 2, dec* 4 times [12]
Fasten off and leave a 12-inch (30 cm) yarn tail. Stuff the arm. Press the final round together and Slip Stitch Closed, then hide the remaining yarn tail inside the work. The arms are now ready to attach as you crochet the body at a later step.
Body
With medium gray yarn:
01. start 6 sc into a Magic Ring [6]
02. inc in each st around [12]
03. *sc, inc* 6 times [18]
04. sc, inc, *sc 2, inc* 5 times, sc [24]
05. *sc 3, inc* 6 times [30]
06. sc 2, inc, *sc 4, inc* 5 times, sc 2 [36]
Attaching the Legs: Attach the legs as you crochet the next round. To view a tutorial, watch my How to Attach Legs | No-Sew Method video.
07. attach the first leg: (sc 5, inc), sc 5, inc, attach the second leg: (sc 5, inc), *sc 5, inc* 3 times [42]
08. sc 3, inc, *sc 6, inc* 5 times, sc 3 [48]
09. *sc 7, inc* 6 times [54]
10. sc 4, inc, *sc 8, inc* 5 times, sc 4 [60]
11 – 17. sc in each st around [60]
18. sc 4, dec, *sc 8, dec* 5 times, sc 4 [54]
19. sc in each st around [54]
20. *sc 7, dec* 6 times [48]
21. sc in each st around [48]
22. sc 3, dec, *sc 6, dec* 5 times, sc 3 [42]
23 – 24. sc in each st around [42]
25. *sc 5, dec* 6 times [36]
26 – 27. sc in each st around [36]
28. sc 2, dec, *sc 4, dec* 5 times, sc 2 [30]
29. sc in each st around [30]
Attaching the Arms: Attach the arms as you crochet the next round. To view a tutorial, watch my How to Attach Arms | No-Sew Method video.
30. sc, attach the first arm: (sc 6), sc 8, attach the second arm: (sc 6), sc 9 [30]
At the end of round 30, the arms should appear centered above the legs. If your arms appear off center, redo the round and adjust the placement of the arms as necessary.
Stuff the body.
31. *sc 3, dec* 6 times [24]
Fasten off and leave a tail the length of your arm span (~65 in / ~165 cm).
Sewing the Body to the Head: To view a tutorial, watch my How to Sew Body to Head video.
Tail
With dark gray yarn:
01. start 6 sc into a Magic Ring [6]
02. sc in each st around [6]
03. *sc, inc* 3 times [9]
04. sc in each st around [9]
05. sc, inc, *sc 2, inc* 2 times, sc [12]
06. dec, sc 3, *inc* 2 times, sc 3, dec [12]
07. sc in each st around [12]
08. dec, sc 3, *inc* 2 times, sc 3, dec [12]
09. sc in each st around [12]
10. dec, sc 4, *inc* 2 times, sc 2, dec [12]
11. sc in each st around [12]
Fasten off and leave a 12-inch (30 cm) yarn tail. Stuff the tail. Sew the tail to your dog centered over round 11 on the back side of the body. Secure with a knot, then hide the remaining yarn tail inside the work.
Henry the Hound
Height: 13.5 inches (34 cm) standing Skill Level: Intermediate Terms: US 🇺🇸Henry is a scent-sational hound with a nose for adventure! Whether it’s sniffing out hidden treasures or tracking down a treat, Henry’s nose knows where to go. His velvety ears & soulful eyes make Henry an irresistible companion.
Supplies
- 3.5mm (E-4) hook
- (2) 15mm safety eyes
- Stitch markers
- Yarn needle
- Scissors
- Straight pins
- Fiber fill
- Disappearing ink marker
264 yards of acrylic (weight 4) yarn:
Notes
Steps to complete this pattern
- Crochet the Tongue
- Crochet the Bottom Lip
- Crochet the Ears
- Crochet the Snout & Head
- Embroider the Nose
- Sew on the Ears
- Crochet the Legs
- Crochet the Arms
- Crochet the Body
- Sew the Head to the Body
- Crochet the Tail
- Sew the Tail to the Body
Abbreviations
- ch – chain
- sc – single crochet
- inc – complete two single crochets within the same stitch
- dec – combine two stitches into one with an invisible decrease
- *sc x* – repeat the instructions between asterisks(*) the indicated number of times
- (sc x) – attach a body part while completing the stitches inside parentheses as instructed by the pattern
General Instructions
- This pattern is worked in continuous rounds without joining.
- Use a stitch marker to mark the end of each round. Move the marker up each round.
Video Tutorials
I’ve made lots of video tutorials that will be referenced throughout this pattern. They will be marked with a clickable play button symbol. A full list of tutorials can be found in the video tutorials section of the pattern.
Instructions
Tongue
With pink yarn, leaving a 6-inch (15 cm) yarn tail, create a slip knot on your hook:
01. ch 4, sc in 2nd ch from hook, sc in next ch, sc 5 in last ch. Working on opposite side of chain base: sc in last 2 ch [9]
02. ch 1, turn, sc 3, *inc* 3 times, sc 3 [12]
03. ch 1, and without turning, sc 4 across top flat edge of tongue [4]
Bottom Lip
With brown yarn:
01. start 6 sc into a Magic Ring [6]
02. inc in each st around [12]
03. *sc, inc* 6 times [18]
04. sc, inc, *sc 2, inc* 5 times, sc [24]
Fasten off, leaving a 12-inch (30 cm) yarn tail. Fold the circle in half and slip stitch closed.
To view a tutorial, watch my Attach Bottom Lip & Tongue video. It covers how to fasten off and Slip Stitch Closed.
Hide the remaining yarn tail inside the work. The bottom lip is now ready to attach as you crochet the head at a later step.
Ears (make 2)
With dark brown yarn:
01. start 6 sc into a magic ring [6]
02. inc in each st around [12]
03. *sc 3, inc* 3 times [15]
04. sc 2, inc, *sc 4, inc* 2 times, sc 2 [18]
05. *sc 5, inc* 3 times [21]
06. sc 3, inc, *sc 6, inc* 2 times, sc 3 [24]
07 – 08. sc in each st around [24]
09. sc 11, dec, sc 11 [23]
10. sc 21, dec [22]
11. sc 10, dec, sc 10 [21]
12. sc 19, dec [20]
13. sc 9, dec, sc 9 [19]
14. sc 17, dec [18]
15. sc 8, dec, sc 8 [17]
16. sc 15, dec [16]
17. sc 7, dec, sc 7 [15]
18. sc 13, dec [14]
19. sc 6, dec, sc 6 [13]
20. sc 11, dec [12]
21. *sc, dec* 4 times [8]
Do not stuff. Fasten off, leaving a 12-inch (30 cm) tail. Press the final round together and Slip Stitch Closed. Hide the remaining yarn tail inside the work. The ears are now ready to attach as you crochet the head at a later step.
Snout & Head
With brown yarn:
01. Chain 5 Start: inc in 2nd ch from hook, sc 2, sc 5 in last ch. Working on opposite side of chain base: sc 2, sc 3 in last ch [14]
02. inc, sc 4, *inc* 3 times, sc 4, *inc* 2 times [20]
03. inc, sc 6, *inc* 2 times, sc, inc, sc 6, *inc* 2 times, sc [26]
04. inc, sc 8, *inc, sc* 2 times, inc, sc 8, *inc, sc* 2 times [32]
05. *sc 7, inc* 4 times [36]
06 – 07. sc in each st around [36]
Attaching the Bottom Lip & Tongue: Attach the bottom lip & tongue as you crochet the next round. To view a tutorial, watch my Attach Bottom Lip & Tongue video.
08. sc 2, start attaching the bottom lip: (sc 4), attach the tongue + bottom lip: (sc 4), finish attaching the bottom lip: (sc 4), sc 22 [36]
09. sc 36 [36]
10. *sc 5, inc* 6 times [42]
11. sc 3, inc, *sc 6, inc* 5 times, sc 3 [48]
12. *sc 7, inc* 6 times [54]
Marking Stitches for the Eyes: Insert two markers 16 stitches apart between rounds 11 & 12. These markers will show you where to place your safety eyes at a later step.
13. sc 4, inc, *sc 8, inc* 5 times, sc 4 [60]
14 – 18. sc in each st around [60]
Marking Stitches for the Ears: Insert two markers 15 stitches apart between rounds 17 & 18. These markers will show you where to sew on the ears at a later step.
19 – 23. sc in each st around [60]
24. sc 4, dec, *sc 8, dec* 5 times, sc 4 [54]
25. *sc 7, dec* 6 times [48]
26. sc 3, dec, *sc 6, dec* 5 times, sc 3 [42]
27. *sc 5, dec* 6 times [36]
28. sc 2, dec, *sc 4, dec* 5 times, sc 2 [30]
Stuff head ¾ full and create indents for the eyes. Insert your safety eyes and secure the backings. To view a tutorial, watch my Indent Eyes video.
29. *sc 3, dec* 6 times [24]
30. sc, dec, *sc 2, dec* 5 times, sc [18]
31. *sc, dec* 6 times [12]
Finish stuffing.
32. *dec* 6 times [6]
Close with an Ultimate Finish.
Embroidering the Nose: Using straight pins, mark the four corners of the nose (see Figure 1). The bottom should be four stitches across between rounds 1 & 2, centered above the Chain 5 Start. The top should be eight stitches across between rounds 4 & 5 (see Figure 1).
Using a 36-inch (90 cm) strand of dark brown yarn and a yarn needle, embroider the nose working through each stitch along the bottom a total of six times, and each stitch along the top a total of three times (see Figure 2).
To view a tutorial, watch my Embroider Dog Nose video.
Sew the Ears to the Head: Using the marked stitches as a guide, sew ears to the head. Secure with a knot, then hide the remaining yarn tail inside the work.
Legs (make 2)
With brown yarn:
01. start 6 sc into a Magic Ring [6]
02. inc in each st around [12]
03. *sc, inc* 6 times [18]
04. sc, inc, *sc 2, inc* 5 times, sc [24]
05. *sc 3, inc* 6 times [30]
06. sc 2, inc, *sc 4, inc* 5 times, sc 2 [36]
07 – 08. sc in each st around [36]
09. sc 34, dec [35]
10. dec, *sc, dec, dec* 2 times, sc 23 [30]
11. *dec, sc* 3 times, sc 21 [27]
12. sc in each st around [27]
13. sc 10, dec, sc 15 [26]
14. sc 15, dec, sc 9 [25]
15. sc 21, dec, sc 2 [24]
16. sc 3, dec, sc 19 [23]
17. sc 10, dec, sc 11 [22]
18. sc 14, dec, sc 6 [21]
19. sc 19, dec [20]
20. sc 3, dec, sc 15 [19]
21. sc 9, dec, sc 8 [18]
22. *sc 7, dec* 2 times [16]
23. *sc 2, dec* 4 times [12]
Fasten off and leave a 12-inch (30 cm) yarn tail. Stuff the leg. Press the final round together and Slip Stitch Closed, then hide the remaining yarn tail inside the work. The legs are now ready to attach as you crochet the body at a later step.
Arms (make 2)
With brown yarn:
01. start 6 sc into a Magic Ring [6]
02. inc in each st around [12]
03. *sc, inc* 6 times [18]
04. sc, inc, *sc 2, inc* 5 times, sc [24]
05. *sc 3, inc* 6 times [30]
06 – 07. sc in each st around [30]
08. sc 4, dec, sc 2, dec, sc 3, dec, sc 2, dec, sc 11 [26]
09. sc 6, dec, sc 3, dec, sc 13 [24]
10. sc in each st around [24]
11. sc 11, dec, sc 11 [23]
12. sc 21, dec [22]
13. sc in each st around [22]
14. sc 10, dec, sc 10 [21]
15. sc in each st around [21]
16. sc 19, dec [20]
17. sc in each st around [20]
18. sc 9, dec, sc 9 [19]
19. sc in each st around [19]
20. sc 17, dec [18]
21. sc in each st around [18]
22. sc 8, dec, sc 8 [17]
23. sc in each st around [17]
24. sc 15, dec [16]
25. sc in each st around [16
26. *sc 2, dec* 4 times [12]
Fasten off and leave a 12-inch (30 cm) yarn tail. Stuff the arm. Press the final round together and Slip Stitch Closed, then hide the remaining yarn tail inside the work. The arms are now ready to attach as you crochet the body at a later step.
Body
With brown yarn:
01. start 6 sc into a Magic Ring [6]
02. inc in each st around [12]
03. *sc, inc* 6 times [18]
04. sc, inc, *sc 2, inc* 5 times, sc [24]
05. *sc 3, inc* 6 times [30]
06. sc 2, inc, *sc 4, inc* 5 times, sc 2 [36]
Attaching the Legs: Attach the legs as you crochet the next round. To view a tutorial, watch my How to Attach Legs | No-Sew Method video.
07. attach the first leg: (sc 5, inc), sc 5, inc, attach the second leg: (sc 5, inc), *sc 5, inc* 3 times [42]
08. sc 3, inc, *sc 6, inc* 5 times, sc 3 [48]
09. *sc 7, inc* 6 times [54]
10. sc 4, inc, *sc 8, inc* 5 times, sc 4 [60]
11 – 17. sc in each st around [60]
18. sc 4, dec, *sc 8, dec* 5 times, sc 4 [54]
19. sc in each st around [54]
20. *sc 7, dec* 6 times [48]
21. sc in each st around [48]
22. sc 3, dec, *sc 6, dec* 5 times, sc 3 [42]
23 – 24. sc in each st around [42]
25. *sc 5, dec* 6 times [36]
26 – 27. sc in each st around [36]
28. sc 2, dec, *sc 4, dec* 5 times, sc 2 [30]
29. sc in each st around [30]
Attaching the Arms: Attach the arms as you crochet the next round. To view a tutorial, watch my How to Attach Arms | No-Sew Method video.
30. sc, attach the first arm: (sc 6), sc 8, attach second arm: (sc 6), sc 9 [30]
At the end of round 30, the arms should appear centered above the legs. If your arms appear off center, redo the round and adjust the placement of the arms as necessary.
Stuff the body.
31. *sc 3, dec* 6 times [24]
Fasten off and leave a tail the length of your arm span (~65 in / ~165 cm).
Sewing the Body to the Head: To view a tutorial, watch my How to Sew Body to Head video.
Tail
With brown yarn:
01. start 6 sc into a Magic Ring [6]
02. sc in each st around [6]
03. *sc, inc* 3 times [9]
04. sc in each st around [9]
05. sc, inc, *sc 2, inc* 2 times, sc [12]
06. dec, sc 3, *inc* 2 times, sc 3, dec [12]
07. sc in each st around [12]
08. dec, sc 3, *inc* 2 times, sc 3, dec [12]
09. sc in each st around [12]
10. dec, sc 4, *inc* 2 times, sc 2, dec [12]
11. sc in each st around [12]
Fasten off and leave a 12-inch (30 cm) yarn tail. Stuff the tail. Sew the tail to your dog centered over round 11 on the back side of the body. Secure with a knot, then hide the remaining yarn tail inside the work.

Lulu the Labrador
Height: 13.5 inches (34 cm) standing Skill Level: Intermediate Terms: US 🇺🇸Lulu is a golden-hearted Labrador with fur to match. Her unwavering loyalty and affectionate nature are a true treasure. Whether it’s a playful game of catch or a comforting cuddle, Lulu will fill your life with sunshine.
Supplies
- 3.5mm (E-4) hook
- (2) 15mm safety eyes
- Stitch markers
- Yarn needle
- Scissors
- Straight pins
- Fiber fill
- Disappearing ink marker
263 yards of acrylic (weight 4) yarn:
Notes
Steps to complete this pattern
- Crochet the Tongue
- Crochet the Bottom Lip
- Crochet the Ears
- Crochet the Snout & Head
- Embroider the Nose
- Tack down the Ears
- Crochet the Legs
- Crochet the Arms
- Crochet the Body
- Sew the Head to the Body
- Crochet the Tail
- Sew the Tail to the Body
Abbreviations
- ch – chain
- sc – single crochet
- inc – complete two single crochets within the same stitch
- dec – combine two stitches into one with an invisible decrease
- *sc x* – repeat the instructions between asterisks(*) the indicated number of times
- (sc x) – attach a body part while completing the stitches inside parentheses as instructed by the pattern
General Instructions
- This pattern is worked in continuous rounds without joining.
- Use a stitch marker to mark the end of each round. Move the marker up each round.
Video Tutorials
I’ve made lots of video tutorials that will be referenced throughout this pattern. They will be marked with a clickable play button symbol. A full list of tutorials can be found in the video tutorials section of the pattern.
Instructions
Tongue
With pink yarn, leaving a 6-inch (15 cm) yarn tail, create a slip knot on your hook:
01. ch 4, sc in 2nd ch from hook, sc in next ch, sc 5 in last ch. Working on opposite side of chain base: sc in last 2 ch [9]
02. ch 1, turn, sc 3, *inc* 3 times, sc 3 [12]
03. ch 1, and without turning, sc 4 across top flat edge of tongue [4]
To view a tutorial, watch my Dog Tongue video.
Fasten off, leaving a 6-inch (15 cm) yarn tail. Using a yarn needle, weave the beginning yarn tail into the work, and tie it off with the ending yarn tail. Cut both tails to 1.5 inches (4 cm). The tongue is now ready to attach as you crochet the head at a later step.
Bottom Lip
With beige yarn:
01. start 6 sc into a Magic Ring [6]
02. inc in each st around [12]
03. *sc, inc* 6 times [18]
04. sc, inc, *sc 2, inc* 5 times, sc [24]
Fasten off, leaving a 12-inch (30 cm) yarn tail. Fold the circle in half and slip stitch closed.
To view a tutorial, watch my Attach Bottom Lip & Tongue video. It covers how to fasten off and Slip Stitch Closed.
Hide the remaining yarn tail inside the work. The bottom lip is now ready to attach as you crochet the head at a later step.
Ears (make 2)
With beige yarn:
01. start 6 sc into a Magic Ring [6]
02. *sc, inc* 3 times [9]
03. sc, inc, *sc 2, inc* 2 times, sc [12]
04. *sc 3, inc* 3 times [15]
05. sc 2, inc, *sc 4, inc* 2 times, sc 2 [18]
06. *sc 5, inc* 3 times [21]
07. sc 3, inc, *sc 6, inc* 2 times, sc 3 [24]
08. sc in each st around [24]
09. sc 11, dec, sc 11 [23]
10. sc 21, dec [22]
11. sc 10, dec, sc 10 [21]
12. sc 19, dec [20]
13. sc 9, dec, sc 9 [19]
14. sc 17, dec [18]
15. *sc 7, dec* 2 times [16]
Do not stuff. Fasten off, leaving a 12-inch (30 cm) tail. Press the final round together and Slip Stitch Closed. Hide the remaining yarn tail inside the work. The ears are now ready to attach as you crochet the head at a later step.
Snout & Head
With beige yarn:
01. Chain 5 Start: inc in 2nd ch from hook, sc 2, sc 5 in last ch. Working on opposite side of chain base: sc 2, sc 3 in last ch [14]
02. inc, sc 4, *inc* 3 times, sc 4, *inc* 2 times [20]
03. inc, sc 6, *inc* 2 times, sc, inc, sc 6, *inc* 2 times, sc [26]
04. inc, sc 8, *inc, sc* 2 times, inc, sc 8, *inc, sc* 2 times [32]
05. *sc 7, inc* 4 times [36]
06 – 07. sc in each st around [36]
Attaching the Bottom Lip & Tongue: Attach the bottom lip & tongue as you crochet the next round. To view a tutorial, watch my Attach Bottom Lip & Tongue video.
08. sc 2, start attaching the bottom lip: (sc 4), attach the tongue + bottom lip: (sc 4), finish attaching the bottom lip: (sc 4), sc 22 [36]
09. sc 36 [36]
10. *sc 5, inc* 6 times [42]
11. sc 3, inc, *sc 6, inc* 5 times, sc 3 [48]
12. *sc 7, inc* 6 times [54]
Marking Stitches for the Eyes: Insert two markers 16 stitches apart between rounds 11 & 12. These markers will show you where to place your safety eyes at a later step.
13. sc 4, inc, *sc 8, inc* 5 times, sc 4 [60]
14 – 18. sc in each st around [60]
Attaching the Ears: Attach the ears as you crochet the next round. To view a tutorial, watch my How to Attach Ears video. You do not need to use stitch markers as shown in the video.
19. sc 32, attach the first ear: (sc 8), sc 11, attach the second ear: (sc 8), sc [60]
At the end of round 19, the ears should appear centered on the top of the head. If your ears appear off center, redo the round and adjust the placement of the ears as necessary.
20 – 23. sc in each st around [60]
24. sc 4, dec, *sc 8, dec* 5 times, sc 4 [54]
25. *sc 7, dec* 6 times [48]
26. sc 3, dec, *sc 6, dec* 5 times, sc 3 [42]
27. *sc 5, dec* 6 times [36]
28. sc 2, dec, *sc 4, dec* 5 times, sc 2 [30]
Stuff head ¾ full and create indents for the eyes. Insert your safety eyes and secure the backings. To view a tutorial, watch my Indent Eyes video.
29. *sc 3, dec* 6 times [24]
30. sc, dec, *sc 2, dec* 5 times, sc [18]
31. *sc, dec* 6 times [12]
Finish stuffing.
32. *dec* 6 times [6]
Embroidering the Nose: Using straight pins, mark the four corners of the nose (see Figure 1). The bottom should be four stitches across between rounds 1 & 2, centered above the Chain 5 Start. The top should be eight stitches across between rounds 4 & 5 (see Figure 1).
Using a 36-inch (90 cm) strand of dark brown yarn and a yarn needle, embroider the nose working through each stitch along the bottom a total of six times, and each stitch along the top a total of three times (see Figure 2).
To view a tutorial, watch my Embroider Dog Nose video.
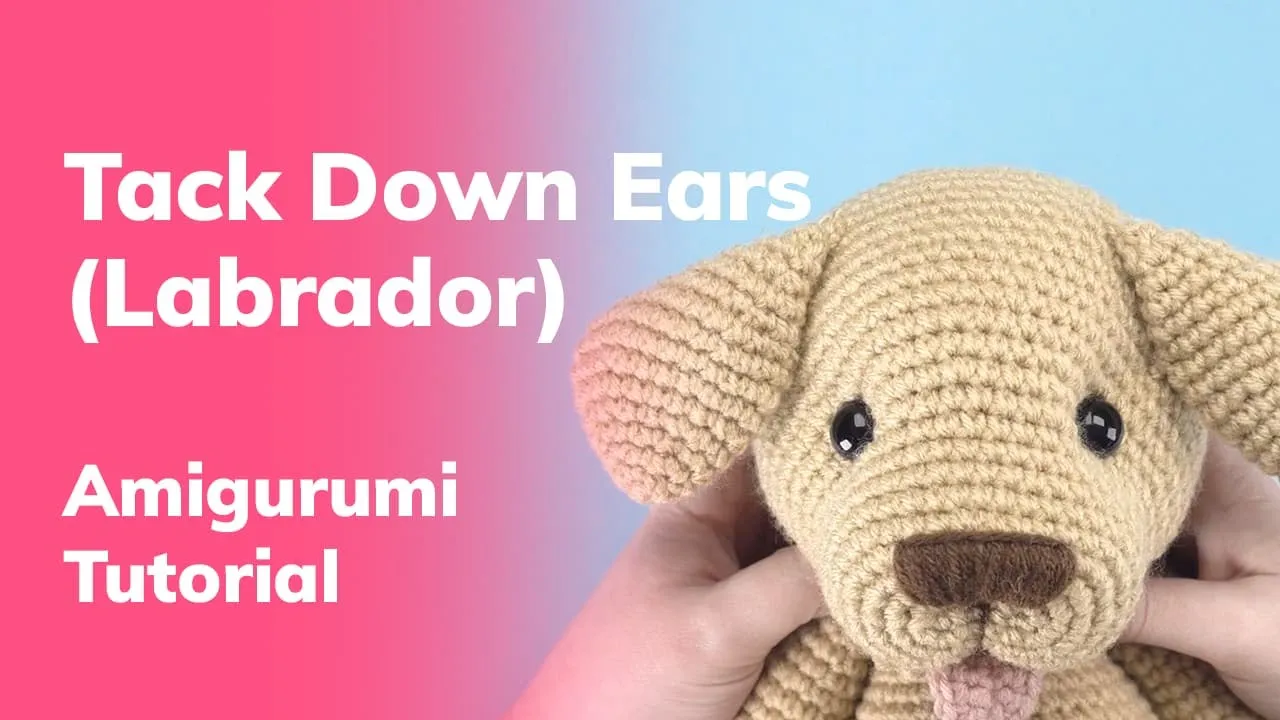
Tacking Down the Ears: Fold the dog’s ears forward. With matching yarn, tack them down on the underside to keep them in place. To view a tutorial, watch my Tack Down Ears (Terrier) video.
Legs (make 2)
With beige yarn:
01. start 6 sc into a Magic Ring [6]
02. inc in each st around [12]
03. *sc, inc* 6 times [18]
04. sc, inc, *sc 2, inc* 5 times, sc [24]
05. *sc 3, inc* 6 times [30]
06. sc 2, inc, *sc 4, inc* 5 times, sc 2 [36]
07 – 08. sc in each st around [36]
09. sc 34, dec [35]
10. dec, *sc, dec, dec* 2 times, sc 23 [30]
11. *dec, sc* 3 times, sc 21 [27]
12. sc in each st around [27]
13. sc 10, dec, sc 15 [26]
14. sc 15, dec, sc 9 [25]
15. sc 21, dec, sc 2 [24]
16. sc 3, dec, sc 19 [23]
17. sc 10, dec, sc 11 [22]
18. sc 14, dec, sc 6 [21]
19. sc 19, dec [20]
20. sc 3, dec, sc 15 [19]
21. sc 9, dec, sc 8 [18]
22. *sc 7, dec* 2 times [16]
23. *sc 2, dec* 4 times [12]
Fasten off and leave a 12-inch (30 cm) yarn tail. Stuff the leg. Press the final round together and Slip Stitch Closed, then hide the remaining yarn tail inside the work. The legs are now ready to attach as you crochet the body at a later step.
Arms (make 2)
With beige yarn:
01. start 6 sc into a Magic Ring [6]
02. inc in each st around [12]
03. *sc, inc* 6 times [18]
04. sc, inc, *sc 2, inc* 5 times, sc [24
05. *sc 3, inc* 6 times [30]
06 – 07. sc in each st around [30]
08. sc 4, dec, sc 2, dec, sc 3, dec, sc 2, dec, sc 11 [26]
09. sc 6, dec, sc 3, dec, sc 13 [24]
10. sc in each st around [24]
11. sc 11, dec, sc 11 [23]
12. sc 21, dec [22]
13. sc in each st around [22]
14. sc 10, dec, sc 10 [21]
15. sc in each st around [21]
16. sc 19, dec [20]
17. sc in each st around [20]
18. sc 9, dec, sc 9 [19]
19. sc in each st around [19]
20. sc 17, dec [18]
21. sc in each st around [18]
22. sc 8, dec, sc 8 [17]
23. sc in each st around [17]
24. sc 15, dec [16]
25. sc in each st around [16]
26. *sc 2, dec* 4 times [12]
Fasten off and leave a 12-inch (30 cm) yarn tail. Stuff the arm. Press the final round together and Slip Stitch Closed, then hide the remaining yarn tail inside the work. The arms are now ready to attach as you crochet the body at a later step.
Body
With beige yarn:
01. start 6 sc into a Magic Ring [6]
02. inc in each st around [12]
03. *sc, inc* 6 times [18]
04. sc, inc, *sc 2, inc* 5 times, sc [24]
05. *sc 3, inc* 6 times [30]
06. sc 2, inc, *sc 4, inc* 5 times, sc 2 [36]
Attaching the Legs: Attach the legs as you crochet the next round. To view a tutorial, watch my How to Attach Legs | No-Sew Method video.
07. attach the first leg: (sc 5, inc), sc 5, inc, attach the second leg: (sc 5, inc), *sc 5, inc* 3 times [42]
08. sc 3, inc, *sc 6, inc* 5 times, sc 3 [48]
09. *sc 7, inc* 6 times [54]
10. sc 4, inc, *sc 8, inc* 5 times, sc 4 [60]
11 – 17. sc in each st around [60]
18. sc 4, dec, *sc 8, dec* 5 times, sc 4 [54]
19. sc in each st around [54]
20. *sc 7, dec* 6 times [48]
21. sc in each st around [48]
22. sc 3, dec, *sc 6, dec* 5 times, sc 3 [42]
23 – 24. sc in each st around [42]
25. *sc 5, dec* 6 times [36]
26 – 27. sc in each st around [36]
28. sc 2, dec, *sc 4, dec* 5 times, sc 2 [30]
29. sc in each st around [30]
Attaching the Arms: Attach the arms as you crochet the next round. To view a tutorial, watch my How to Attach Arms | No-Sew Method video.
30. sc, attach the first arm: (sc 6), sc 8, attach second arm: (sc 6), sc 9 [30]
At the end of round 30, the arms should appear centered above the legs. If your arms appear off center, redo the round and adjust the placement of the arms as necessary.
Stuff the body.
31. *sc 3, dec* 6 times [24]
Fasten off and leave a tail the length of your arm span (~65 in / ~165 cm).
Sewing the Body to the Head: To view a tutorial, watch my How to Sew Body to Head video.
Tail
With beige yarn:
01. start 6 sc into a Magic Ring [6]
02. sc in each st around [6]
03. *sc, inc* 3 times [9]
04. sc in each st around [9]
05. sc, inc, *sc 2, inc* 2 times, sc [12]
06. dec, sc 3, *inc* 2 times, sc 3, dec [12]
07. sc in each st around [12]
08. dec, sc 3, *inc* 2 times, sc 3, dec [12]
09. sc in each st around [12]
10. dec, sc 4, *inc* 2 times, sc 2, dec [12]
11. sc in each st around [12]
Fasten off and leave a 12-inch (30 cm) yarn tail. Stuff the tail. Sew the tail to your dog centered over round 11 on the back side of the body. Secure with a knot, then hide the remaining yarn tail inside the work.