


Resources
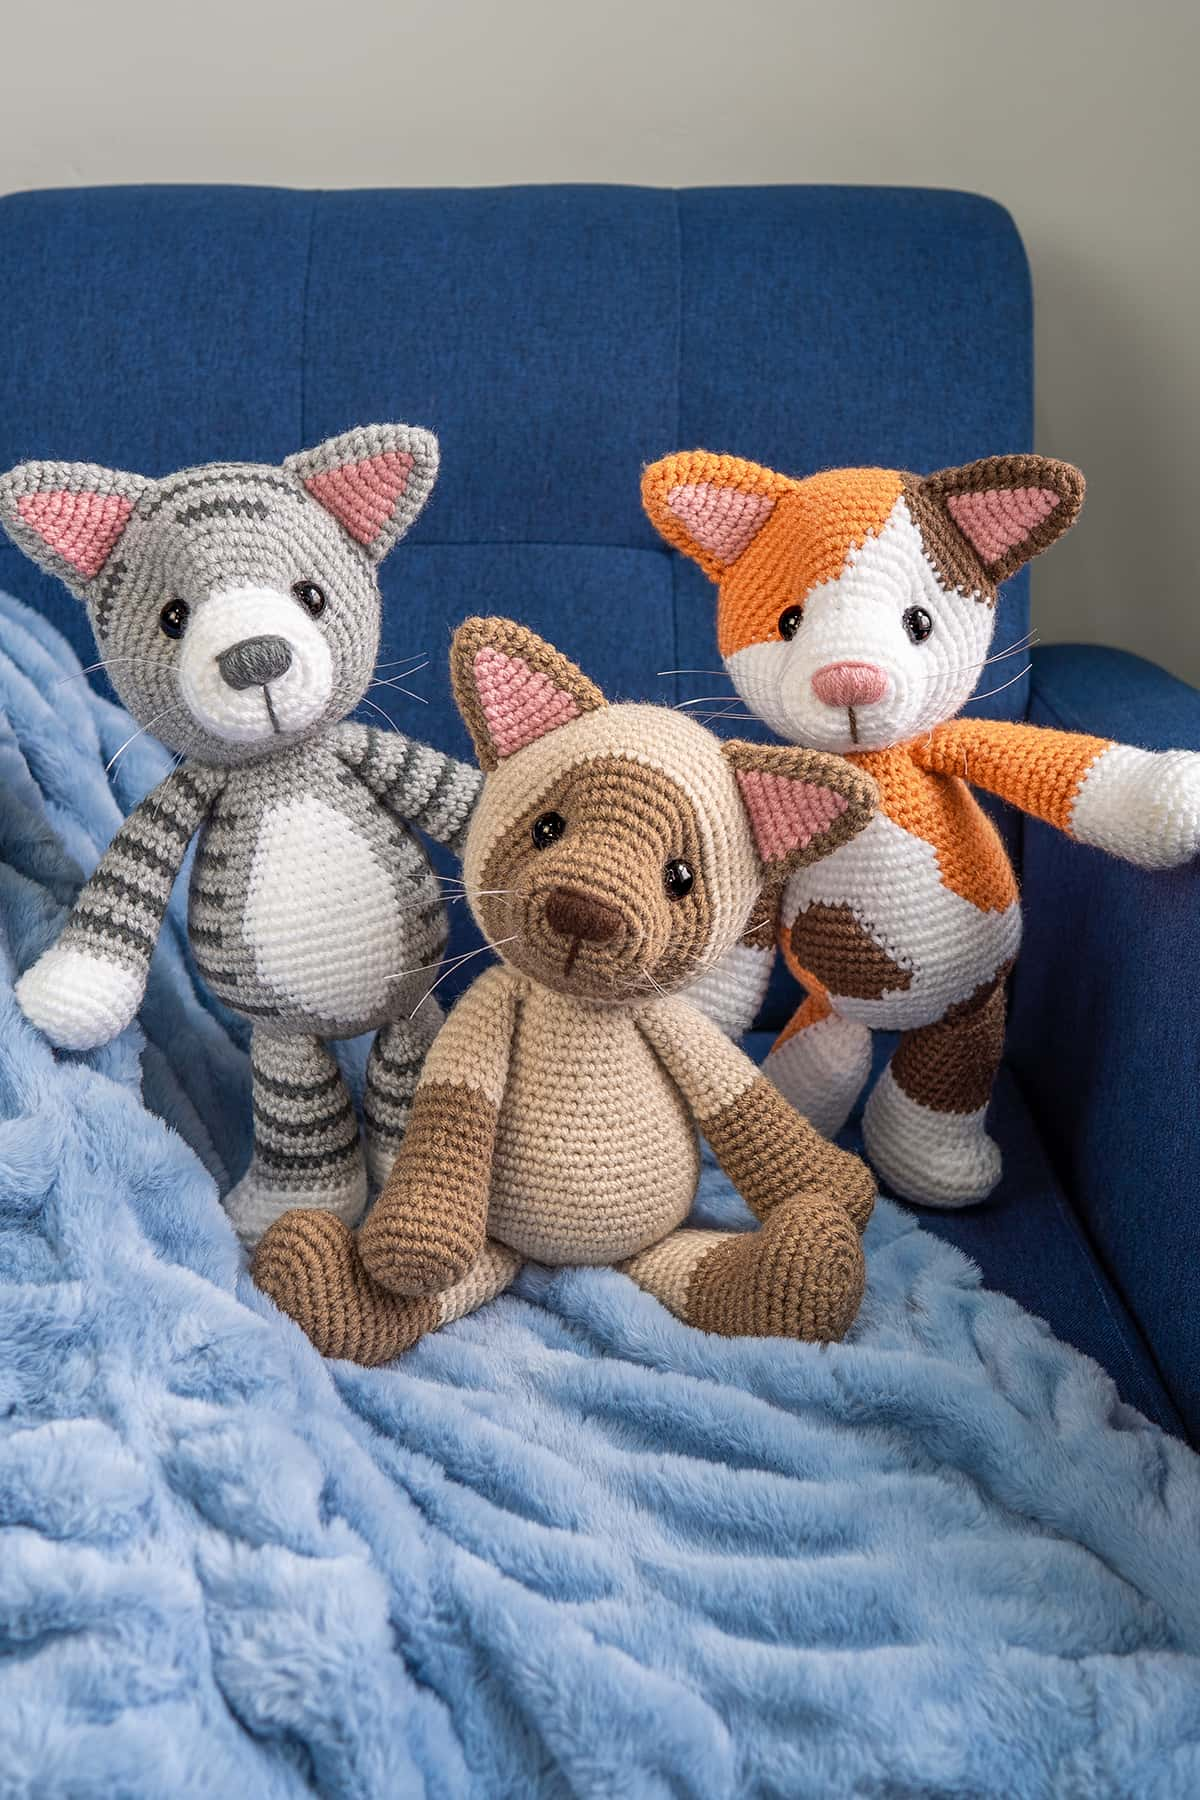
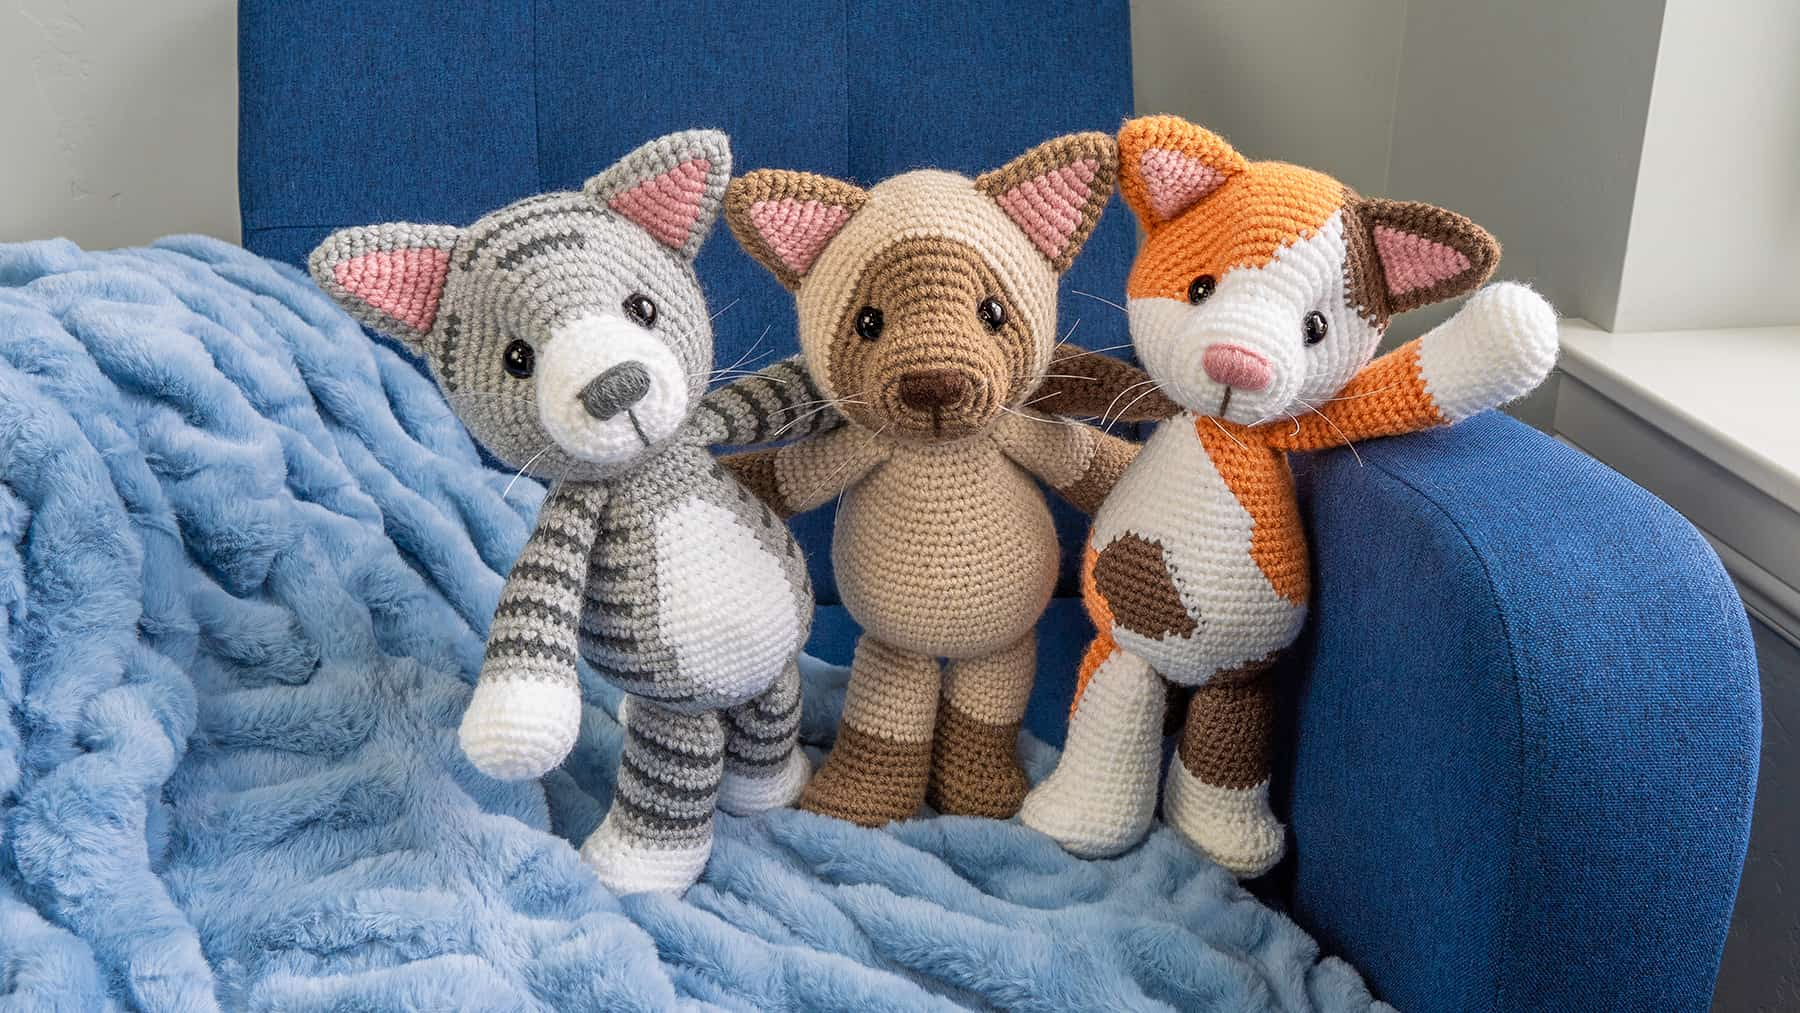
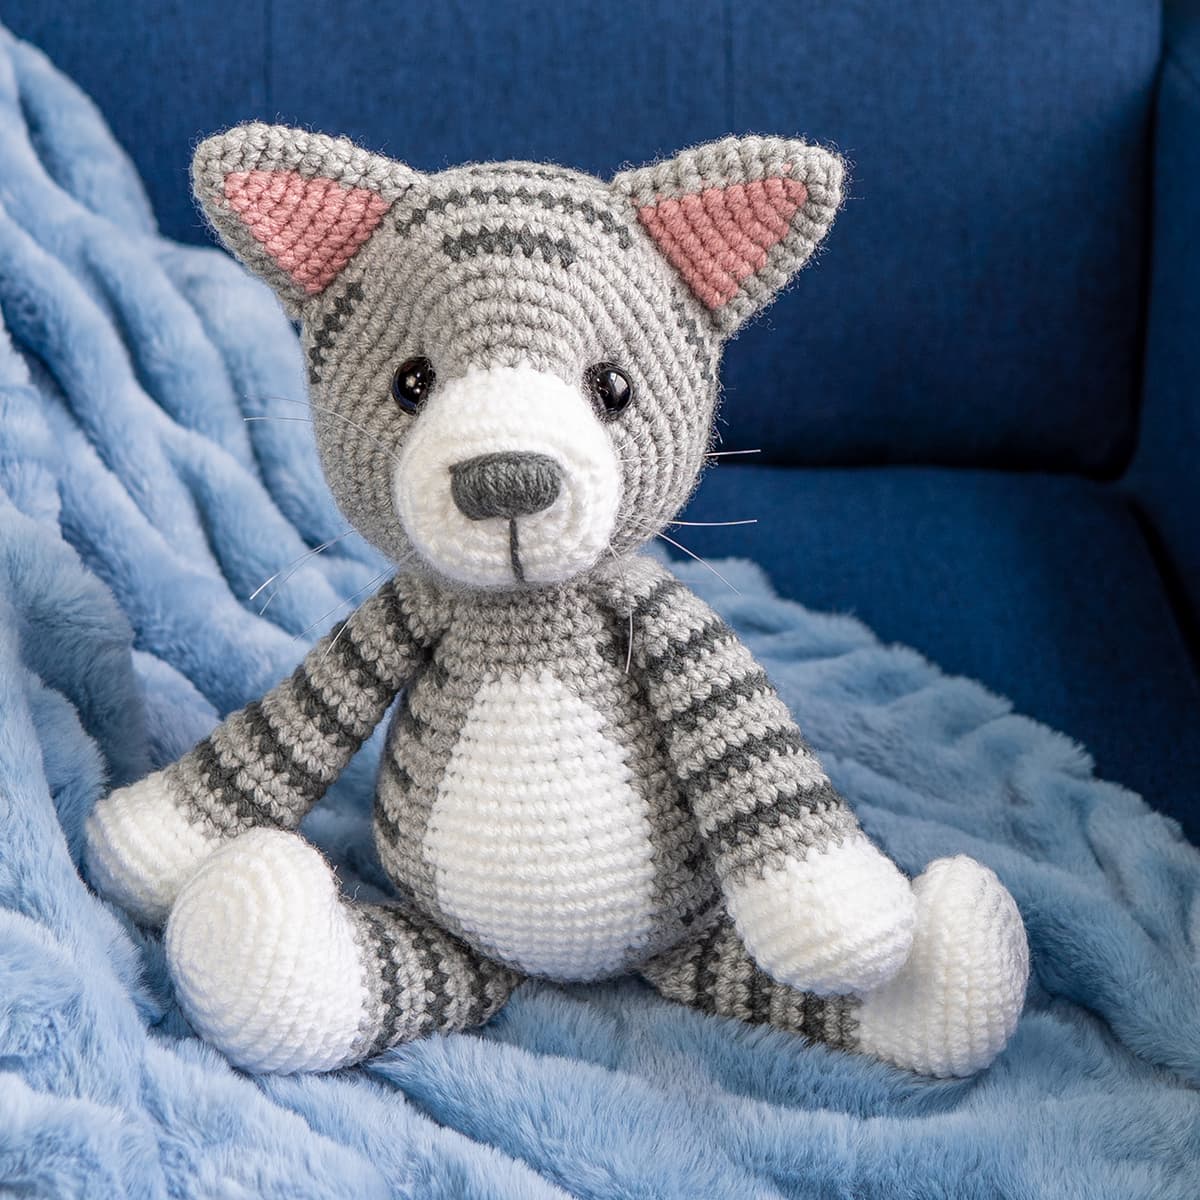
Toby the Tabby Cat
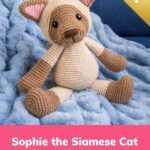
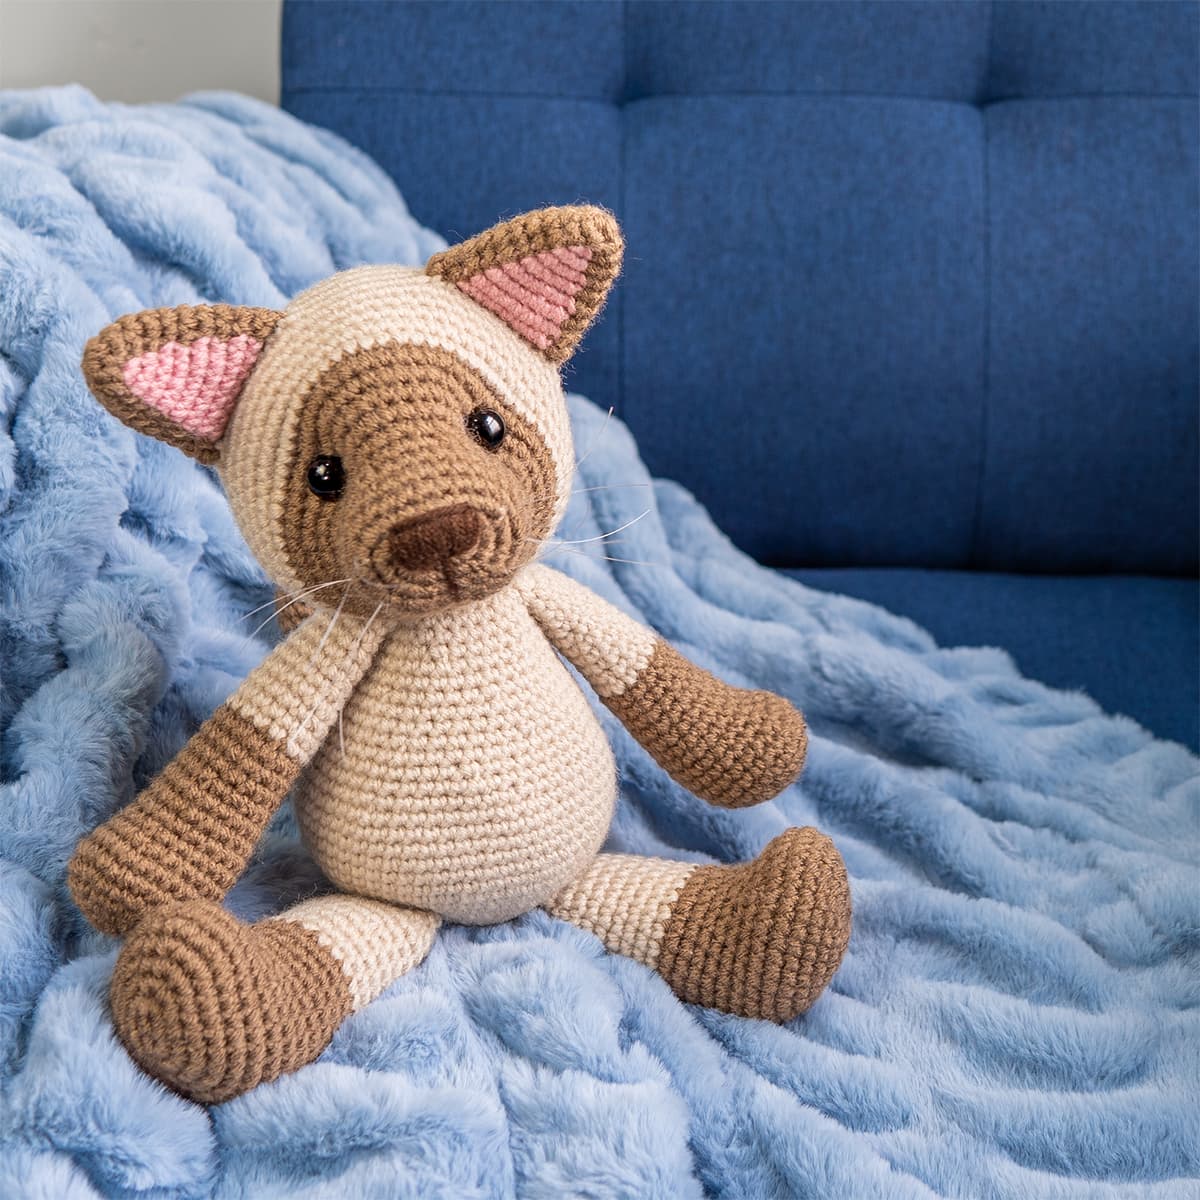
Sophie the Siamese Cat
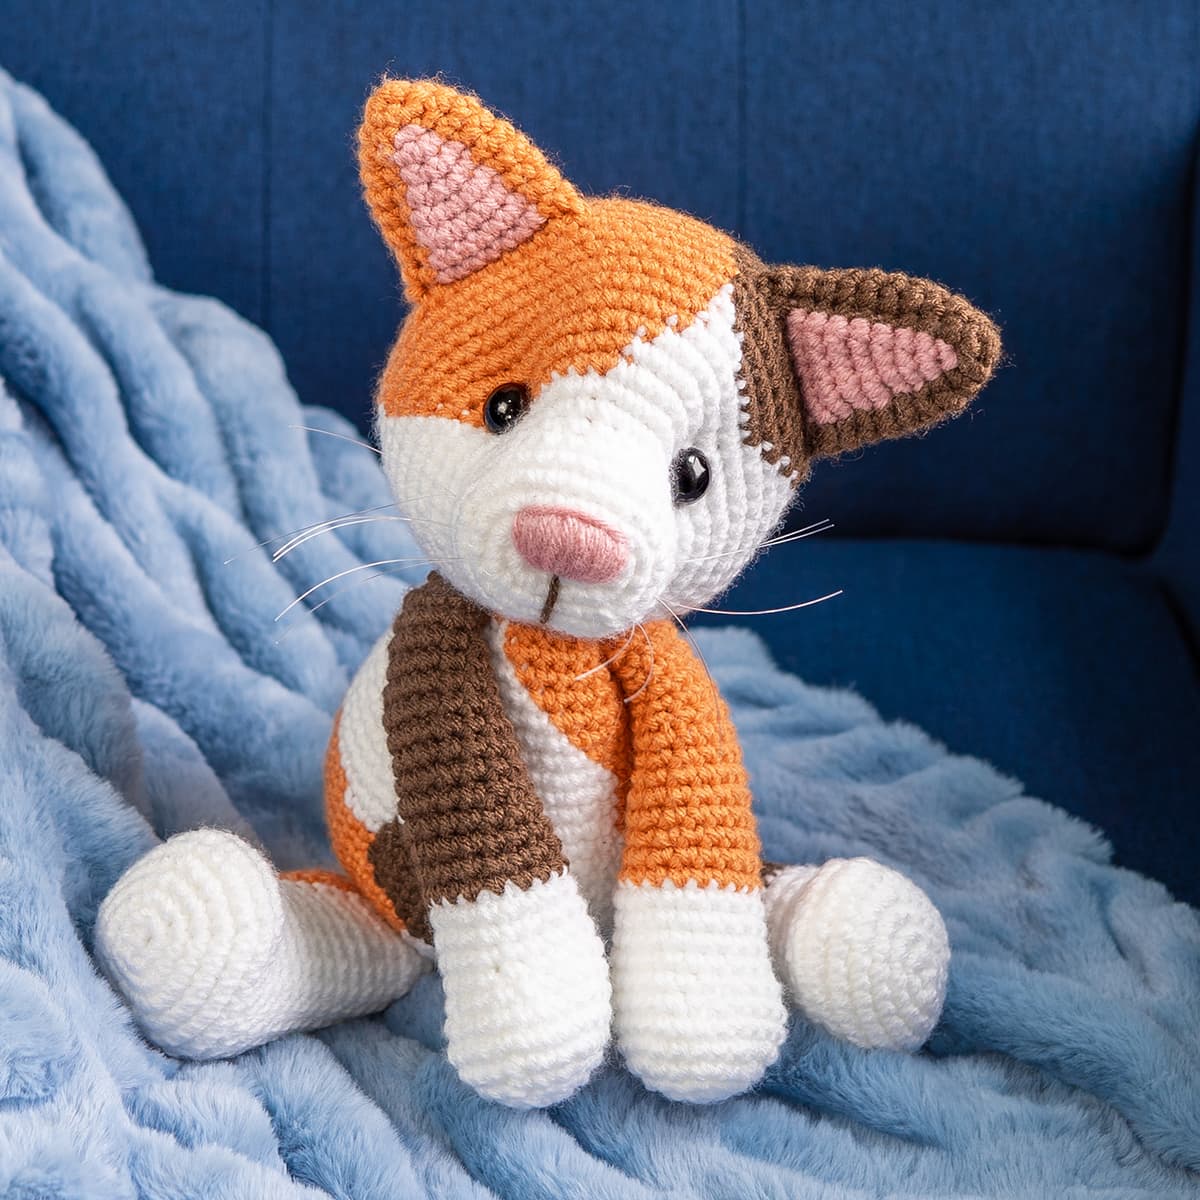
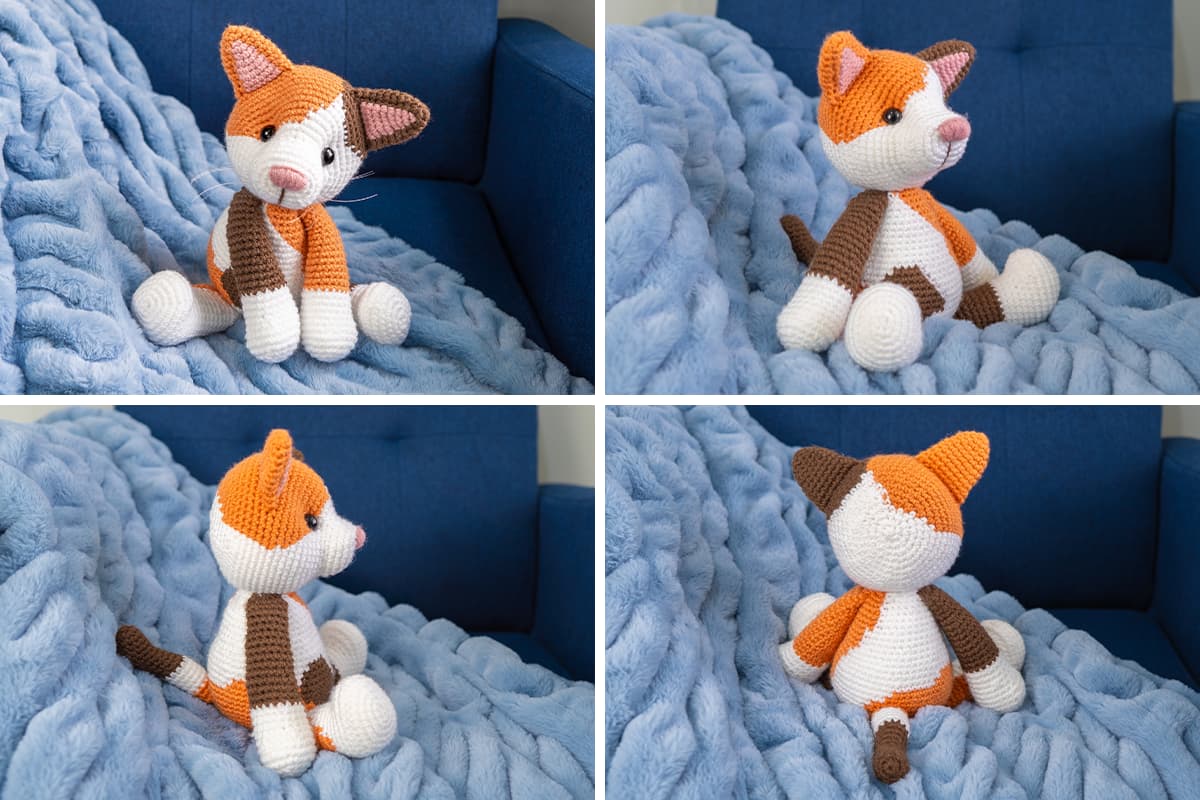
Callie the Calico Cat
How to crochet a cat
This amigurumi cat has been one of my most requested free animal crochet patterns for years now, and I’m so glad I was finally able to make one! This pattern comes in 3 color variations: a tabby cat, a siamese cat, and a calico cat. Go wild and make a whole litter of kittens!
The first step is to crochet the ears. Next you’ll crochet the head, and the ears will be crocheted in as you go. Then you’ll crochet all the limbs and tail, and those will be attached as you crochet the body.
A nearly no-sew cat crochet pattern
I love that this pattern requires such little assembly. The only sewing you’ll have to do is attaching the head to the body. Less time assembling means more time for the part we all love: the crocheting! 🧶
This cat crochet pattern is great for beginners
As long as you know the basic stitches of amigurumi (single crochet, increase and invisible decrease), you should be able to complete this pattern easy-peasy. I’ve included video tutorials for all the tricky parts!
This cat pattern is great for commissions and craft fairs
This crocheted kitty works up incredibly fast, which will maximize your profit. Unlike my lion crochet pattern where you must manually attach hundreds of strands for the mane (😵), there are very few embellishments you’ll need to add – just embroider a nose, and if you really want to put it over the top, you can add some whiskers with fishing line.
Even though my patterns are fairly large and cuddle-sized, I was able to finish each cat within a day. The siamese version definitely works up the fastest because of the minimal color changes!
Resources


Video Tutorials
Toby the Tabby Cat
Height: 14 inches (36 cm) standing Skill Level: Intermediate Terms: US 🇺🇸Toby the Tabby is one cool cat, and the life of any party! His striking stripes and hiss-terical jokes will leave you “feline” fine.
Supplies
- 3.5mm (E-4) hook
- (2) 15mm safety eyes
- Stitch markers
- Yarn needle
- Scissors
- Straight pins
- Fiber fill
- Fishing line (60 in / 152 cm)
- Disappearing ink marker
235 yards of acrylic (weight 4) yarn:
- Pink – 4 yards (4m / 2g)
- White – 59 yards (54m / 33g)
- Light Gray – 143 yards (131m / 79g)
- Dark Gray – 30 yards (27m / 17g)
Notes
Steps to complete this pattern
- Crochet the Ears
- Crochet the Head
- Embroider the Nose
- Add Whiskers
- Crochet the Tail
- Crochet the Legs
- Crochet the Arms
- Crochet the Body
- Sew the Head to the Body
Abbreviations
- ch – chain
- sc – single crochet
- inc – complete two single crochets within the same stitch
- dec – combine two stitches into one with an invisible decrease
- *sc x* – repeat the instructions between asterisks(*) the indicated number of times
- (sc x) – attach a body part while completing the stitches inside parentheses as instructed by the pattern
- {x, y} – complete the stitches listed in the curly brackets within the same stitch
General Instructions
- This pattern is worked in continuous rounds without joining.
- Use a stitch marker to mark the end of each round. Move the marker up each round.
Video Tutorials
I’ve made lots of video tutorials that will be referenced throughout this pattern. They will be marked with a clickable play button symbol. A full list of tutorials can be found in the video tutorials section of the pattern.
Instructions
Ears (make 2)
LG= with light gray yarn; P = with pink yarn
01. LG: start 6 sc into a Magic Ring [6]
02. *sc, inc* 3 times [9]
03. sc, P: inc, LG: *sc 2, inc* 2 times, sc [12]
04. sc, P: sc 2, {P, LG} in same st, LG: *sc 3, inc* 2 times [15]
05. sc, P: sc 4, LG: sc 10 [15]
06. sc, P: sc, inc, sc 2, LG: sc 2, inc, sc 4, inc, sc 2 [18]
07 – 08. sc, P: sc 6, LG: sc 11 [18]
09. sc, P: sc 7, LG: inc, sc 8, inc [20]
10. sc, P: sc 7, LG: sc 12 [20]
Fasten off, leaving an 18-inch (46 cm) yarn tail in LG. Do not stuff. Press the final round together and Slip Stitch Closed, then hide the remaining yarn tail inside the work. The ears are now ready to attach as you crochet the head at a later step.
Head
W= with white yarn; LG= with light gray yarn; DG= with dark gray yarn
01. W: Chain 3 Start: inc in 2nd ch from hook, sc 5 in the last ch. Working on opposite side of chain base, sc 3 in the last ch [10]
02. inc, sc 2, *inc* 3 times, sc 2, *inc* 2 times [16]
03. inc, sc 4, *inc* 2 times, sc, inc, sc 4, *inc* 2 times, sc [22]
04. inc, sc 6, *inc, sc* 2 times, inc, sc 6, *inc, sc* 2 times [28]
05. sc 11, inc, sc 15, inc [30]
06 – 07. sc in each st around [30]
08. *sc 3, dec* 4 times, sc 2, LG: sc, dec, sc 3, dec [24]
Fasten off W. We are done with this color for the remainder of the head.
09. *sc, inc* 12 times [36]
10. *sc 5, inc* 6 times [42]
11. sc 3, inc, *sc 6, inc* 5 times, sc 3 [48]
12. *sc 7, inc* 6 times [54]
Marking Stitches for the Eyes: Insert two markers 18 stitches apart between rounds 11 & 12 (see Figure 1). These markers will show you where to place your safety eyes at a later step.
13. sc 4, inc, *sc 8, inc* 5 times, sc 4 [60]
14. sc 10, DG: sc 7, LG: sc 43 [60]
15. sc in each st around [60]
16. sc 59, DG: sc [60]
17. sc 5, LG: sc 3, DG: sc 12, LG: sc 3, DG: sc 6, LG: sc 31 [60]
18. sc in each st around [60]
Attaching the Ears: Attach the ears as you crochet the next round. To view a tutorial, watch my How to Attach Ears video. You do not need to use stitch markers as shown in the video.
19. sc, attach the first ear: (sc 10), sc 7, attach the second ear: (sc 10), sc 32 [60]
At the end of round 19, the ears should appear centered on the top of the head. If your ears appear off center, redo the round and adjust the placement of the ears as necessary.
20. sc 12, DG: sc 5, LG: sc 43 [60]
21 – 22. sc in each st around [60]
23. sc 7, DG: sc 17, LG: sc 36 [60]
Fasten off DG. We are done with this color for the remainder of the head.
24. sc 4, dec, *sc 8, dec* 5 times, sc 4 [54]
25. *sc 7, dec* 6 times [48]
26. sc 3, dec, *sc 6, dec* 5 times, sc 3 [42]
27. *sc 5, dec* 6 times [36]
28. sc 2, dec, *sc 4, dec* 5 times, sc 2 [30]
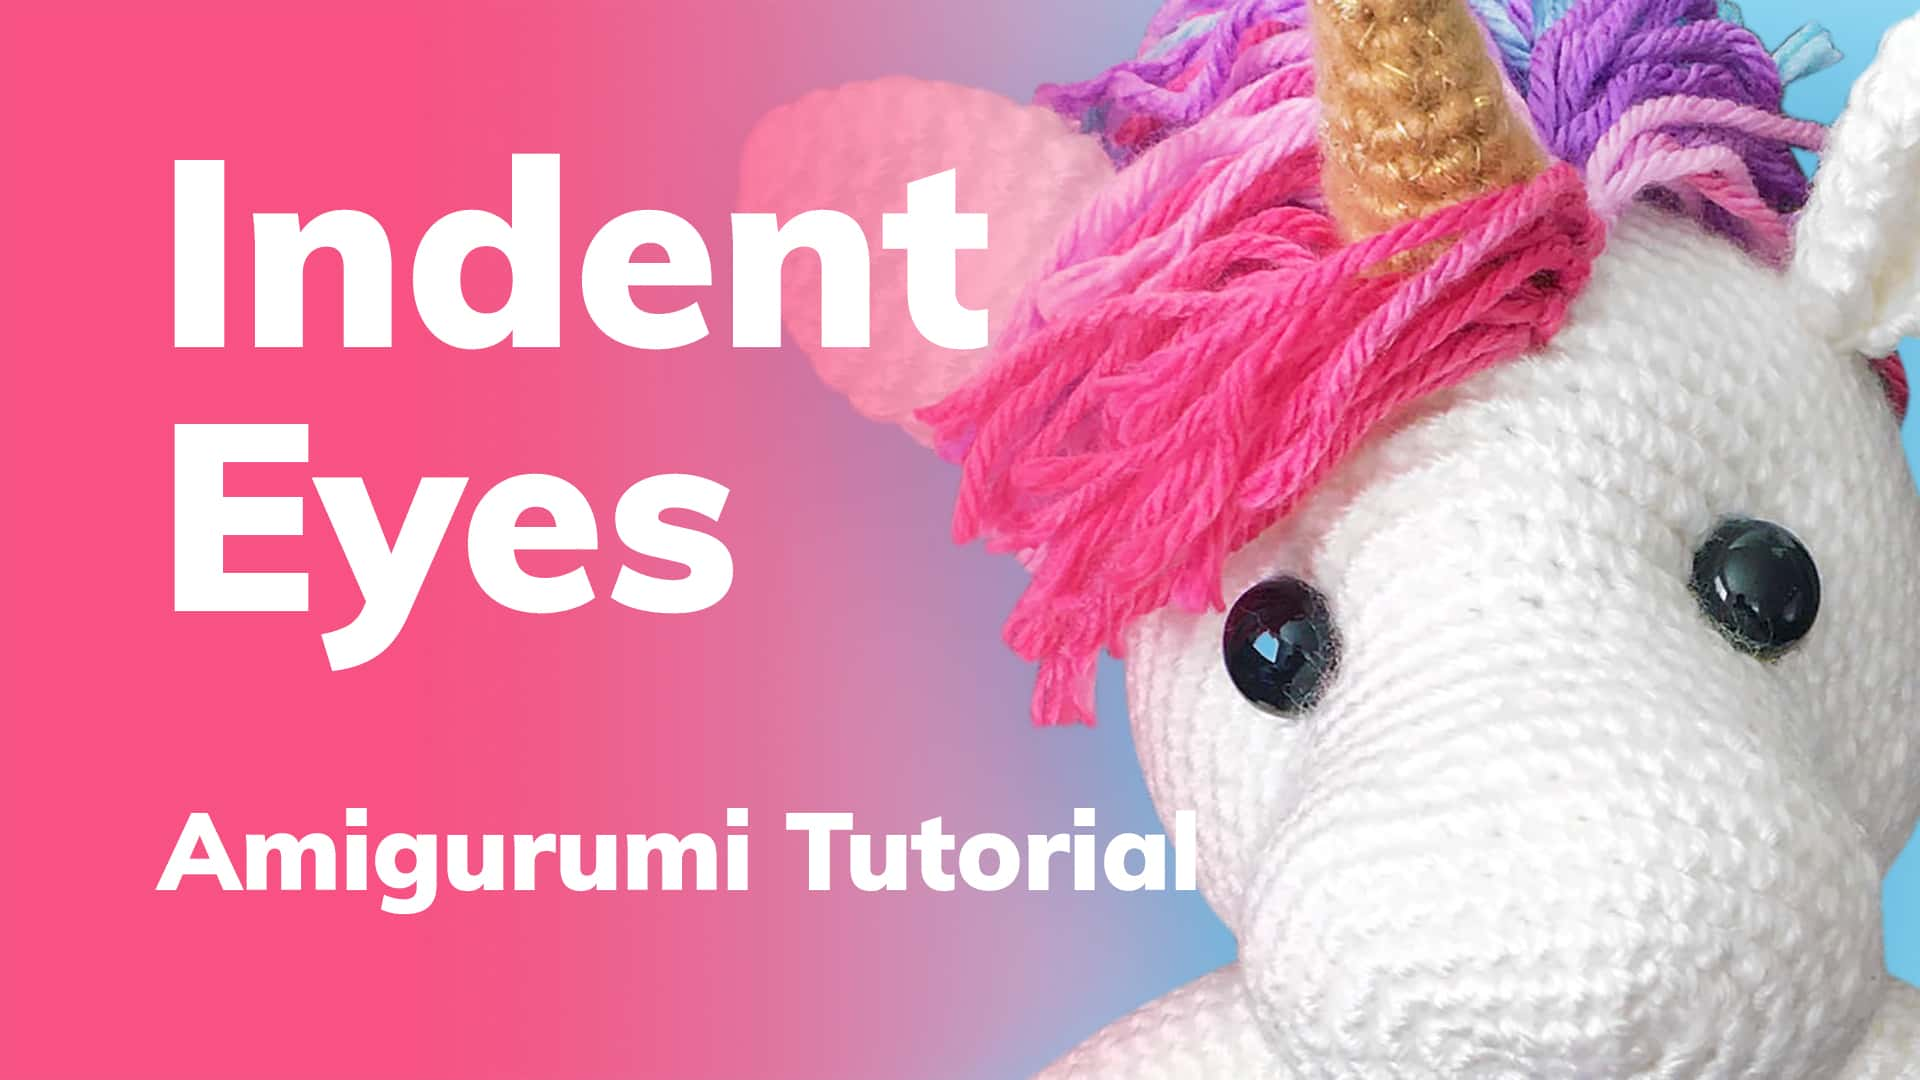
Stuff head ¾ full and create the eye indents. Insert safety eyes and secure backings. To view a tutorial, watch my Indent Eyes video.
29. *sc 3, dec* 6 times [24]
30. sc, dec, *sc 2, dec* 5 times, sc [18]
31. *sc, dec* 6 times [12]
Finish stuffing.
32. *dec* 6 times [6]
Close with an Ultimate Finish.
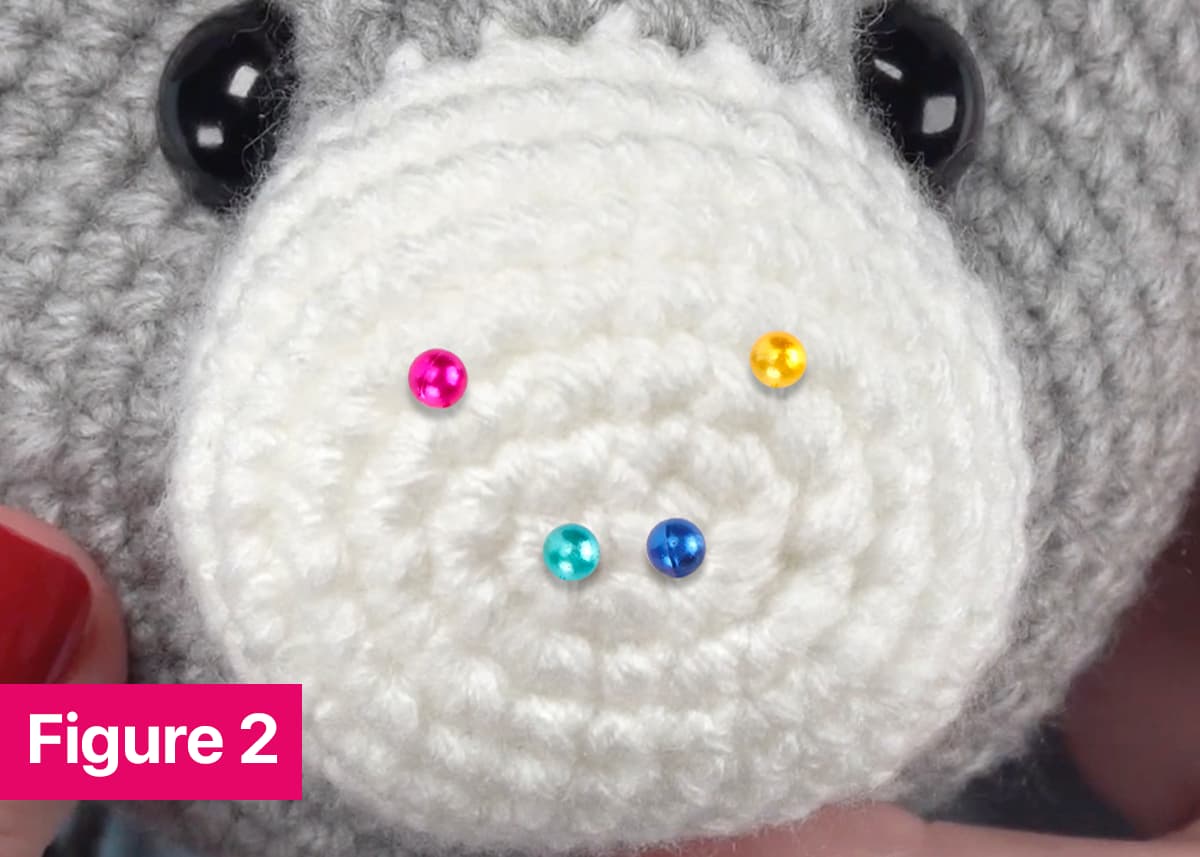
Embroidering the Nose: Using straight pins, mark the four corners of the nose (see Figure 2).
The bottom should be two stitches across, centered in the Chain 3 Start. The top should be five stitches across between rounds 3 & 4.
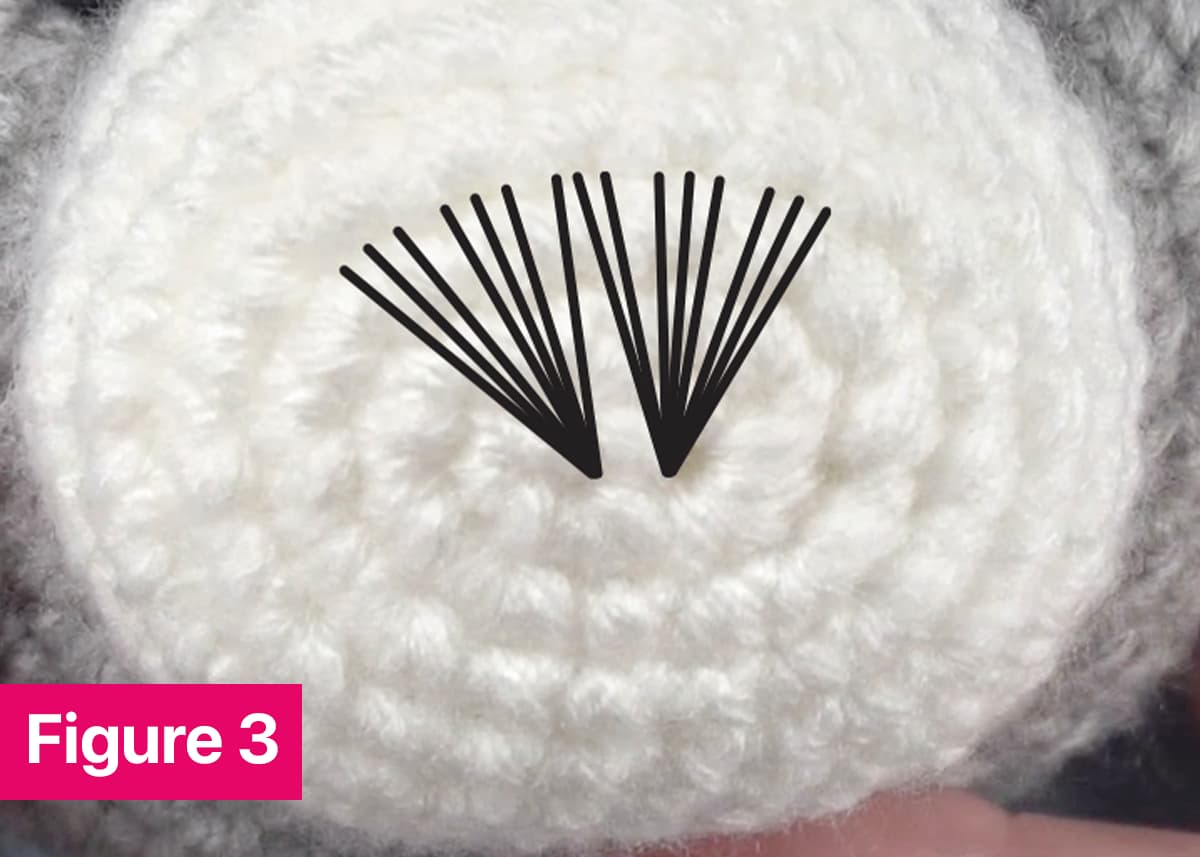
Using a 36-inch (90 cm) strand of dark brown yarn and yarn needle, embroider the nose.
Work through each stitch along bottom a total of seven/eight times, and each stitch along the top a total of three times (see Figure 3).
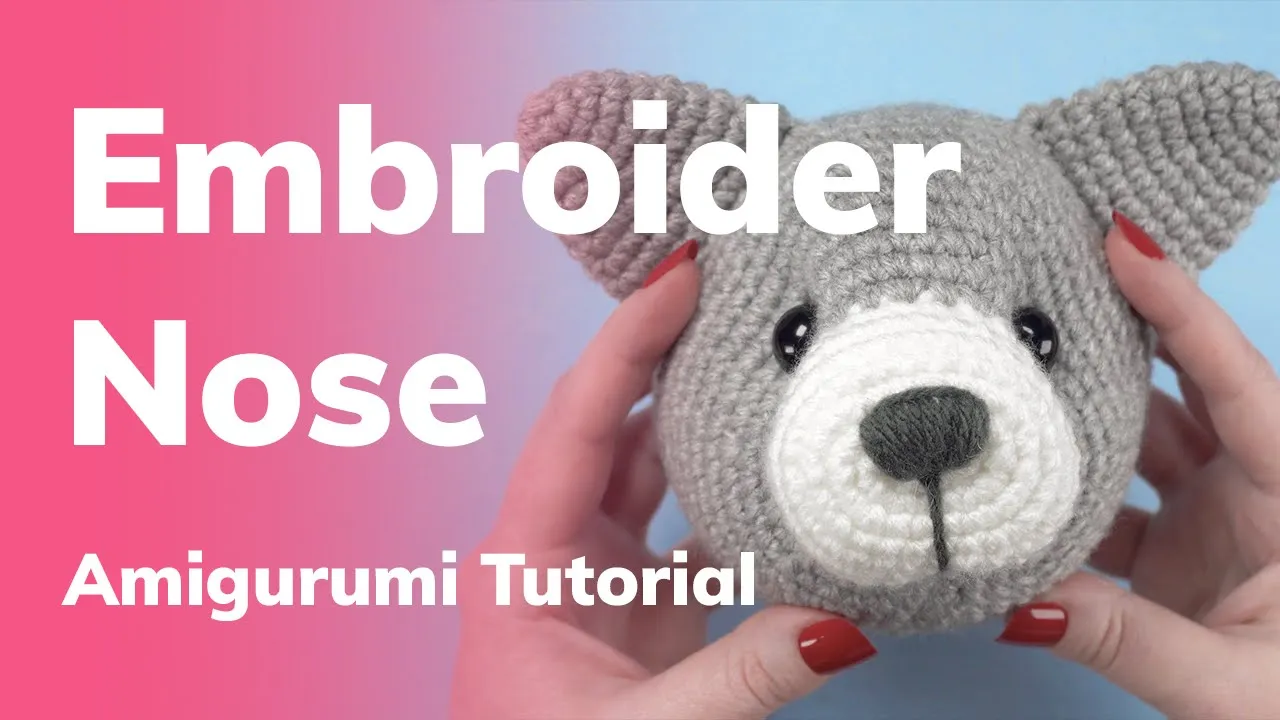
To view a tutorial, watch my Embroider Nose video.
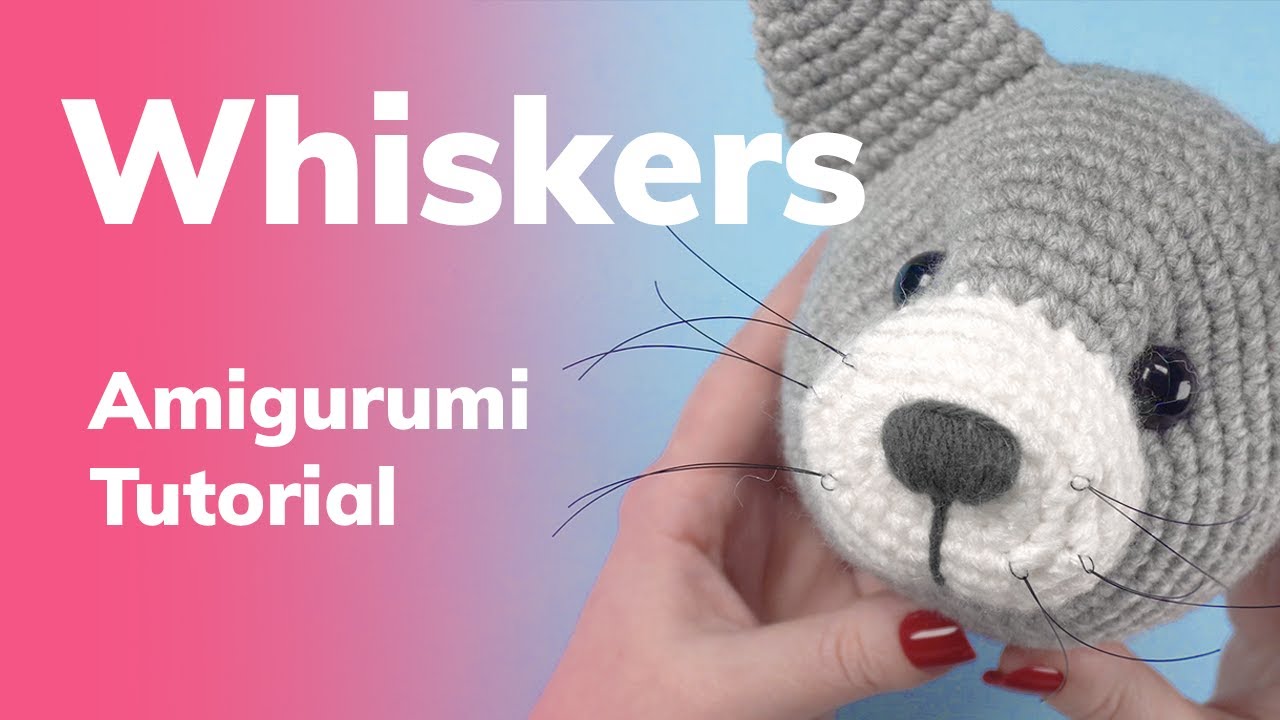
Adding Whiskers: Cut fishing line into (6) 10-inch (25 cm) strands. Fold one strand in half, forming a loop. Insert the hook into a stitch on either side of nose, and pull loop through stitch. Yarn over the loose ends of strand and pull through the loop. Secure the whisker in place with a knot. Repeat for remaining whiskers.
To view a tutorial, watch my Whiskers video.
Tail
W= with white yarn; LG= with light gray yarn; DG= with dark gray yarn
01. W: start 6 sc into a Magic Ring [6]
02. inc in each st around [12]
03 – 05. sc in each st around [12]
06. LG: sc in each st around [12]
Fasten off W. We are done with this color for the remainder of the tail.
07. dec, sc 3, *inc* 2 times, sc 3, dec [12]
08. DG: dec, sc 3, *inc* 2 times, sc 3, dec [12]
09 – 10. LG: dec, sc 3, *inc* 2 times, sc 3, dec [12]
11. DG: dec, sc 3, *inc* 2 times, sc 3, dec [12]
12 – 13. LG: sc in each st around [12]
14. sc, DG: sc 11 [12]
15. sc, LG: sc 11 [12]
16. sc in each st around [12]
17. sc 2, DG: sc 10 [12]
18. sc 2, LG: sc 10 [12]
19. dec, sc 8, dec [10]
Fasten off and leave a 12-inch (30 cm) yarn tail. Stuff the tail. Press the final round together and Slip Stitch Closed, then hide the remaining yarn tail inside the work. The tail is now ready to attach as you crochet the body at a later step.
Legs (make 2)
W= with white yarn; LG= with light gray yarn; DG= with dark gray yarn
01. W: Chain 3 Start: inc in 2nd ch from hook, sc 5 in the last ch. Working on opposite side of chain base, sc 3 in the last ch [10]
02. inc, sc 2, *inc* 3 times, sc 2, *inc* 2 times [16]
03. inc, sc 4, *inc* 2 times, sc, inc, sc 4, *inc* 2 times, sc [22]
04. inc, sc 6, *inc, sc* 2 times, inc, sc 6, *inc, sc* 2 times [28]
05. inc, sc 8, inc, sc 2, inc, sc, inc, sc 8, inc, sc 2, inc, sc [34]
06 – 07. sc in each st around [34]
08. sc 28, *dec* 3 times [31]
09. *dec* 3 times, sc 21, *dec* 2 times [26]
10. *dec* 2 times, sc 22 [24]
11. sc 12, LG: sc 12 [24]
Fasten off W. We are done with this color for the remainder of the leg.
12. sc 17, dec, sc 5 [23]
13. sc 12, DG: sc 11 [23]
14. sc 12, LG: sc 9, dec [22]
15. sc in each st around [22]
16. sc 10, dec, sc, DG: sc 9 [21]
17. sc 12, LG: sc 9 [21]
18. sc 19, dec [20]
19. sc 13, DG: sc 7 [20]
Fasten off and leave a 12-inch (30 cm) yarn tail. Stuff the tail. Press the final round together and Slip Stitch Closed, then hide the remaining yarn tail inside the work. The tail is now ready to attach as you crochet the body at a later step.
Arms (make 2)
W= with white yarn; LG= with light gray yarn; DG= with dark gray yarn
01. W: start 6 sc into a Magic Ring [6]
02. inc in each st around [12]
03. *sc, inc* 6 times [18]
04. sc, inc, *sc 2, inc* 5 times, sc [24]
05 – 06. sc in each st around [24]
07. sc 2, dec, sc 16, dec, sc 2 [22]
08. sc, dec, sc 16, dec, sc [20]
09. sc 12, LG: sc 8 [20]
Fasten off W. We are done with this color for the remainder of the arm.
10. LG: sc 9, dec, sc 9 [19]
11. sc 11, DG: sc 8 [19]
12. sc 11, LG: sc 6, dec [18]
13. sc in each st around [18]
14. sc 8, dec, sc 2, DG: sc 6 [17]
15. sc 11, LG: sc 6 [17]
16. sc 15, dec [16]
17. sc 11, DG: sc 5 [16]
18. sc 7, dec, sc 2, LG: sc 5 [15]
19. sc in each st around [15]
20. sc 11, DG: sc 2, dec [14]
21. sc 11, LG: sc 3 [14]
22. sc 6, dec, sc 6 [13]
23. sc 11, DG: sc 2 [13]
24. sc 11, LG: dec [12]
25 – 26. sc in each st around [12]
Fasten off and leave a 12-inch (30 cm) yarn tail. Stuff the arm. Press the final round together and Slip Stitch Closed, then hide the remaining yarn tail inside the work. The arms are now ready to attach as you crochet the body at a later step.
Body
W= with white yarn; LG= with light gray yarn; DG= with dark gray yarn
01. LG: start 6 sc into a Magic Ring [6]
02. inc in each st around [12]
03. *sc, inc* 6 times [18]
04. sc, inc, *sc 2, inc* 5 times, sc [24]
05. *sc 3, inc* 6 times [30]
06. sc 2, inc, *sc 4, inc* 5 times, sc 2 [36]
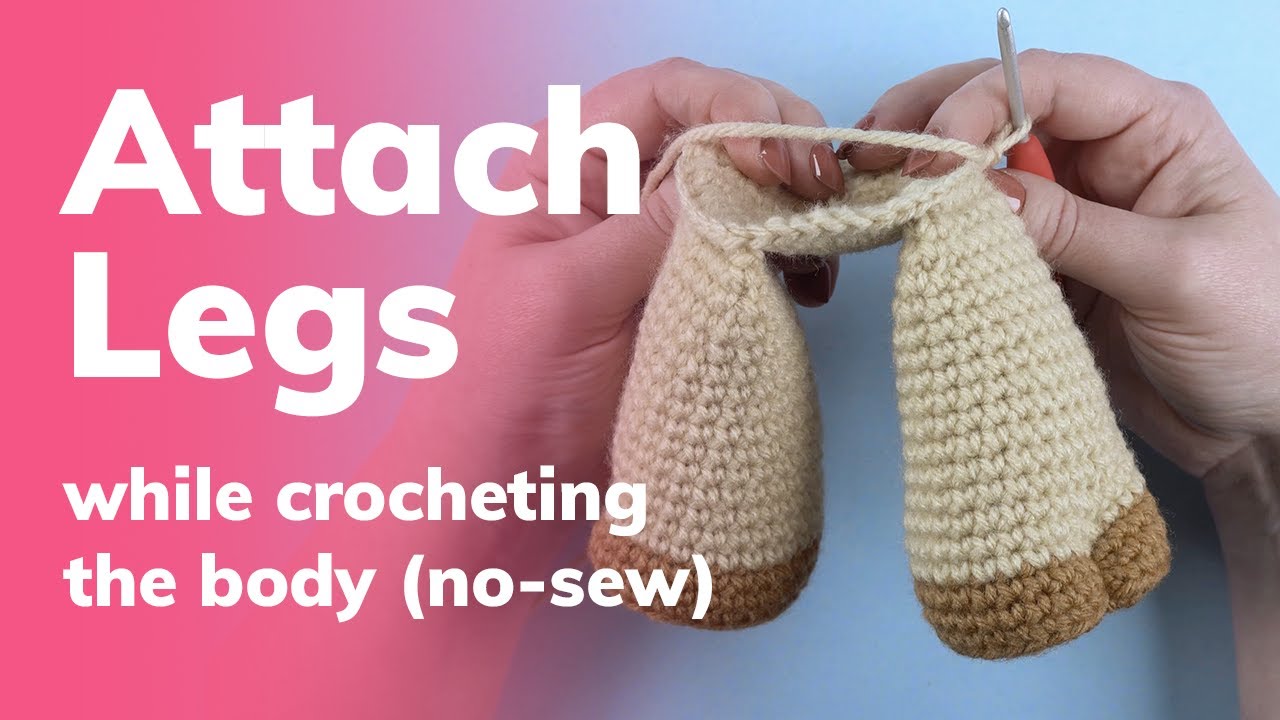
Attaching the Legs: Attach the legs as you crochet the next round. To view a tutorial, watch my How to Attach Legs | No-Sew Method video.
07. attach the first leg: (sc 5, inc), sc 5, inc, attach the second leg: (sc 5, inc), *sc 5, inc* 3 times [42]
08. sc 3, inc, *sc 6, inc* 3 times, DG: sc 6, inc, sc 5, LG: sc, inc, sc 3 [48]
09. sc 7, inc, sc 2, W: sc 3, LG: sc 2, inc, *sc 7, inc* 4 times [54]
10. sc 4, inc, sc 5, W: sc 3, inc, sc, LG: sc 7, inc, *sc 8, inc* 3 times, sc 4 [60]
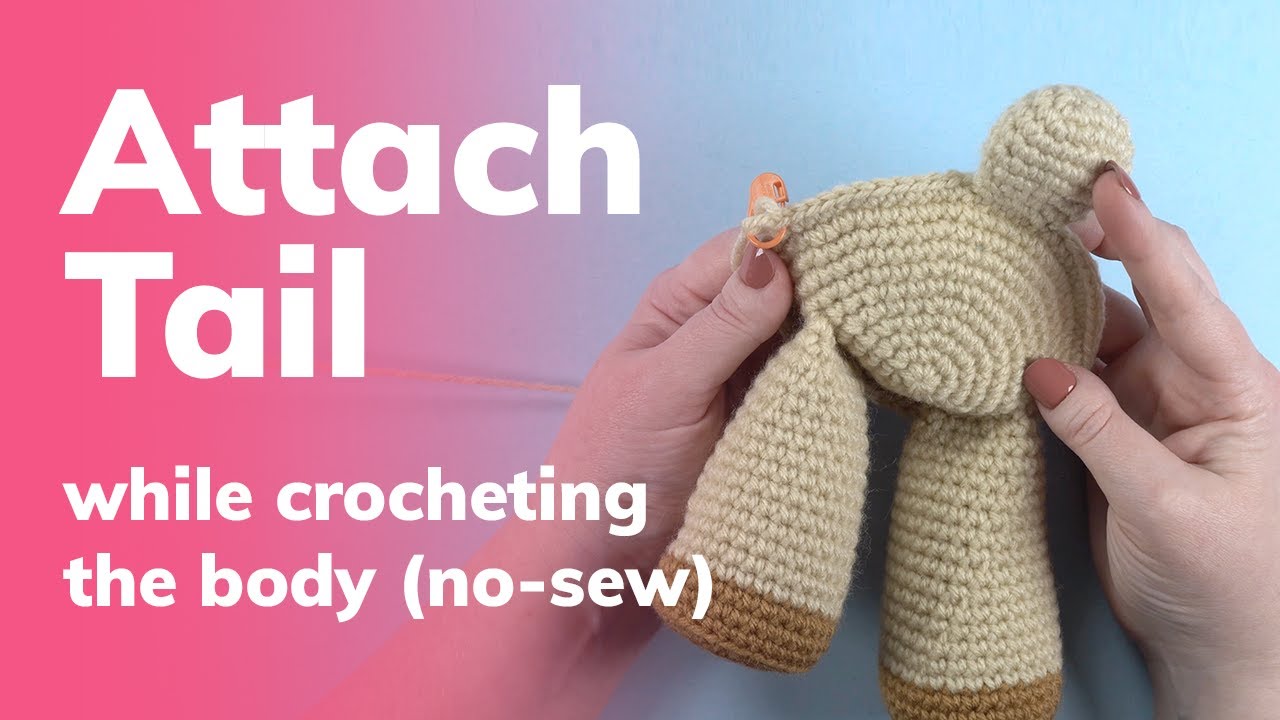
Attaching the Tail: Attach the tail as you crochet the next round. To view a tutorial, watch my Attach Tail video.
11. sc 11, W: sc 7, LG: sc 2, DG: sc 22, attach the tail: (sc 5), sc 13 [60]
At the end of round 11, the tail should appear centered between the legs on the back. If the tail appears off center, redo the round and adjust the placement of the tail as necessary.
12. sc 8, LG: sc 2, W: sc 9, LG: 41 [60]
13. sc 10, W: sc 10, LG: sc 40 [60]
14. sc 10, W: sc 11, LG: sc 2, DG: sc 37 [60]
15. sc 8, LG: sc 2, W: sc 11, LG: sc 39 [60]
16. sc 10, W: sc 11, LG: sc 39 [60]
17. sc 10, W: sc 12, LG: sc 2, DG: sc 36 [60]
18. sc 4, dec, sc 2, LG: sc 2, W: sc 4, dec, sc 6, LG: sc 2, dec, *sc 8, dec* 3 times, sc 4 [54]
19. sc 9, W: sc 11, LG: 34 [54]
20. sc 7, dec, sc, W: sc 6, dec, sc 2, LG: sc 2, DG: sc 3, dec, *sc 7, dec* 3 times [48]
21. sc 7, LG: sc 2, W: sc 9, LG: sc 30 [48]
22. sc 3, dec, sc 4, W: sc 2, dec, sc 5, LG: sc, dec, *sc 6, dec* 3 times, sc 3 [42]
23. sc 9, W: sc 7, LG: sc 2, DG: sc 24 [42]
24. sc 7, LG: sc 2, W: sc 7, LG: 26 [42]
25. sc 5, dec, sc 3, W: sc 2, dec, sc 2, LG: sc 3, dec, *sc 5, dec* 3 times [36]
26. sc 10, W: sc 4, LG: sc 2, DG: sc 20 [36]
27. sc 8, LG: sc 28 [36]
28. sc 2, dec, *sc 4, dec* 5 times, sc 2 [30]29. sc 22, DG: sc 8 [30]
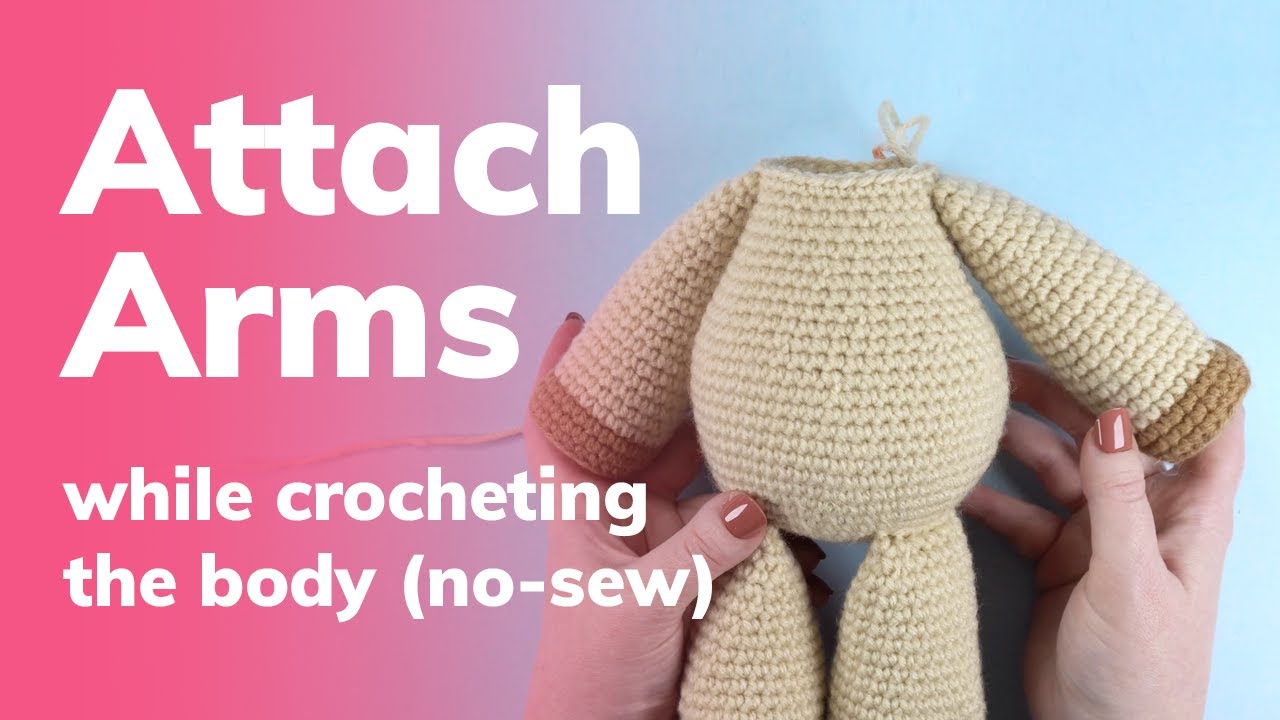
Attaching the Arms: Attach the arms as you crochet the next round. To view a tutorial, watch my How to Attach Arms | No-Sew Method video.
30. LG: sc, attach the first arm: (sc 6), sc 8, attach the second arm: (sc 6), sc 9 [30]
At the end of round 30, the arms should appear centered above the legs. If your arms appear off center, redo the round and adjust the placement of the arms as necessary.
Stuff the body.
31. *sc 3, dec* 6 times [24]
Fasten off and leave a tail the length of your arm span (~65 in / ~165 cm).
Sewing the Body to the Head: To view a tutorial, watch my How to Sew Body to Head video.
Sophie the Siamese Cat
Height: 14 inches (36 cm) standing Skill Level: Intermediate Terms: US 🇺🇸Sophie the Siamese is the ultimate cuddle companion. Curl up on the couch with her, and she’ll be your best friend fur-ever!
Supplies
- 3.5mm (E-4) hook
- (2) 15mm safety eyes
- Stitch markers
- Yarn needle
- Scissors
- Straight pins
- Fiber fill
- Fishing line (60 in / 152 cm)
- Disappearing ink marker
237 yards of acrylic (weight 4) yarn:
- Pink – 4 yards (4m / 2g)
- Light Brown – 132 yards (120m / 73g)
- Medium Brown – 99 yards (91m / 55g)
- Dark Brown – 2 yards (2m / 1g)
Notes
Steps to complete this pattern
- Crochet the Ears
- Crochet the Head
- Embroider the Nose
- Add Whiskers
- Crochet the Tail
- Crochet the Legs
- Crochet the Arms
- Crochet the Body
- Sew the Head to the Body
Abbreviations
- ch – chain
- sc – single crochet
- inc – complete two single crochets within the same stitch
- dec – combine two stitches into one with an invisible decrease
- *sc x* – repeat the instructions between asterisks(*) the indicated number of times
- (sc x) – attach a body part while completing the stitches inside parentheses as instructed by the pattern
- {x, y} – complete the stitches listed in the curly brackets within the same stitch
General Instructions
- This pattern is worked in continuous rounds without joining.
- Use a stitch marker to mark the end of each round. Move the marker up each round.
Video Tutorials
I’ve made lots of video tutorials that will be referenced throughout this pattern. They will be marked with a clickable play button symbol. A full list of tutorials can be found in the video tutorials section of the pattern.
Instructions
Ears (make 2)
MB = with medium brown yarn; P = with pink yarn
01. MB: start 6 sc into a Magic Ring [6]
02. *sc, inc* 3 times [9]
03. sc, P: inc, MB: *sc 2, inc* 2 times, sc [12]
04. sc, P: sc 2, {P, MB} in same st, MB: *sc 3, inc* 2 times [15]
05. sc, P: sc 4, MB: sc 10 [15]
06. sc, P: sc, inc, sc 2, MB: sc 2, inc, sc 4, inc, sc 2 [18]
07 – 08. sc, P: sc 6, MB: sc 11 [18]
09. sc, P: sc 7, MB: inc, sc 8, inc [20]
10. sc, P: sc 7, MB: sc 12 [20]
Fasten off, leaving an 18-inch (46 cm) yarn tail in MB. Do not stuff. Press the final round together and Slip Stitch Closed, then hide the remaining yarn tail inside the work. The ears are now ready to attach as you crochet the head at a later step.
Head
With medium brown yarn:
01. Chain 3 Start: inc in 2nd ch from hook, sc 5 in the last ch. Working on opposite side of chain base, sc 3 in the last ch [10]
02. inc, sc 2, *inc* 3 times, sc 2, *inc* 2 times [16]
03. inc, sc 4, *inc* 2 times, sc, inc, sc 4, *inc* 2 times, sc [22]
04. inc, sc 6, *inc, sc* 2 times, inc, sc 6, *inc, sc* 2 times [28]
05. sc 11, inc, sc 15, inc [30]
06 – 07. sc in each st around [30]
08. *sc 3, dec* 6 times [24]
09. *sc, inc* 12 times [36]
10. *sc 5, inc* 6 times [42]
11. sc 3, inc, *sc 6, inc* 5 times, sc 3 [48]
12. *sc 7, inc* 6 times [54]
Marking Stitches for the Eyes: Insert two markers 18 stitches apart between rounds 11 & 12 (see Figure 1). These markers will show you where to place your safety eyes at a later step.
13. sc 4, inc, *sc 8, inc* 3 times, sc 7, switch to light brown yarn: sc, inc, sc 8, inc, sc 4 [60]
14 – 18. sc in each st around [60]
Attaching the Ears: Attach the ears as you crochet the next round. To view a tutorial, watch my How to Attach Ears video. You do not need to use stitch markers as shown in the video.
19. sc, attach the first ear: (sc 10), sc 7, attach the second ear: (sc 10), sc 32 [60]
At the end of round 19, the ears should appear centered on the top of the head. If your ears appear off center, redo the round and adjust the placement of the ears as necessary.
20 – 23. sc in each st around [60]
24. sc 4, dec, *sc 8, dec* 5 times, sc 4 [54]
25. *sc 7, dec* 6 times [48]
26. sc 3, dec, *sc 6, dec* 5 times, sc 3 [42]
27. *sc 5, dec* 6 times [36]
28. sc 2, dec, *sc 4, dec* 5 times, sc 2 [30]
Stuff head ¾ full and create the eye indents. Insert safety eyes and secure backings. To view a tutorial, watch my Indent Eyes video.
29. *sc 3, dec* 6 times [24]
30. sc, dec, *sc 2, dec* 5 times, sc [18]
31. *sc, dec* 6 times [12]
Finish stuffing.
32. *dec* 6 times [6]
Close with an Ultimate Finish.
Embroidering the Nose: Using straight pins, mark the four corners of the nose (see Figure 2).
The bottom should be two stitches across, centered in the Chain 3 Start. The top should be five stitches across between rounds 3 & 4.
Using a 36-inch (90 cm) strand of dark brown yarn and yarn needle, embroider the nose.
Work through each stitch along bottom a total of seven/eight times, and each stitch along the top a total of three times (see Figure 3).
To view a tutorial, watch my Embroider Nose video.
Adding Whiskers: Cut fishing line into (6) 10-inch (25 cm) strands. Fold one strand in half, forming a loop. Insert the hook into a stitch on either side of nose, and pull loop through stitch. Yarn over the loose ends of strand and pull through the loop. Secure the whisker in place with a knot. Repeat for remaining whiskers.
To view a tutorial, watch my Whiskers video.
Tail
With medium brown yarn:
01. start 6 sc into a Magic Ring [6]
02. inc in each st around [12]
03 – 06. sc in each st around [12]
07 – 11. dec, sc 3, *inc* 2 times, sc 3, dec [12]
12 – 18. sc in each st around [12]
19. dec, sc 8, dec [10]
Fasten off and leave a 12-inch (30 cm) yarn tail. Stuff the tail. Press the final round together and Slip Stitch Closed, then hide the remaining yarn tail inside the work. The tail is now ready to attach as you crochet the body at a later step.
Legs (make 2)
With medium brown yarn:
01. Chain 3 Start: inc in 2nd ch from hook, sc 5 in the last ch. Working on opposite side of chain base, sc 3 in the last ch [10]
02. inc, sc 2, *inc* 3 times, sc 2, *inc* 2 times [16]
03. inc, sc 4, *inc* 2 times, sc, inc, sc 4, *inc* 2 times, sc [22]
04. inc, sc 6, *inc, sc* 2 times, inc, sc 6, *inc, sc* 2 times [28]
05. inc, sc 8, inc, sc 2, inc, sc, inc, sc 8, inc, sc 2, inc, sc [34]
06 – 07. sc in each st around [34]
08. sc 28, *dec* 3 times [31]
09. *dec* 3 times, sc 21, *dec* 2 times [26]
10. *dec* 2 times, sc 22 [24]
11. sc in each st around [24]
12. sc 11, dec, sc 11 [23]
13. sc in each st around [23]
14. sc 12, switch to light brown yarn: sc 9, dec [22]
15. sc in each st around [22]
16. sc 10, dec, sc 10 [21]
17. sc in each st around [21]
18. sc 19, dec [20]
19. sc in each st around [20]
20. sc 9, dec, sc 9 [19]
21. sc 17, dec [18]
22. *sc 7, dec* 2 times [16]
23. *sc 2, dec* 4 times [12]
Fasten off and leave a 12-inch (30 cm) yarn tail. Stuff the leg. Press the final round together and Slip Stitch Closed, then hide the remaining yarn tail inside the work. The legs are now ready to attach as you crochet the body at a later step.
Arms (make 2)
With medium brown:
01. start 6 sc into a Magic Ring [6]
02. inc in each st around [12]
03. *sc, inc* 6 times [18]
04. sc, inc, *sc 2, inc* 5 times, sc [24]
05 – 06. sc in each st around [24]
07. sc 2, dec, sc 16, dec, sc 2 [22]
08. sc, dec, sc 16, dec, sc [20]
09. sc in each st around [20]
10. sc 9, dec, sc 9 [19]
11. sc in each st around [19]
12. sc 17, dec [18]
13. sc in each st around [18]
14. sc 8, dec, sc 8 [17]
15. sc in each st around [17]
16. sc 11, switch to light brown yarn: sc 4, dec [16]
17. sc in each st around [16]
18. sc 7, dec, sc 7 [15]
19. sc in each st around [15]
20. sc 13, dec [14]
21. sc in each st around [14]
22. sc 6, dec, sc 6 [13]
23. sc in each st around [13]
24. sc 11, dec [12]
25 – 26. sc in each st around [12]
Fasten off and leave a 12-inch (30 cm) yarn tail. Stuff the arm. Press the final round together and Slip Stitch Closed, then hide the remaining yarn tail inside the work. The arms are now ready to attach as you crochet the body at a later step.
Body
With light brown yarn:
01. start 6 sc into a Magic Ring [6]
02. inc in each st around [12]
03. *sc, inc* 6 times [18]
04. sc, inc, *sc 2, inc* 5 times, sc [24]
05. *sc 3, inc* 6 times [30]
06. sc 2, inc, *sc 4, inc* 5 times, sc 2 [36]
Attaching the Legs: Attach the legs as you crochet the next round. To view a tutorial, watch my How to Attach Legs | No-Sew Method video.
07. attach the first leg: (sc 5, inc), sc 5, inc, attach the second leg: (sc 5, inc), *sc 5, inc* 3 times [42]
08. sc 3, inc, *sc 6, inc* 5 times, sc 3 [48]
09. *sc 7, inc* 6 times [54]
10. sc 4, inc, *sc 8, inc* 5 times, sc 4 [60]
Attaching the Tail: Attach the tail as you crochet the next round. To view a tutorial, watch my Attach Tail video.
11. sc 42, attach the tail: (sc 5), sc 13 [60]
At the end of round 11, the tail should appear centered between the legs on the back. If the tail appears off center, redo the round and adjust the placement of the tail as necessary.
12 – 17. sc in each st around [60]
18. sc 4, dec, *sc 8, dec* 5 times, sc 4 [54]
19. sc in each st around [54]
20. *sc 7, dec* 6 times [48]
21. sc in each st around [48]
22. sc 3, dec, *sc 6, dec* 5 times, sc 3 [42]
23 – 24. sc in each st around [42]
25. *sc 5, dec* 6 times [36]
26 – 27. sc in each st around [36]
28. sc 2, dec, *sc 4, dec* 5 times, sc 2 [30]
29. sc in each st around [30]
Attaching the Arms: Attach the arms as you crochet the next round. To view a tutorial, watch my How to Attach Arms | No-Sew Method video.
30. sc, attach the first arm: (sc 6), sc 8, attach the second arm: (sc 6), sc 9 [30]
At the end of round 30, the arms should appear centered above the legs. If your arms appear off center, redo the round and adjust the placement of the arms as necessary.
Stuff the body.
31. *sc 3, dec* 6 times [24]
Fasten off and leave a tail the length of your arm span (~65 in / ~165 cm).
Sewing the Body to the Head: To view a tutorial, watch my How to Sew Body to Head video.
Callie the Calico Cat
Height: 14 inches (36 cm) standing Skill Level: Intermediate Terms: US 🇺🇸Callie the Calico is a frisky feline looking for some fun! Batting at yarn and rolling in catnip is her idea of a purr-fect afternoon.
Supplies
- 3.5mm (E-4) hook
- (2) 15mm safety eyes
- Stitch markers
- Yarn needle
- Scissors
- Straight pins
- Fiber fill
- Fishing line (60 in / 152 cm)
- Disappearing ink marker
234 yards of acrylic (weight 4) yarn:
Notes
Steps to complete this pattern
- Crochet the Ears
- Crochet the Head
- Embroider the Nose
- Add Whiskers
- Crochet the Tail
- Crochet the Legs
- Crochet the Arms
- Crochet the Body
- Sew the Head to the Body
Abbreviations
- ch – chain
- sc – single crochet
- inc – complete two single crochets within the same stitch
- dec – combine two stitches into one with an invisible decrease
- *sc x* – repeat the instructions between asterisks(*) the indicated number of times
- (sc x) – attach a body part while completing the stitches inside parentheses as instructed by the pattern
- {x, y} – complete the stitches listed in the curly brackets within the same stitch
General Instructions
- This pattern is worked in continuous rounds without joining.
- Use a stitch marker to mark the end of each round. Move the marker up each round.
Video Tutorials
I’ve made lots of video tutorials that will be referenced throughout this pattern. They will be marked with a clickable play button symbol. A full list of tutorials can be found in the video tutorials section of the pattern.
Instructions
Ears (make 2)
M = with main color yarn (orange for Ear 1; brown for Ear 2); P = with pink yarn
01. M: start 6 sc into a Magic Ring [6]
02. *sc, inc* 3 times [9]
03. sc, P: inc, M: *sc 2, inc* 2 times, sc [12]
04. sc, P: sc 2, {P, M} in same st, M: *sc 3, inc* 2 times [15]
05. sc, P: sc 4, M: sc 10 [15]
06. sc, P: sc, inc, sc 2, M: sc 2, inc, sc 4, inc, sc 2 [18]
07 – 08. sc, P: sc 6, M: sc 11 [18]
09. sc, P: sc 7, M: inc, sc 8, inc [20]
10. sc, P: sc 7, M: sc 12 [20]
Fasten off, leaving an 18-inch (46 cm) yarn tail in M. Do not stuff. Press the final round together and Slip Stitch Closed, then hide the remaining yarn tail inside the work. The ears are now ready to attach as you crochet the head at a later step.
Head
W = with white yarn; O = with orange yarn; B = with brown yarn
01. W: Chain 3 Start: inc in 2nd ch from hook, sc 5 in the last ch. Working on opposite side of chain base, sc 3 in the last ch [10]
02. inc, sc 2, *inc* 3 times, sc 2, *inc* 2 times [16]
03. inc, sc 4, *inc* 2 times, sc, inc, sc 4, *inc* 2 times, sc [22]
04. inc, sc 6, *inc, sc* 2 times, inc, sc 6, *inc, sc* 2 times [28]
05. sc 11, inc, sc 15, inc [30]
06 – 07. sc in each st around [30]
08. *sc 3, dec* 6 times [24]
09. *sc, inc* 12 times [36]
10. *sc 5, inc* 6 times [42]
11. sc 3, inc, sc 6, O: inc, sc 6, inc, W: *sc 6, inc* 3 times, sc 3 [48]
12. sc 7, inc, sc 3, O: sc 4, inc, sc 6, W: sc, inc, *sc 7, inc* 3 times [54]
Marking Stitches for the Eyes: Insert two markers 18 stitches apart between rounds 11 & 12 (see Figure 1). These markers will show you where to place your safety eyes at a later step.
13. sc 4, inc, sc 6, O: sc 2, inc, sc 8, inc, sc 2, W: sc 6, inc, *sc 8, inc* 2 times, sc 4 [60]
14. sc 11, O: sc 18, W: sc 31 [60]
15. sc 3, B: sc 5, W: sc 3, O: sc 19, W: sc 30 [60]
16. sc 2, B: sc 8, W: sc, O: sc 20, W: sc 29 [60]
17 – 18. B: sc 11, O: sc 21, W: sc 28 [60]
Attaching the Ears: Attach the ears as you crochet the next round. To view a tutorial, watch my How to Attach Ears video. You do not need to use stitch markers as shown in the video.
19. B: sc, attach the brown ear: (sc 10), sc, O: sc 6, attach the orange ear: (sc 10), sc 4, W: sc 28 [60]
At the end of round 19, the ears should appear centered on the top of the head. If your ears appear off center, redo the round and adjust the placement of the ears as necessary.
20. B: sc 12, O: sc 20, W: sc 28 [60]
21. sc, B: sc 11, O: sc 20, W: sc 28 [60]
22. sc 2, B: sc 10, O: sc 20, W: sc 28 [60]
23. sc 3, B: sc 9, O: 20, W: 28 [60]
24. sc 4, B: dec, sc 5, W: sc 2, O: sc, dec, sc 8, dec, sc 6, W: sc 2, dec, *sc 8, dec* 2 times, sc 4 [54]
25. sc 7, dec, sc 3, O: sc 4, dec, sc 7, dec, sc 2, W: sc 5, dec, *sc 7, dec* 2 times [48]
26. sc 3, dec, sc 6, O: dec, sc 6, dec, sc 5, W: sc, dec, *sc 6, dec* 2 times, sc 3 [42]
27. sc 5, dec, sc 4, O: sc, dec, sc 5, dec, sc, W: sc 4, dec, *sc 5, dec* 2 times [36]
28. sc 2, dec, sc 4, dec, sc, O: sc 3, dec, sc 2, W: sc 2, dec, *sc 4, dec* 2 times, sc 2 [30]
Stuff head ¾ full and create the eye indents. Insert safety eyes and secure backings. To view a tutorial, watch my Indent Eyes video.
29. *sc 3, dec* 2 times, O: sc 3, W: dec, *sc 3, dec* 3 times [24]
30. sc, dec, *sc 2, dec* 5 times, sc [18]
31. *sc, dec* 6 times [12]
Finish stuffing.
32. *dec* 6 times [6]
Close with an Ultimate Finish.
Embroidering the Nose: Using straight pins, mark the four corners of the nose (see Figure 2).
The bottom should be two stitches across, centered in the Chain 3 Start. The top should be five stitches across between rounds 3 & 4.
Using a 36-inch (90 cm) strand of dark brown yarn and yarn needle, embroider the nose.
Work through each stitch along bottom a total of seven/eight times, and each stitch along the top a total of three times (see Figure 3).
To view a tutorial, watch my Embroider Nose video.
Adding Whiskers: Cut fishing line into (6) 10-inch (25 cm) strands. Fold one strand in half, forming a loop. Insert the hook into a stitch on either side of nose, and pull loop through stitch. Yarn over the loose ends of strand and pull through the loop. Secure the whisker in place with a knot. Repeat for remaining whiskers.
To view a tutorial, watch my Whiskers video.
Tail
With brown yarn:
01. start 6 sc into a Magic Ring [6]
02. inc in each st around [12]
03 – 06. sc in each st around [12]
07 – 11. dec, sc 3, *inc* 2 times, sc 3, dec [12]
12 – 16. switch to white yarn: sc in each st around [12]
17 – 18. switch to orange yarn: sc in each st around [12]
19. dec, sc 8, dec [10]
Fasten off and leave a 12-inch (30 cm) yarn tail. Stuff the tail. Press the final round together and Slip Stitch Closed, then hide the remaining yarn tail inside the work. The tail is now ready to attach as you crochet the body at a later step.
Leg 1
W = with white yarn; O = with orange yarn
01. W: Chain 3 Start: inc in 2nd ch from hook, sc 5 in the last ch. Working on opposite side of chain base, sc 3 in the last ch [10]
02. inc, sc 2, *inc* 3 times, sc 2, *inc* 2 times [16]
03. inc, sc 4, *inc* 2 times, sc, inc, sc 4, *inc* 2 times, sc [22]
04. inc, sc 6, *inc, sc* 2 times, inc, sc 6, *inc, sc* 2 times [28]
05. inc, sc 8, inc, sc 2, inc, sc, inc, sc 8, inc, sc 2, inc, sc [34]
06 – 07. sc in each st around [34]
08. sc 28, *dec* 3 times [31]
09. *dec* 3 times, sc 21, *dec* 2 times [26]
10. *dec* 2 times, sc 22 [24]
11. sc 5, O: sc 2, W: sc 17 [24]
12. sc 5, O: sc 3, W: sc 3, dec, sc 11 [23]
13. sc 4, O: sc 5, W: sc 12, dec [22]
14. sc 4, O: sc 5, W: sc 13 [22]
15. sc 4, O: sc 6, W: sc 12 [22]
16. sc 3, O: sc 7, W: dec, sc 10 [21]
17. sc 3, O: sc 7, W: sc 11 [21]
18. sc 3, O: sc 8, W: sc 8, dec [20]
19. sc 3, O: sc 9, W: sc 8 [20]
20. sc 3, O: sc 6, dec, sc, W: sc 8 [19]
21. sc 3, O: sc 9, W: sc 5, dec [18]
22. sc 3, O: sc 4, dec, sc 4, W: sc 3, dec [16]
23. sc 3, O: dec, sc, dec, sc 2, dec, sc, W: sc, dec [12]
Fasten off and leave a 12-inch (30 cm) yarn tail. Stuff the leg. Press the final round together and Slip Stitch Closed, then hide the remaining yarn tail inside the work. The legs are now ready to attach as you crochet the body at a later step.
Leg 2
With white yarn:
Chain 3 Start: inc in 2nd ch from hook, sc 5 in the last ch. Working on opposite side of chain base, sc 3 in the last ch [10]
02. inc, sc 2, *inc* 3 times, sc 2, *inc* 2 times [16]
03. inc, sc 4, *inc* 2 times, sc, inc, sc 4, *inc* 2 times, sc [22]
04. inc, sc 6, *inc, sc* 2 times, inc, sc 6, *inc, sc* 2 times [28]
05. inc, sc 8, inc, sc 2, inc, sc, inc, sc 8, inc, sc 2, inc, sc [34]
06 – 07. sc in each st around [34]
08. sc 28, *dec* 3 times [31]
09. *dec* 3 times, sc 21, *dec* 2 times [26]
10. *dec* 2 times, sc 22 [24]
11. sc in each st around [24]
12. sc 11, dec, sc 11 [23]
13. sc 12, switch to brown yarn: sc 11 [23]
14. sc 21, dec [22]
15. sc in each st around [22]
16. sc 10, dec, sc 10 [21]
17. sc in each st around [21]
18. sc 19, dec [20]
19. sc in each st around [20]
20. sc 9, dec, sc 9 [19]
21. sc 17, dec [18]
22. *sc 7, dec* 2 times [16]
23. *sc 2, dec* 4 times [12]
Fasten off and leave a 12-inch (30 cm) yarn tail. Stuff the leg. Press the final round together and Slip Stitch Closed, then hide the remaining yarn tail inside the work. The legs are now ready to attach as you crochet the body at a later step.
Arms (make 2)
W = with white yarn; Main color yarn = orange for Arm 1; brown for Arm 2
01. W: start 6 sc into a Magic Ring [6]
02. inc in each st around [12]
03. *sc, inc* 6 times [18]
04. sc, inc, *sc 2, inc* 5 times, sc [24]
05 – 06. sc in each st around [24]
07. sc 2, dec, sc 16, dec, sc 2 [22]
08. sc, dec, sc 16, dec, sc [20]
09. sc in each st around [20]
10. sc 9, dec, sc 9 [19]
11. sc in each st around [19]
12. sc 11, switch to main color yarn: sc 6, dec [18]
13. sc in each st around [18]
14. sc 8, dec, sc 8 [17]
15. sc in each st around [17]
16. sc 15, dec [60]
17. sc in each st around [16]
18. sc 7, dec, sc 7 [15]
19. sc in each st around [15]
20. sc 13, dec [14]
21. sc in each st around [14]
22. sc 6, dec, sc 6 [13]
23. sc in each st around [13]
24. sc 11, dec [12]
25 – 26. sc in each st around [12]
Fasten off and leave a 12-inch (30 cm) yarn tail. Stuff the arm. Press the final round together and Slip Stitch Closed, then hide the remaining yarn tail inside the work. The arms are now ready to attach as you crochet the body at a later step.
Body
W = with white yarn; O = with orange yarn; B = with brown yarn
01. W: start 6 sc into a Magic Ring [6]
02. inc in each st around [12]
03. *sc, inc* 2 times, sc, O: inc, *sc, inc* 2 times, W: sc, inc [18]
04. sc, inc, sc 2, inc, sc 2, O: inc, *sc 2, inc* 2 times, sc, W: sc, inc, sc [24]
05. B: sc 3, inc, W: sc 3, inc, sc 2, O: sc, inc, *sc 3, inc* 2 times, W: sc 3, B: inc [30]
06. sc 2, inc, sc 2, W: sc 2, inc, sc 4, O: inc, *sc 4, inc* 2 times, sc 2, W: sc 2, inc, B: sc 2 [36]
Attaching the Legs: Attach the legs as you crochet the next round. To view a tutorial, watch my How to Attach Legs | No-Sew Method video.
07. attach the brown leg: (sc 5, inc), sc, W: sc 4, inc, attach the orange leg: (sc 2, O: sc 3, inc), *sc 5, inc* 2 times, W: sc 4, B: sc, inc [42]
08. sc 3, inc, sc 4, W: sc 2, inc, sc 5, O: sc, inc, *sc 6, inc* 2 times, sc 3, W: sc 3, inc, sc, B: sc 2 [48]
09. sc 7, inc, sc, W: sc 6, inc, sc 2, O: sc 5, inc, *sc 7, inc* 2 times, W: sc 7, inc [54]
10. B: sc 4, inc, sc 3, W: sc 5, inc, sc 6, O: sc 2, inc, *sc 8, inc* 2 times, sc 3, W: sc 5, inc, sc 4 [60]
Attaching the Tail: Attach the tail as you crochet the next round. To view a tutorial, watch my Attach Tail video.
11. sc 2, B: sc5, W: sc 15, O: sc20, attach the tail: (sc5), sc, W: sc 12 [60]
At the end of round 11, the tail should appear centered between the legs on the back. If the tail appears off center, redo the round and adjust the placement of the tail as necessary.
12. sc 17, B: sc 5, O: sc 27, W: sc 11 [60]
13. sc 15, B: sc 8, O: sc 25, W: sc 10, O: sc 2 [60]
14. sc, W: sc 14, B: sc 10, O: sc 21, W: sc 11, O: sc 3 [60]
15. sc 3, W: sc 13, B: sc 10, O: sc 19, W: sc 12, O: sc 3 [60]
16. sc 7, W: sc 10, B: sc 9, O: sc 12, W: sc 19, O: sc 3 [60]
17. sc 9, W: sc 9, B: sc 8, W: sc 3, O: sc 8, W: sc 20, O: sc 3 [60]
18. sc 4, dec, sc 4, W: sc 4, dec, sc 3, B: sc 5, dec, W: *sc 8, dec* 3 times, sc, O: sc 3 [54]
19. sc 10, W: sc 8, B: sc 4, W: sc 28, O: sc 4 [54]
20. sc 7, dec, sc 2, W: sc 5, dec, *sc 7, dec* 3 times, sc 5, O: sc 2, dec [48]
21. sc 10, W: sc 34, O: sc 4 [48]
22. sc 3, dec, sc 5, W: sc, dec, *sc 6, dec* 3 times, sc 6, O: dec, sc 3 [42]
23. sc 9, W: sc 29, O: sc 4 [42]
24. sc 10, W: 28, O: sc 4 [42]
25. sc 5, dec, sc 4, W: sc, dec, *sc 5, dec* 3 times, sc 2, O: sc 3, dec [36]
26. sc 11, W: sc 21, O: sc 4 [36]
27. sc 12, W: sc 20, O: sc 4 [36]
28. sc 2, dec, sc 4, dec, sc 3, W: sc, dec, *sc 4, dec* 2 times, sc 4, O: dec, sc 2 [30]
29. sc 12, W: sc 15, O: sc 3 [30]
Attaching the Arms: Attach the arms as you crochet the next round. To view a tutorial, watch my How to Attach Arms | No-Sew Method video.
30. sc, attach orange arm: (sc 6), sc 7, attach brown arm: (sc 6), W: sc 6, O: sc 3 [30]
At the end of round 30, the arms should appear centered above the legs. If your arms appear off center, redo the round and adjust the placement of the arms as necessary.
Stuff the body.
31. *sc 3, dec* 3 times, B: sc 3, dec, sc, W: sc 2, dec, sc 2, O: sc, dec [24]
Fasten off and leave a tail the length of your arm span (~65 in / ~165 cm).
Sewing the Body to the Head: To view a tutorial, watch my How to Sew Body to Head video.