Crochet Dinosaur – Free Amigurumi Pattern

Dan the Dino has no color changes, and requires very little sewing. What a sight for saur eyes! This crochet dinosaur is 10.5″ tall when made with a 3.5mm hook & worsted-weight yarn.

This post may contain affiliate links. Please read my disclosure policy.
Pinterest Hidden ImagePinterest Hidden Image
Crochet Dinosaur Free Amigurumi Pattern

This dinosaur crochet pattern has been in the works for a year now, and I’m so glad to have it finished!

My goal was to make a 100% no-sew dinosaur. I made countless prototypes—some crocheted tail-to-nose, some nose-to-tail—but they never looked quite right.

I finally tried making the tail separately and sewing it on. It looked so much better and I was much happier with the final result. I’m bummed I couldn’t make this dinosaur amigurumi pattern zero-sew, but I’m still calling it a win.

There are no color changes, it requires very little sewing overall, and works up super fast!

Dinosaur Free Amigurumi Crochet Pattern

Making this crochet dinosaur pushed me out of my comfort zone.

When I started making patterns, I was afraid to attempt anything other than basic, symmetrical shapes.

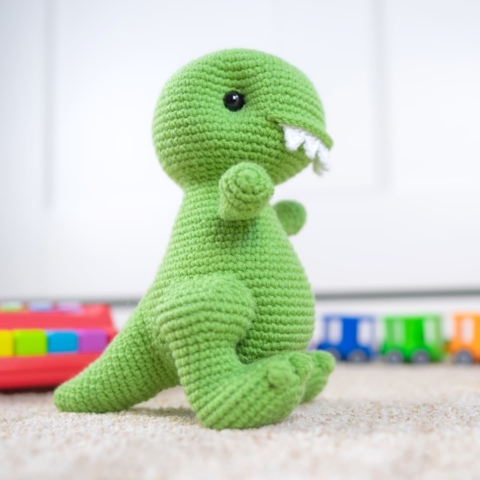
While there is nothing wrong with that, I envisioned something much more dynamic than basic nubs for this dinosaur’s legs/feet.

I also wanted to give the tail a subtle upward curve, similar to a cornucopia. Creating those “irregular” shapes was a bit of a challenge, and I’m really proud of how everything turned out!

Crochet Dinosaur Free Amigurumi Pattern

Customize your crochet dinosaur and make it your own.

My goal was to keep this pattern simple & easy, but I imagined a lot of fun embellishments as I was making my dino. Feel free to add them if you’re feeling ambitious:

  • Add some spikes down the back. I’ve added optional instructions for how to make spikes at the bottom of the pattern!
  • Add a belly patch. The belly from my free lion crochet pattern would work great.
  • Add some spots. You can use the spots from my free giraffe crochet pattern, though I don’t think there would be room for spots if you’re adding the spikes & belly patch.
  • Turn the “toes” into “claws” by crocheting the bobbles on the feet with white yarn. Adding that extra bit of visual interest would look great!

I hope you enjoy making this dinosaur as much as I did designing it. Happy crocheting!

Crochet Dinosaur Free Amigurumi Pattern

Dan the Dinosaur

Height: 10.5" standing
Skill level: Intermediate
Terms: US 🇺🇸
Jurassic times call for Jurassic measures, but there's no need to be a nervous rex. Dan the Dino has no color changes, and requires very little sewing. What a sight for saur eyes!

Supplies

Yarn (acrylic, weight 4) – 198 total yards

Notes

Abbreviations
  • ch – chain
  • sc – single crochet
  • inc – complete two single crochets within the same stitch
  • dec – combine two stitches into one with an invisible decrease
  • hdc – half double crochet
  • dc – double crochet
  • bobble – 4 incomplete double crochets worked in the same st, then yarn over and pull through all 5 loops on your hook.
  • BLO – crochet in the back loop only
  • *sc x* – repeat the instructions between asterisks(*) the indicated number of times.
  • (sc x) – attach a body part while completing the stitches inside parentheses as instructed by the pattern.

General Instructions
  • This pattern is worked in one continuous spiral.
  • Use a stitch marker to keep track of where one round ends and the next begins. I prefer to place my stitch marker in the last stitch of the round.

Recommended Sequence
Here are the steps to create your dinosaur, in order:
  1. Crochet the Teeth
  2. Crochet the Arms
  3. Crochet the Legs
  4. Crochet the Tail
  5. Crochet the Head & Body
  6. Tack down the Legs
  7. Attach the Tail
  8. Add the Upper Lip

Crochet Video Tutorials

Making the Teeth
With white yarn, create a slip knot on your hook.
Chain 4. Single crochet in the second chain from your hook. Half double crochet in the next chain. Then double crochet in the last chain.
We’ve just created our first tooth. Without fastening off, we’re going to repeat this process 4 more times for a total of 5 teeth.
After you’ve crocheted all 5 teeth, chain 1, and make 3 single crochets across the top of each tooth, for a total of 15 single crochets.
Fasten off and secure the two yarn tails together. Your teeth are now ready to crochet onto the head at a later step.

Attaching the Teeth
At this point, you should have completed the teeth, and crocheted to the end of round 16 of the Head & Body.
To begin round 17, single crochet in the first 24 stitches.
In the back loop only, single crochet in the next 2 stitches.
Now align the teeth on the head. The wrong side of the work should be facing out, and the teeth should be upside down.
Insert your hook through the first stitch on the teeth, then in the back loop only of the next stitch on the head.
Complete a single crochet, then repeat this process all the way across the teeth for a total of 15 single crochets in the back loop only.
Now that the teeth are attached, single crochet in the back loop only of the next 2 stitches.
Complete the round by single crocheting through both loops of the remaining 23 stitches.

Indenting the Eyes
Note: This video shows a unicorn, but the technique is the same for all of my patterns.
Cut a strand of yarn approximately 18″ long. Tie a large, secure knot in one end and thread the other end through your yarn needle.
Insert your needle through the back opening of the head and sew between the two spots where you’ll be placing your safety eyes (marked with strands of yarn).
Pull your strand of yarn taut, which will create indents. Fasten off with a knot and hide your yarn tail inside the head.

Attaching the Arms
At this point, you should have two completed arms, ready to attach. You should also have your dinosaur crocheted to the end of round 31.
Start round 32 by single crocheting in the first 15 stitches of the round.
In the next 4 stitches, we’ll be attaching the arm. Insert your hook through the first slip stitch at the top of the arm, then through the next stitch of the round on the body, and complete a single crochet. Do this all the way across the top of the arm, for a total of 4 single crochets.
Single crochet in the next 8 stitches.
Now we’re going to attach the second arm using the same process we did for the first arm.
Single crochet in the 5 remaining stitches of the round. At the end of the round, you should have 36 stitches.

Attaching the Legs
At this point, you should have two completed legs, ready to attach. You should also have the Head & Body of your dinosaur crocheted to the end of round 38. In rounds 39 & 40, we’ll be attaching the legs.
To start round 39, single crochet in the first 48 stitches. We’ll be attaching the first leg in the last 6 stitches of the round. Align the top of the leg with the remaining 6 stitches of the round, and make sure the toes are facing the same direction as the face.
Insert your hook through the first slip stitch on the top of the leg, then through the next stitch of the round on the body. Complete a single crochet. Repeat this process all the way across the top of the leg. This is the end of round 39. At the end of the round, you should have 54 stitches.
To start round 40, single crochet in the first 18 stitches of the round. Align the top of the second leg with the next 6 stitches of the round. And again, make sure the toes are facing the same direction as the face. Attach this leg using the same method as the first.
To complete the round, single crochet in the 30 remaining stitches. At the end of the round, you should have 54 stitches.
It may look a little crazy at this stage, but I promise it will come together as you complete the pattern.

Tacking Down the Legs
It looks pretty silly to have the dinosaur’s legs flopping around, so I recommend tacking them down to the sides of the dinosaur’s body.
However, the body is quite wide, and if you simply tack the legs down to each side, your dinosaur will appear bow legged.
So as you tack down each side, I recommend threading your yarn through the dinosaur’s belly and pulling it taut with each pass through.
This will allow the legs to sit straight up and down against the sides of the dino’s body. Make sure you fasten off with a knot and hide the tails inside the work.

Sewing on the Tail
Pin the tail to the back of the dinosaur, centered between the legs. The top of the tail should be aligned with the top of the legs.
Thread the yarn tail attached to the dinosaur’s tail through a yarn needle, then sew the tail to the body stitch for stitch.
When you’re about 3/4ths of the way around, stuff the tail, then finish sewing.
Secure with a knot, then hide the yarn tail inside the work.

Adding the Top Lip
We’ll be adding the top lip into the 19 exposed front loops from round 17 of the Head & Body.
Create a slip knot on your hook, leaving a 6 inch yarn tail. Then turn your dinosaur upside down.
Single crochet into the first two exposed front loops. Half double crochet in the next 15 loops. Then single crochet in the last two loops.
Fasten off and secure with a knot, then hide both the ending and beginning yarn tails inside the work.

Crochet Dinosaur Free Amigurumi Crochet Pattern: Figure 1 - Teeth
Figure 1: Shows the completed teeth with the starting and ending yarn tails tied together, ready to crochet into the head.
Crochet Dinosaur Free Amigurumi Crochet Pattern: Figure 2 - Arms
Figure 2: Shows two completed arms that have been stuffed and slip-stitched closed with the yarn tails hidden inside the work.
Crochet Dinosaur Free Amigurumi Crochet Pattern: Figure 3 - Legs
Figure 3: Shows two completed legs that have been stuffed and slip-stitched closed with the yarn tails hidden inside the work.
Crochet Dinosaur Free Amigurumi Crochet Pattern: Figure 4 - Tail
Figure 4: Shows the completed tail with a long yarn tail attached for sewing the tail to the body.

Instructions

Teeth


  • With white yarn:

    01. *ch 4, sc in the 2nd ch from hook, hdc in next ch, dc in final ch* without fastening off, repeat for a total of 5 teeth [15]

    02. ch 1, then sc 3 across the top of each tooth [15]

    Fasten off and tie the ending yarn tail to to the starting yarn tail. For a video tutorial, see "Making the Teeth" in the Notes section of the pattern.

Arms (make 2)


  • With green yarn:

    01. start 6 sc into a magic ring [6]
    02. inc in each st around [12]
    03. *sc 2, inc* 4 times [16]
    04. sc in each st around [16]
    05. *sc 2, dec* 4 times [12]
    06 – 07. sc in each st around [12]
    08. *sc 4, dec* 2 times [10]
    09. sc in each st around [10]
    10. *sc 3, dec* 2 times [8]

    Stuff the arm. Fasten off, leaving a 10” tail. Pinch the final round together and slip stitch closed. Hide the remaining tail inside the work. Your arm is now ready to attach while crocheting the body at a later step.

Legs (make 2)


  • With green yarn:

    01. ch 3, inc in 2nd ch from hook, 5sc in the last ch. Continue on the other side of the chain base, 3sc in the last ch [10]
    02. inc, sc 2, *inc* 3 times, sc 2, *inc* 2 times [16]
    03. inc, sc 4, *inc* 2 times, sc, inc, sc 4, *inc* 2 times, sc [22]
    04. inc, sc 6, *inc, sc* 2 times, inc, sc 6, *inc, sc* 2 times [28]
    05. inc, sc 8, inc, sc 2, inc, sc, inc, sc 8, inc, sc 2, inc, sc [34]
    06. sc 9, *bobble, sc 3* 2 times, bobble, sc 16 [34]
    07. sc in each st around [34]
    08. sc 12, *dec* 3 times, sc 16 [31]
    09. sc 7, *dec* 6 times, sc 12 [25]
    10. sc 4, *dec* 6 times, sc 9 [19]
    11. sc 4, *dec* 3 times, sc 9 [16]
    12 – 14. sc in each st around [16]

    Stuff the foot.

    15. sc 5, inc, sc 2, inc, sc 7 [18]
    16. sc 4, *sc, inc, sc* 3 times, sc 5 [21]
    17. *sc 6, inc* 3 times [24]
    18. *sc 3, inc* 6 times [30]
    19 – 20. sc in each st around [30]
    21. *sc 3, dec* 6 times [24]
    22. sc, dec, *sc 2, dec* 5 times, sc [18]
    23. *sc, dec* 6 times [12]

    Finish stuffing the leg. Fasten off, leaving an 12” tail. Pinch the final round together and slip stitch closed. Hide the remaining tail inside the work. Your leg is now ready to attach while crocheting the body at a later step.

Tail


  • With green yarn:

    01. start 6 sc into a magic ring [6]
    02. *sc, inc* 3 times [9]
    03. sc, inc, *sc 2, inc* 2 times, sc [12]
    04. *sc 3, inc* 3 times [15]
    05. sc in each st around [15]
    06. sc 2, inc, *sc 4, inc* 2 times, sc 2 [18]
    07. *sc 2, inc* 3 times, *sc, dec* 3 times [18]
    08. *sc 5, inc* 3 times [21]
    09. sc in each st around [21]
    10. sc 3, inc, *sc 6, inc* 2 times, sc 3 [24]
    11. sc, dec, *sc 2, inc* 4 times, *sc, dec* 3 times [24]
    12. *sc 7, inc* 3 times [27]
    13. sc in each st around [27]
    14. sc 4, inc, *sc 8, inc* 2 times, sc 4 [30]
    15. *sc, dec* 2 times, *sc 2, inc* 5 times, *sc, dec* 3 times [30]
    16. *sc 9, inc* 3 times [33]
    17. sc in each st around [33]
    18. sc 5, inc, *sc 10, inc* 2 times, sc 5 [36]
    19. sc in each st around [36]

    Fasten off, leaving a 3 ft yarn tail for sewing the tail to the body at a later step.

Head & Body


  • With green yarn:

    01. start 6 sc into a magic ring [6]
    02. inc in each st around [12]
    03. *sc, inc* 6 times [18]
    04. sc, inc, *sc 2, inc* 5 times, sc [24]
    05. *sc 3, inc* 6 times [30]
    06. sc 2, inc, *sc 4, inc* 5 times, sc 2 [36]
    07. *sc 5, inc* 6 times [42]
    08. sc 3, inc, *sc 6, inc* 5 times, sc 3 [48]
    09. *sc 7, inc* 6 times [54]
    10. sc 4, inc, *sc 8, inc* 5 times, sc 4 [60]
    11. *sc 9, inc* 6 times [66]
    12 – 16. sc in each st around [66]

    17. sc 24, BLO: sc 2, Attach the teeth in BLO: (sc 15), BLO: sc 2, Both loops: sc 23 [66]

    For additional details and a video tutorial, see "Attaching the Teeth" in the Notes section of the pattern.

    18. sc 23, *dec, sc 8* 2 times, dec, sc 21 [63]
    19. sc 18, *dec, sc 7* 3 times, dec, sc 16 [59]
    20. sc 23, dec, sc 11, dec, sc 21 [57]
    21. sc 20, *dec, sc 7* 2 times, dec, sc 17 [54]
    22. *sc 7, dec* 6 times [48]
    23. sc 16, *dec, sc 2* 3 times, dec, sc 3, dec, sc, dec, sc 10 [42]
    24. *sc 5, dec* 6 times [36]
    25. sc 2, dec, *sc 4, dec* 5 times, sc 2 [30]
    26. sc 8, dec, sc, dec, sc 2, dec, sc 3, dec, sc 2, dec, sc, dec, sc [24]

    Stuffing the Head & Adding the Eyes: Stuff head ¾ full. Mark stitches for the eyes 30 stitches apart between rounds 14 & 15, centered above the teeth.

    Create indents for the eyes, then insert your safety eyes and secure the backings. For additional details and a video tutorial, see "Indenting the Eyes" in the Notes section of the pattern.

    Without fastening off, Continue on with the rest of the body:

    27. *sc 3, inc* 6 times [30]
    28 – 29. sc in each st around [30]
    30. sc 2, inc, *sc 4, inc* 5 times, sc 2 [36]
    31. sc in each st around [36]

    32. sc 15, Attach the first arm: (sc 4), sc 8, Attach the second arm: (sc 4), sc 5 [36]

    At the end of round 32, the arms should appear centered on the body. If your arms appear off center, redo the round and adjust the placement of the arms as necessary.

    For additional details and a video tutorial, see "Attaching the Arms" in the Notes section of the pattern.

    33. *sc 5, inc* 6 times [42]
    34 – 35. sc in each st around [42]
    36. sc 3, inc, *sc 6, inc* 5 times, sc 3 [48]
    37. sc in each st around [48]
    38. *sc 7, inc* 6 times [54]

    39. sc 48, Attach the first leg: (sc 6) [54]
    40. sc 18, Attach the second leg: (sc 6), sc 30 [54]

    At the end of round 40, the legs should appear centered on the body. If your legs appear off center, redo rounds 39 & 40, and adjust the placement of the legs as necessary.

    For additional details and a video tutorial, see "Attaching the Legs" in the Notes section of the pattern.

    41. sc 4, inc, *sc 8, inc* 5 times, sc 4 [60]
    42 – 47. sc in each st around [60]
    48. sc 4, dec, *sc 8, dec* 5 times, sc 4 [54]
    49. *sc 7, dec* 6 times [48]
    50. sc 3, dec, *sc 6, dec* 5 times, sc 3 [42]
    51. *sc 5, dec* 6 times [36]
    52. sc 2, dec, *sc 4, dec* 5 times, sc 2 [30]

    Stuff the body 3/4 full.

    53. *sc 3, dec* 6 times [24]
    54. sc, dec, *sc 2, dec* 5 times, sc [18]
    55. *sc, dec* 6 times [12]

    Finish stuffing.

    56. *dec* 6 times [6]

    Fasten off, leaving a tail of about 8 inches. Close with an Ultimate Finish, then hide the tail inside the work.

    Next, tack down the legs and sew on the tail. For additional details and video tutorials, see "Tacking Down the Legs" and "Sewing on the Tail" in the Notes section of the pattern.

Top Lip


  • Work into the exposed front loops above the teeth, holding the dinosaur upside down.

    With green yarn:

    01. sc 2, hdc 15, sc 2 [19]

    Fasten off, leaving a 6 inch yarn tail. Secure with a knot, then hide the yarn tails on each side inside the work. For additional details and a video tutorial, see "Adding the Top Lip" in the Notes section of the pattern.

Spikes (optional)


  • With a contrasting yarn color:

    01. start 6 sc into a magic ring [6]
    02. *sc, inc* [9]
    03. sc, inc, *sc 2, inc* 2 times, sc [12]
    04 – 05. sc in each st around [12]

    Do not stuff. Fasten off and slip stitch closed. Make as many as you like and sew them on in a straight line down the dinosaur's head, back & tail.

Subscribe To Our Newsletter

Join our mailing list to receive the latest news and updates from our team.

[ninja_form id=5]

You have Successfully Subscribed!