As I was writing up this free giraffe crochet pattern, I realized I had no idea what the “horns” on a giraffe are called. After a quick Google search, I learned they’re called ossicones. I’ve decided I won’t be applying to compete on Are You Smarter Than a 5th Grader any time soon, because I would probably lose. 😂
What I lack in elementary school knowledge, I hopefully make up for by creating adorable amigurumi. 😉 I hope you enjoy this free crochet pattern for Ginnie the Giraffe!


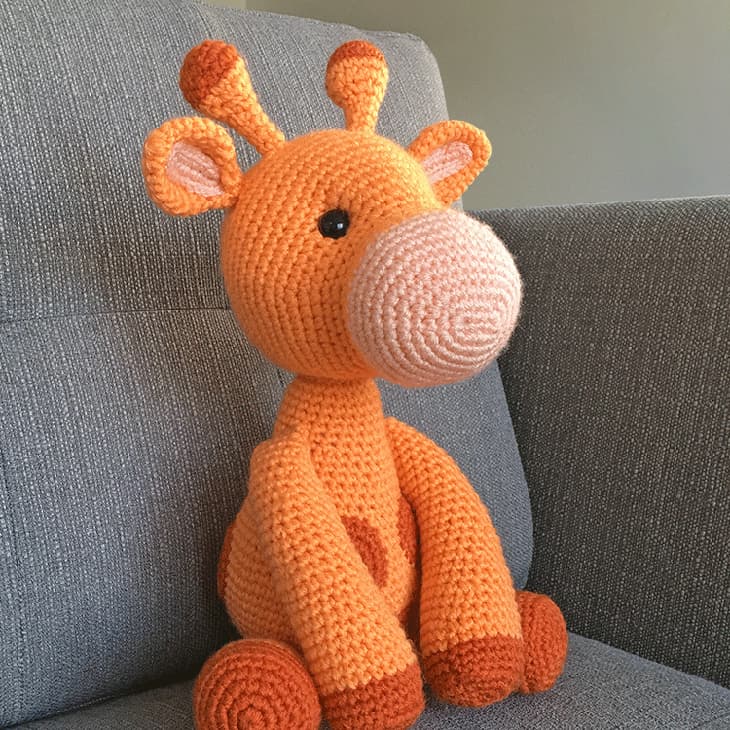
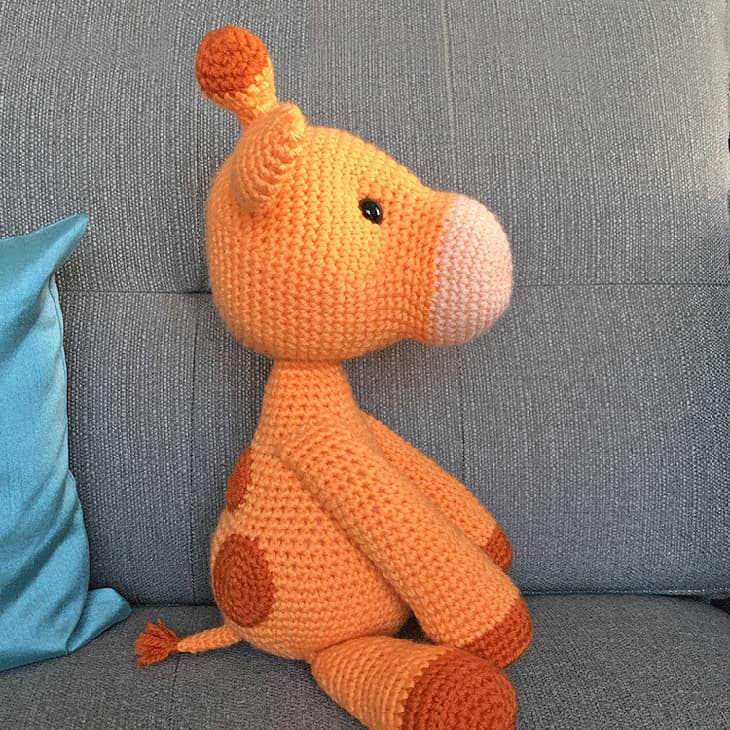
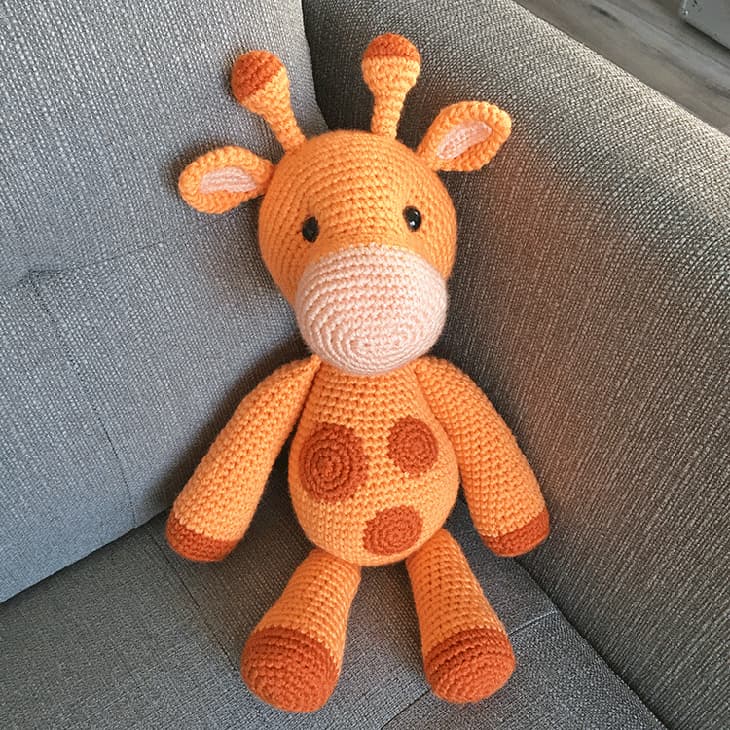
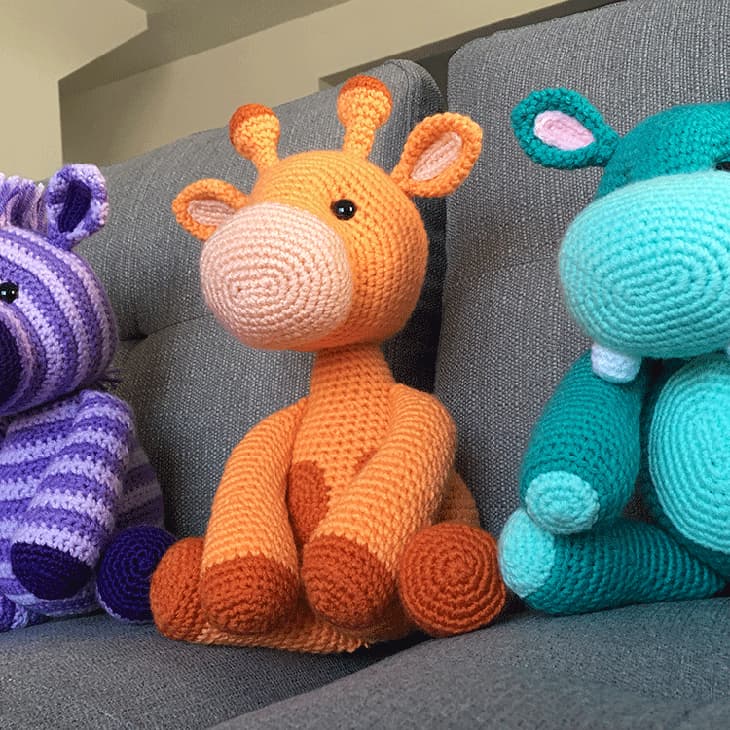


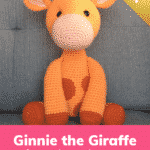
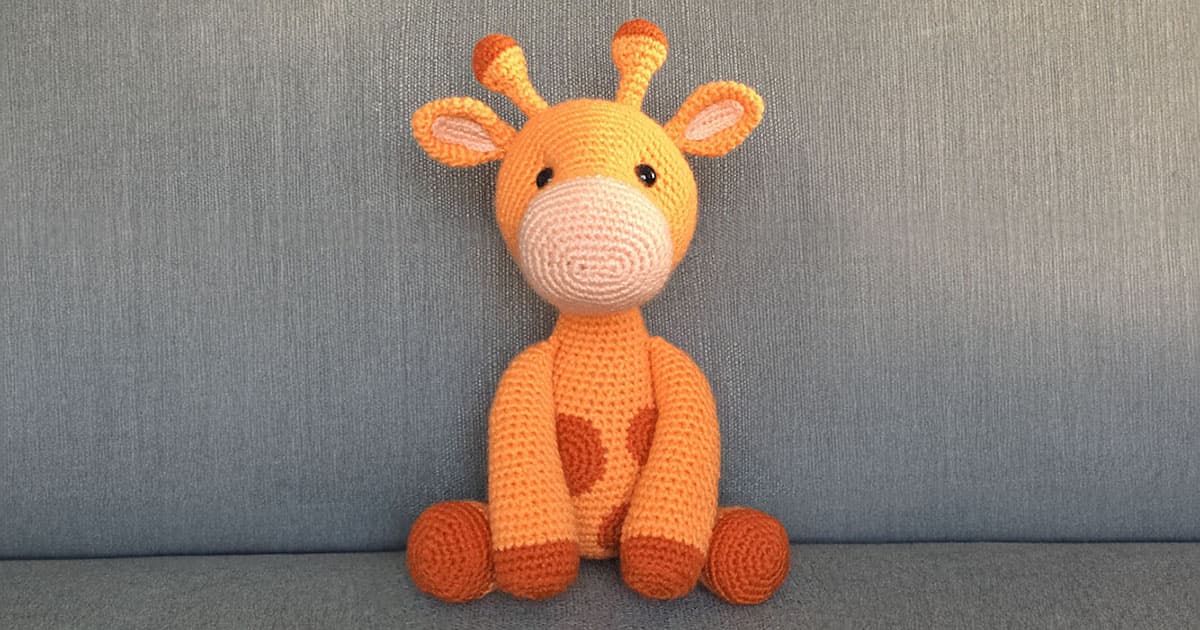
Ginnie the Giraffe
Height: 17" standing
Skill level: Intermediate
Ravelry: Ginnie the Giraffe
The other animals on the savanna look up to Ginnie, and not just because of her height! 😉 She's ultra-cuddly and makes a great friend.
Skill level: Intermediate
Ravelry: Ginnie the Giraffe
The other animals on the savanna look up to Ginnie, and not just because of her height! 😉 She's ultra-cuddly and makes a great friend.
Supplies
Yarn (acrylic, weight 4)
- Light Orange (I used I Love This Yarn! – Light Peach)
- Medium Orange (I used Big Twist Baby – Goldfish)
- Dark Orange (I used Red Heart Super Saver – Carrot)
Notes
Abbreviations
General Instructions
Recommended Sequence Here are the steps to create your giraffe, in order:
Crochet Video Tutorials
Attaching with thread vs. yarn tail
For a cleaner look, I opted to cut the yarn tails short on the inner ears and weave them into the back of the work, then attach the inner ears to the ears with matching thread. However, you can also attach them using a yarn needle and the yarn tail. It's up to you!
Assembly Tutorials
How to Indent the Eyes
How to Crochet the Tail Tuft
- ch – chain
- slst – slip stitch
- sc – single crochet
- inc – complete two single crochets within the same stitch
- dec – combine two stitches into one with an invisible decrease
- BLO – crochet in the back loop only
- *sc x* – repeat the instructions between asterisks(*) the indicated number of times. If the pattern doesn't tell you how many times to repeat, then repeat the sequence until you reach the end of the round.
General Instructions
- Work all stitches in both loops unless the pattern instructs otherwise.
- This pattern is worked in one continuous spiral. Do not join rounds unless the pattern indicates otherwise (in other words, do not slip stitch and chain to start a new round).
- Use a stitch marker to keep track of where one round ends and the next begins. I prefer to place my stitch marker in the last stitch of the round.
Recommended Sequence Here are the steps to create your giraffe, in order:
- Crochet the Head
- Crochet the Ears
- Crochet the Inner Ears
- Crochet the Ossicones
- Sew the Inner Ears to the Ears
- Attach the Ears to the Head
- Attach the Ossicones to the Head
- Crochet the Body
- Crochet the Big Spots
- Crochet the Small Spots
- Crochet the Arms
- Crochet the Legs
- Crochet the Tail
- Attach the Head to the Body
- Attach the Legs to the Body
- Attach the Arms to the Body
- Attach the Tail to the Body
Crochet Video Tutorials
- Magic ring
- Slip stitch closed
- Chain 5 start
- Chain 7 start
- Crochet Ears to Head
- Ultimate finish
- Crochet the Tail Tuft
Attaching with thread vs. yarn tail
For a cleaner look, I opted to cut the yarn tails short on the inner ears and weave them into the back of the work, then attach the inner ears to the ears with matching thread. However, you can also attach them using a yarn needle and the yarn tail. It's up to you!
Assembly Tutorials
- How to attach the head to the body
- How to attach the legs to the body
- How to attach the arms to the body
- How to attach the tail to the body
How to Indent the Eyes
Note: This video shows a unicorn, but the technique is the same for all of my patterns.
Cut a strand of yarn approximately 18" long. Tie a large, secure knot in one end and thread the other end through your yarn needle.
Insert your needle through the back opening of the head and sew between the two spots where you'll be placing your safety eyes (marked with strands of yarn).
Pull your strand of yarn taut, which will create indents. Fasten off with a knot and hide your yarn tail inside the head.
How to Crochet the Tail Tuft
Note: I'm in the process of updating the tail style for all of my patterns, but haven't had a chance to take new giraffe photos yet. I recommend using the new style as shown in the video.
With dark orange yarn, create a slip knot on your hook. slst into the first stitch, chain 6, then slst into the same stitch.
Repeat this process in the 2 remaining stitches across: slst into the next stitch, chain 6, then slst into the same stitch.
Fasten off and hide the yarn tails inside the work with a yarn needle.
Instructions
Head
- With light orange yarn:
01. Chain 5 start: ch5, inc in 2nd ch from hook, sc 2, 5sc in the last ch. Continue on the other side of the chain base, sc 2, 3sc in the last ch [14]
02. inc, sc 4, *inc* 3 times, sc 4, *inc* 2 times [20]
03. inc, sc 6, *inc* 2 times, sc, inc, sc 6, *inc* 2 times, sc [26]
04. inc, sc 8, *inc, sc* 2 times, inc, sc 8, *inc, sc* 2 times [32]
05. inc, sc 10, inc, sc 2, inc, sc, inc, sc 10, inc, sc 2, inc, sc [38]
06. inc, sc 12, *inc, sc 2* 2 times, inc, sc 12, *inc, sc 2* 2 times [44]
07. *sc 10, inc* 4 times [48]
08. sc 3, dec, *sc 6, dec* 5 times, sc 3 [42]
09. *sc 5, dec* [36]
Now sc 9 additional stitches. Consider this the official end of round 9. Continue with round 10 as normal.
Switch to medium orange yarn (tutorial):
10. sc 2, dec, *sc 4, dec* 5 times, sc 2 [30]
11 - 12. sc in each st around [30]
13. sc 2, inc, *sc 4, inc* 5 times, sc 2 [36]
14. *sc 5, inc* [42]
15. sc 3, inc, *sc 6, inc* 5 times, sc 3 [48]
16. *sc 7, inc* [54]
17. sc 4, inc, *sc 8, inc* 5 times, sc 4 [60]
18 - 27. sc in each st around [60]
28. sc 4, dec, *sc 8, dec* 5 times, sc 4 [54]
29. *sc 7, dec* [48]
30. sc 3, dec, *sc 6, dec* 5 times, sc 3 [42]
31. *sc 5, dec* [36]
32. sc 2, dec, *sc 4, dec* 5 times, sc 2 [30]
Stuff head ¾ full. Decide on placement of eyes, sew between the two spots to sculpt the head. Insert eyes and secure backings.
33. *sc 3, dec* [24]
34. sc, dec, *sc 2, dec* 5 times, sc [18]
35. *sc, dec* [12]
Finish stuffing.
36. dec in each st around [6]
Close with an ultimate finish.
Ears (make 2)
- With medium orange yarn:
01. start 6 sc into a magic ring [6]
02. *sc, inc* [9]
03. sc, inc, *sc 2, inc* 2 times, sc [12]
04. *sc 3, inc* [15]
05. sc 2, inc, *sc 4, inc* 2 times, sc 2 [18]
06. *sc 5, inc* [21]
07. sc in each st around [21]
08. *sc 5, dec* [18]
09. sc 2, dec, *sc 4, dec* 2 times, sc 2 [15]
10. *sc 3, dec* [12]
11 - 12. sc in each st around [12]
Fasten off and leave a long tail for sewing. Fold the top opening in half and slip stitch closed.
Inner Ears (make 2)
- With light orange yarn:
01. Chain 7 start: ch7, inc in 2nd ch from hook, sc 4, 5sc in the last ch. Continue on the other side of the chain base, sc 4, 3sc in the last ch [18]
Fasten off and leave a long tail for sewing.
Ossicones (make 2)
- With dark orange yarn:
01. start 6 sc into a magic ring [6]
02. inc in each st around [12]
03. *sc, inc* [18]
04. sc in each st around [18]
Switch to medium orange yarn (tutorial):
05. sc in each st around [18]
06. *sc, dec* [12]
07. *sc, dec* [8]
Stuff the top.
08 - 09. sc in each st around [8]
10. sc 6, dec [7]
11. sc 5, dec [6]
12. sc in each st around [6]
Fasten off and leave a long tail for sewing. Finish stuffing firmly with fiber fill.
Body
- With medium orange yarn:01. start 6 sc into a magic ring [6]02. inc in each st around [12]03. *sc, inc* [18]04. sc, inc, *sc 2, inc* 5 times, sc [24]05. *sc 3, inc* [30]06. sc 2, inc, *sc 4, inc* 5 times, sc 2 [36]07. *sc 5, inc* [42]08. sc 3, inc, *sc 6, inc* 5 times, sc 3 [48]09. *sc 7, inc* [54]10. sc 4, inc, *sc 8, inc* 5 times, sc 4 [60]11 - 17. sc in each st around [60]18. sc 4, dec, *sc 8, dec* 5 times, sc 4 [54]19. sc in each st around [54]20. *sc 7, dec* [48]21. sc in each st around [48]22. sc 3, dec, *sc 6, dec* 5 times, sc 3 [42]23 - 24. sc in each st around [42]25. *sc 5, dec* [36]26 - 27. sc in each st around [36]28. sc 2, dec, *sc 4, dec* 5 times, sc 2 [30]29 - 30. sc in each st around [30]31. *sc 3, dec* [24]32. sc in each st around [24]33 - 38. sc in each st around [24]
Big Spots (make 2)
- With dark orange yarn:
01. start 6 sc into a magic ring [6]
02. inc in each st around [12]
03. *sc, inc* [18]
04. sc, inc, *sc 2, inc* 5 times, sc [24]
Fasten off and leave a long tail for sewing.
Small Spots (make 4)
- With dark orange yarn:
01. start 6 sc into a magic ring [6]
02. inc in each st around [12]
03. *sc, inc* [18]
Fasten off and leave a long tail for sewing.
Arms (make 2)
- With dark orange yarn:
01. start 6 sc into a magic ring [6]
02. inc in each st around [12]
03. *sc, inc* [18]
04. sc, inc, *sc 2, inc* 5 times, sc [24]
05. BLO: sc in each st around [24]
06 - 07. sc in each st around [24]
Switch to medium orange yarn (tutorial):
08. sc in each st around [24]
09. sc 11, dec, sc 11 [23]
10. sc in each st around [23]
11. sc 21, dec [22]
12. sc in each st around [22]
13. sc 10, dec, sc 10 [21]
14. sc in each st around [21]
15. sc 19, dec [20]
16. sc in each st around [20]
17. sc 9, dec, sc 9 [19]
18. sc in each st around [19]
19. sc 17, dec [18]
20. sc in each st around [18]
21. sc 8, dec, sc 8 [17]
22. sc in each st around [17]
23. sc 15, dec [16]
24 - 25. sc in each st around [16]
26. *sc 2, dec* [12]
Fasten off and leave a long tail for sewing. Stuff firmly with fiber fill. Fold the top opening in half and slip stitch closed.
Legs (make 2)
- With dark orange yarn:
01. start 6 sc into a magic ring [6]
02. inc in each st around [12]
03. *sc, inc* [18]
04. sc, inc, *sc 2, inc* 5 times, sc [24]
05. *sc 3, inc* [30]
06. BLO: sc in each st around [30]
07 - 08. sc in each st around [30]
Switch to medium orange yarn (tutorial):
09. sc in each st around [30]
10. sc 14, dec, sc 14 [29]
11. sc 27, dec [28]
12. sc 13, dec, sc 13 [27]
13. sc 25, dec [26]
14. sc 12, dec, sc 12 [25]
15. sc 23, dec [24]
16. sc 11, dec, sc 11 [23]
17. sc 21, dec [22]
18. sc 10, dec, sc 10 [21]
19. sc 19, dec [20]
20. sc 9, dec, sc 9 [19]
21. sc 17, dec [18]
22. *sc 7, dec* [16]
23. *sc 2, dec* [12]
Fasten off and leave a long tail for sewing. Stuff firmly with fiber fill. Fold the top opening in half and slip stitch closed.
Tail
- With medium orange yarn:01. start 6 sc into a magic ring [6]02 - 08. sc around [6]
You are now going to add a tuft of fur to the slip-stitched end of the tail. With dark orange yarn, create a sip knot on your hook. See "How to Crochet the Tail Tuft" in the Notes section for more details and a video tutorial.