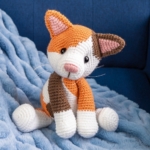
Callie the Calico Cat
Height: 14" standing
Skill level: Intermediate
Terms: US 🇺🇸You’ve CAT to be kitten me! Callie the Calico is the cat’s pajamas. Find her some yarn and catnip and she’ll be your best friend fur-ever.
Skill level: Intermediate
Terms: US 🇺🇸You’ve CAT to be kitten me! Callie the Calico is the cat’s pajamas. Find her some yarn and catnip and she’ll be your best friend fur-ever.
Supplies
Yarn (acrylic, weight 4) – 234 total yards
- White – 130 yards (Mary Maxim Starlette Yarn - White)
- Pink – 4 yards (Mary Maxim Starlette Yarn - Pale Petal Pink)
- Brown – 41 yards (Mary Maxim Starlette Yarn - Chocolate)
- Orange – 59 yards (Mary Maxim Starlette Yarn - Burnt Orange)
Notes
Abbreviations
General Instructions
Recommended Sequence
Here are the steps to create your cat, in order:
Crochet Video Tutorials
Head: Round 12 – Marking Stitches for the Eyes
Head: Round 19 – Attaching the Ears
Indenting the Eyes
Body: Round 7 – Attaching the Legs
Body: Round 11 – Attaching the Tail
Body: Round 30 – Attaching the Arms
Attaching the Head to the Body
Embroidering the Nose
Adding Whiskers
- ch – chain
- sc – single crochet
- inc – complete two single crochets within the same stitch
- dec – combine two stitches into one with an invisible decrease
- *sc x* – repeat the instructions between asterisks(*) the indicated number of times.
- {P+O} – color-change increase: complete two single crochets within the same stitch. The first single crochet should be in pink, and the second single crochet should be in orange.
- (sc x) – attach a body part while completing the stitches inside parentheses as instructed by the pattern.
General Instructions
- This pattern is worked in one continuous spiral.
- Use a stitch marker to keep track of where one round ends and the next begins. I prefer to place my stitch marker in the last stitch of the round.
- Unless the pattern indicates otherwise, start the next round with the same color the previous round ended with.
Recommended Sequence
Here are the steps to create your cat, in order:
- Crochet the Ears
- Crochet the Head
- Crochet the Legs
- Crochet the Tail
- Crochet the Arms
- Crochet the Body
- Attach the Head to the Body
- Embroider the Nose
- Add Whiskers
Crochet Video Tutorials
Head: Round 12 – Marking Stitches for the Eyes
Between rounds 11 and 12, you are going to insert 2 markers to show you where to place your safety eyes at a later step.
There should be 18 stitches between the markers (counted on round 11) as shown in the photo.
You will leave the stitch markers in place as you crochet rounds 13 - 28, so I recommend using strands of yarn to mark these stitches, ensuring they’re easy to crochet around.
Use a yarn needle to insert each strand to mark your stitches.
Head: Round 19 – Attaching the Ears
Note: This video shows a lion, but the technique is the same.
Since this pattern indicates in which exact stitches of the round you'll be attaching each ear, you do not have to use stitch markers as shown in the video.
When aligning each ear, make sure the pink side is facing down. In round 19, the parentheses indicate where you should attach each ear.
The base of each ear has 10 stitches and each set of parentheses contains 10 stitches, so crochet each ear to the head stitch-for-stitch.
At the end of round 19, the ears should be centered above the snout. If your ears appear off center, redo the round and adjust the placement of the ears as necessary.
Indenting the Eyes
Note: This video shows a unicorn, but the technique is the same for all of my patterns.
Cut a strand of yarn approximately 18" long. Tie a large, secure knot in one end and thread the other end through your yarn needle.
Insert your needle through the back opening of the head and sew between the two spots where you'll be placing your safety eyes (marked with strands of yarn).
Pull your strand of yarn taut, which will create indents. Fasten off with a knot and hide your yarn tail inside the head.
Body: Round 7 – Attaching the Legs
Note: This video shows a llama, but the technique is the same for this pattern.
Since this pattern indicates in which exact stitches of the round you’ll be attaching each leg, you do not have to use stitch markers as shown in the video.
As you crochet round 7, attach the first leg as you crochet into the first 6 stitches.
Crochet into the next 6 stitches as normal to leave a gap between the legs, then attach the second leg as you crochet into the second group of 6 marked off stitches.
Complete the remainder of the round as normal.
Body: Round 11 – Attaching the Tail
Note: This video shows a llama, but the technique is the same for this pattern.
Since this pattern indicates in which exact stitches of the round you’ll be attaching the tail, you do not have to use stitch markers as shown in the video.
At the end of round 11, the tail should be centered above the legs on the opposite side of the round. If your tail appears off center, redo the round and adjust the placement of the tail as necessary.
Body: Round 30 – Attaching the Arms
Note: This video shows a llama, but the technique is the same for this pattern.
Since this pattern indicates in which exact stitches of the round you’ll be attaching each arm, you do not have to use stitch markers as shown in the video.
At the end of round 30, the arms should be centered above the legs and tail. If your arms appear off center, redo the round and adjust the placement of the arms as necessary.
Attaching the Head to the Body
Note: This video shows a sheep, but the technique is the same for this pattern.
Step 1: Find an object with a circular base that has the same circumference as the opening of your body. I like to use a shot glass that I found at the dollar store.
Using a disappearing ink marker, trace the circular object centered on the bottom of the head. This will act as a guide as you sew.
Step 2: Sew the head to the body, leaving some slack in your stitches. Leave your last couple stitches open, and view the head & body from all angles to ensure the head is on straight.
Tighten all the stitching with a yarn needle. Tight stitching and proper stuffing ensure you won’t end up with a wobbly head.
Step 3: Add additional stuffing until the neck is nice and firm. There shouldn’t be any slack or empty space between the top of the body and the head.
Step 4: Once you’re finished stuffing, close up the last couple stitches and pull them tight. Secure with a knot and hide the yarn tail inside the work.
Embroidering the Nose
Cut a 3 foot strand of yarn and embroider a V to outline the shape of the nose. I did my nose 3 rounds high, and 4 or 5 stitches across the top (whatever looks even).
Insert 3 or 4 strands of yarn per stitch across the top of the nose.
If you'd like, you can end with a final strand across the top of the nose to give a smoother final appearance.
End by adding a line between the point of the nose and the bottom of the snout. Secure the beginning and ending yarn tails together with a knot, then hide them inside the work.
Adding Whiskers
Cut six strands of fishing line, about 10 inches long.
Fold a strand in half, then use your crochet hook to pull the folded end of the strand through a stitch on the snout.
You should now have a "loop" of fishing line on your hook. Yarn over with the two loose strands and pull them through the loop on your hook.
Secure the whisker in place with a knot. Repeat this process for the 5 remaining whiskers.
Trim all the whiskers to your desired length.
Instructions
Orange Ear
O = Orange | P = Pink O: start 6 sc into a magic ring [6]02. *sc, inc* 3 times [9]03. sc, P: inc, O: *sc 2, inc* 2 times, sc [12]04. sc, P: sc 2, color-change increase: {P+O}, O: *sc 3, inc* 2 times [15]05. sc, P: sc 4, O: sc 10 [15]06. sc, P: sc, inc, sc 2, O: sc 2, inc, sc 4, inc, sc 2 [18]07. sc, P: sc 6, O: sc 11 [18]08. sc, P: sc 6, O: sc 11 [18]09. sc, P: sc 7, O: inc, sc 8, inc [20]10. sc, P: sc 7, O: sc 12 [20]
Brown Ear
B = Brown | P = Pink Fasten off and leave a 18″ tail. Do not stuff. Pinch the final round together and slip stitch closed. Hide the tail inside the work. Each ear will be attached while crocheting the head at a later step.
Head
01. W: Chain 3 Start: ch 3, inc in 2nd ch from hook, 5sc in the last ch. Continue on the other side of the chain base, 3sc in the last ch [10]02. inc, sc 2, *inc* 3 times, sc 2, *inc* 2 times [16]03. inc, sc 4, *inc* 2 times, sc, inc, sc 4, *inc* 2 times, sc [22]04. inc, sc 6, *inc, sc* 2 times, inc, sc 6, *inc, sc* 2 times [28]05. sc 11, inc, sc 15, inc [30]06 - 07. sc in each st around [30]08. *sc 3, dec* 6 times [24]09. *sc, inc* 12 times [36]10. *sc 5, inc* 6 times [42]11. sc 3, inc, sc 6, O: inc, sc 6, inc, W: *sc 6, inc* 3 times, sc 3 [48]12. sc 7, inc, sc 3, O: sc 4, inc, sc 6, W: sc, inc, *sc 7, inc* 3 times [54]
Leg with Orange Spot
01. W: Chain 3 Start: ch 3, inc in 2nd ch from hook, 5sc in the last ch. Continue on the other side of the chain base, 3sc in the last ch [10]02. inc, sc 2, *inc* 3 times, sc 2, *inc* 2 times [16]03. inc, sc 4, *inc* 2 times, sc, inc, sc 4, *inc* 2 times, sc [22]04. inc, sc 6, *inc, sc* 2 times, inc, sc 6, *inc, sc* 2 times [28]05. inc, sc 8, inc, sc 2, inc, sc, inc, sc 8, inc, sc 2, inc, sc [34]06 - 07. sc in each st around [34]08. sc 28, *dec* 3 times [31]09. *dec* 3 times, sc 21, *dec* 2 times [26]10. *dec* 2 times, sc 22 [24]11. sc 5, O: sc 2, W: sc 17 [24]12. sc 5, O: sc 3, W: sc 3, dec, sc 11 [23]13. sc 4, O: sc 5, W: sc 12, dec [22]14. sc 4, O: sc 5, W: sc 13 [22]15. sc 4, O: sc 6, W: sc 12 [22]16. sc 3, O: sc 7, W: dec, sc 10 [21]17. sc 3, O: sc 7, W: sc 11 [21]18. sc 3, O: sc 8, W: sc 8, dec [20]19. sc 3, O: sc 9, W: sc 8 [20]20. sc 3, O: sc 6, dec, sc, W: sc 8 [19]21. sc 3, O: sc 9, W: sc 5, dec [18]22. sc 3, O: sc 4, dec, sc 4, W: sc 3, dec [16]23. sc 3, O: dec, sc, dec, sc 2, dec, sc, W: sc, dec [12]
Brown Leg
W = White | B = Brown
Tail
B = Brown | W = White | O = Orange
Orange Arm
Brown Arm
W = White | B = Brown 01. W: start 6 sc into a magic ring [6]02. inc in each st around [12]03. *sc, inc* 6 times [18]04. sc, inc, *sc 2, inc* 5 times, sc [24]05 – 06. sc in each st around [24]07. sc 2, dec, sc 16, dec, sc 2 [22]08. sc, dec, sc 16, dec, sc [20]09. sc in each st around [20]10. sc 9, dec, sc 9 [19]11. sc in each st around [19]12. sc 11, B: sc 6, dec [18]13. sc in each st around [18]14. sc 8, dec, sc 8 [17]15. sc in each st around [17]16. sc 15, dec [16]17. sc in each st around [16]18. sc 7, dec, sc 7 [15]19. sc in each st around [15]20. sc 13, dec [14]21. sc in each st around [14]22. sc 6, dec, sc 6 [13]23. sc in each st around [13]24. sc 11, dec [12]25 - 26. sc in each st around [12] Fasten off and leave a 18″ tail. Stuff the arm. Pinch the final round together and slip stitch closed, then hide the tail inside the work. Each arm will be attached while crocheting the body at a later step.
Body
01. W: start 6 sc into a magic ring [6]02. inc in each st around [12]03. *sc, inc* 2 times, sc, O: inc, *sc, inc* 2 times, W: sc, inc [18]04. sc, inc, sc 2, inc, sc 2, O: inc, *sc 2, inc* 2 times, sc, W: sc, inc, sc [24]05. B: sc 3, inc, W: sc 3, inc, sc 2, O: sc, inc, *sc 3, inc* 2 times, W: sc 3, B: inc [30] 06. sc 2, inc, sc 2, W: sc 2, inc, sc 4, O: inc, *sc 4, inc* 2 times, sc 2, W: sc 2, inc, B: sc 2 [36] Attaching the Legs: Attach the legs where instructed while crocheting the next round. For additional details and a video tutorial, see "Body: Round 7 – Attaching the Legs" in the Notes section of the pattern. 07. Attach the brown leg in the next six stitches: (sc 5, inc), sc, W: sc 4, inc, Attach the leg with the orange spot in the next six stitches: (sc 2, O: sc 3, inc), *sc 5, inc* 2 times, W: sc 4, B: sc, inc [42]08. sc 3, inc, sc 4, W: sc 2, inc, sc 5, O: sc, inc, *sc 6, inc* 2 times, sc 3, W: sc 3, inc, sc, B: sc 2 [48]09. sc 7, inc, sc, W: sc 6, inc, sc 2, O: sc 5, inc, *sc 7, inc* 2 times, W: sc 7, inc [54]10. B: sc 4, inc, sc 3, W: sc 5, inc, sc 6, O: sc 2, inc, *sc 8, inc* 2 times, sc 3, W: sc 5, inc, sc 4 [60] Attaching the Tail: Attach the tail where instructed while crocheting the next round. For additional details and a video tutorial, see "Body: Round 11 – Attaching the Tail" in the Notes section of the pattern. 11. sc 2, B: sc 5, W: sc 15, O: sc 20, Attach the tail in the next five stitches: (sc 5), sc, W: sc 12 [60]12. sc 17, B: sc 5, O: sc 27, W: sc 11 [60]13. sc 15, B: sc 8, O: sc 25, W: sc 10, O: sc 2 [60]14. sc, W: sc 14, B: sc 10, O: sc 21, W: sc 11, O: sc 3 [60]15. sc 3, W: sc 13, B: sc 10, O: sc 19, W: sc 12, O: sc 3 [60]16. sc 7, W: sc 10, B: sc 9, O: sc 12, W: sc 19, O: sc 3 [60]17. sc 9, W: sc 9, B: sc 8, W: sc 3, O: sc 8, W: sc 20, O: sc 3 [60]18. sc 4, dec, sc 4, W: sc 4, dec, sc 3, B: sc 5, dec, W: *sc 8, dec* 3 times, sc, O: sc 3 [54]19. sc 10, W: sc 8, B: sc 4, W: sc 28, O: sc 4 [54]20. sc 7, dec, sc 2, W: sc 5, dec, *sc 7, dec* 3 times, sc 5, O: sc 2, dec [48]21. sc 10, W: sc 34, O: sc 4 [48]22. sc 3, dec, sc 5, W: sc, dec, *sc 6, dec* 3 times, sc 6, O: dec, sc 3 [42]23. sc 9, W: sc 29, O: sc 4 [42]24. sc 10, W: 28, O: sc 4 [42]25. sc 5, dec, sc 4, W: sc, dec, *sc 5, dec* 3 times, sc 2, O: sc 3, dec [36]26. sc 11, W: sc 21, O: sc 4 [36]27. sc 12, W: sc 20, O: sc 4 [36]28. sc 2, dec, sc 4, dec, sc 3, W: sc, dec, *sc 4, dec* 2 times, sc 4, O: dec, sc 2 [30]29. sc 12, W: sc 15, O: sc 3 [30] Attaching the Arms: Attach the arms where instructed while crocheting the next round. For additional details and a video tutorial, see "Body: Round 30 – Attaching the Arms" in the Notes section of the pattern. 30. Attach the orange arm in the next six stitches: (sc 6), sc 7, W: sc 2, B: Attach the brown arm in the next six stitches: (sc 6), W: sc 6, O: sc 3 [30] Stuff the body. 31. *sc 3, dec* 3 times, B: sc 3, dec, sc, W: sc 2, dec, sc 2, O: sc, dec [24] Fasten off and leave a tail the length of your arm span (5+ feet). For instructions on how to attach the head to the body, see "Attaching the Head to the Body" in the Notes section of the pattern.