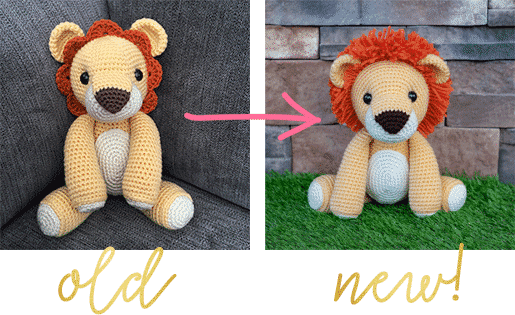
✨ New and Improved! I originally published the pattern for Laurence the Lion in April 2018. As of January 2020, I have overhauled it for easier assembly, clearer instructions, and an even cuter finished product. 😊
In 2017 I had the idea to write my very first amigurumi pattern. I wanted to crochet a matching set of safari animals for my nephew. I didn’t love any of the existing patterns out there, so I decided to create my own!
In hindsight, trying to write my own pattern at that point was a little overambitious. 😂 I was brand new to crochet and had only completed 3 small projects. Who knew writing patterns required so much math?! 😩 But I’m not one to back down from a challenge.
After countless revisions and flexing brain muscles I never knew I had, Laurence the Lion was born. I struggled a lot at first, but my free lion amigurumi pattern turned out pretty great. I learned a LOT in the process!
At the time I was so impressed with how my lion turned out, but looking back at photos of the original, I can see my craftsmanship has come a long way. More importantly, thanks to feedback from lovely fellow crocheters like you, I have also leveled up my pattern-writing skills.
With no further ado, I hope you enjoy this new, improved (and still free!) amigurumi crochet pattern for Laurence the Lion!


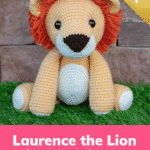
Laurence the Lion
Skill level: Intermediate-Advanced
Ravelry: Laurence the Lion
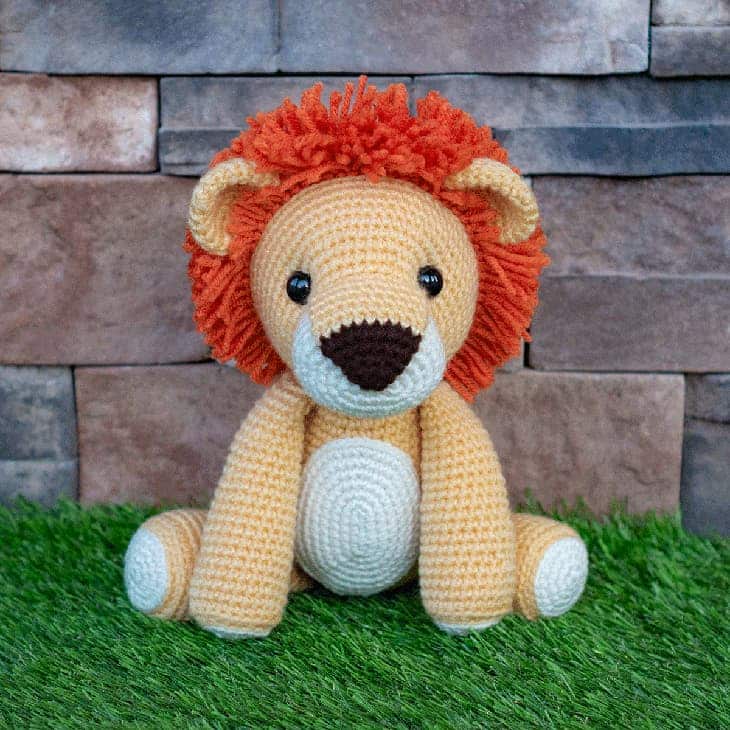
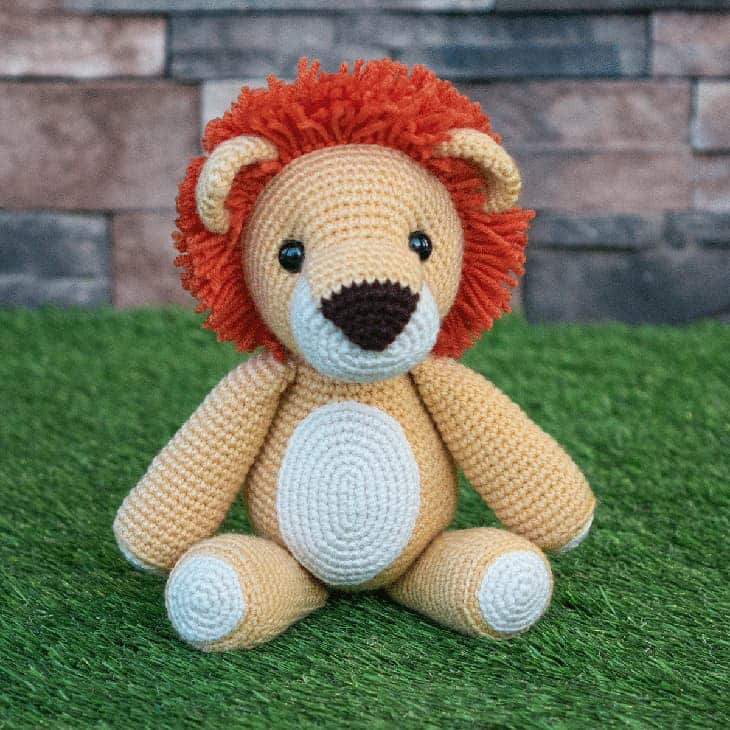
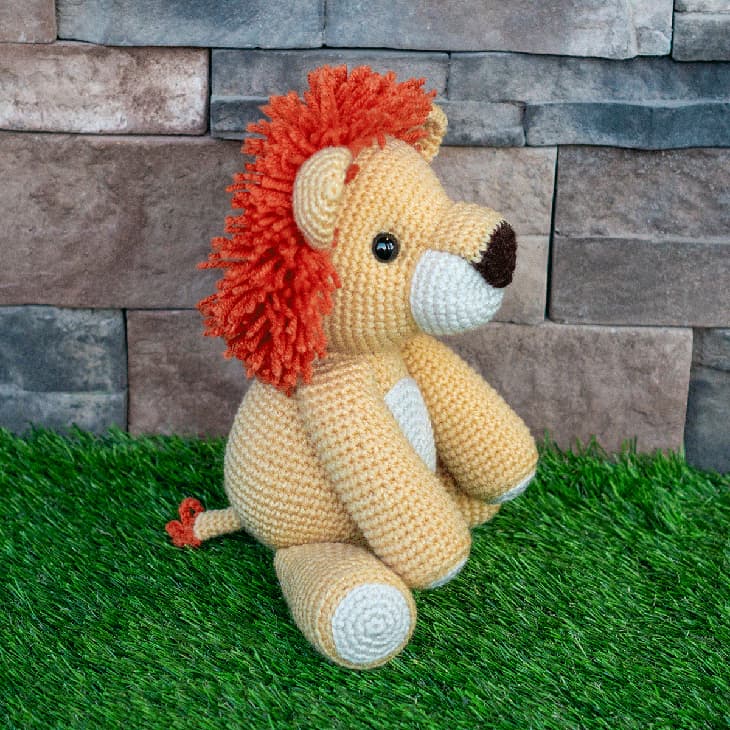
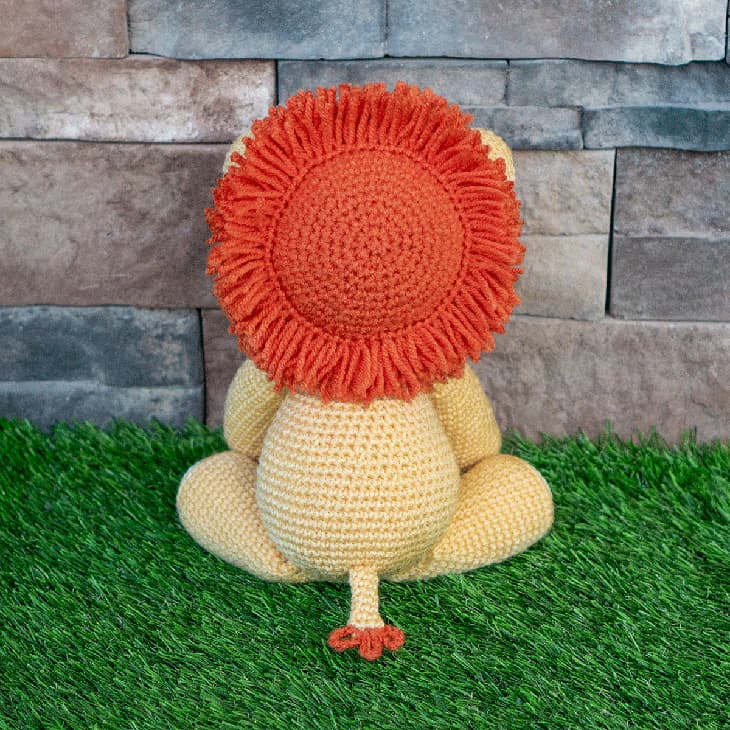
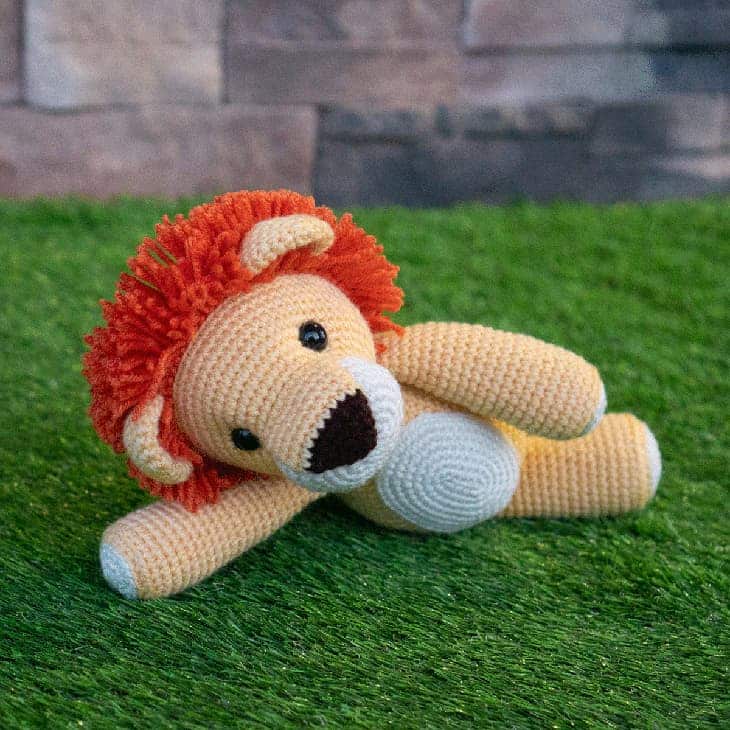
He may be king of the jungle, but Laurence is the sweetest lion you’ll ever meet. His defining characteristics are his big brown nose and wild mane.
Supplies
Yarn (acrylic, weight 4) – 242 total yards
- Yellow – 181 yards (I used Red Heart Super Saver – Cornmeal)
- Cream – 31 yards (I used Red Heart Super Saver – Aran)
- Brown – 3 yards (I used Red Heart Super Saver – Coffee)
- Orange – 27 yards (I used Red Heart Super Saver – Carrot)
Notes
- ch – chain
- slst – slip stitch
- sc – single crochet
- inc – complete two single crochets within the same stitch
- dec – combine two stitches into one with an invisible decrease
- BLO – crochet in the back loop only
- *sc x* – repeat the instructions between asterisks(*) the indicated number of times. If the pattern doesn't tell you how many times to repeat, then repeat the sequence until you reach the end of the round.
General Instructions
- Work all stitches in both loops unless the pattern instructs otherwise.
- This pattern is worked in one continuous spiral. Do not join rounds unless the pattern indicates otherwise (in other words, do not slip stitch and chain to start a new round).
- Use a stitch marker to keep track of where one round ends and the next begins. I prefer to place my stitch marker in the last stitch of the round.
Recommended Sequence
Here are the steps to create your lion, in order:
- Crochet the Nose
- Crochet the Ears
- Crochet the Snout & Head
- Crochet the Body
- Crochet the Belly
- Crochet the Arms
- Crochet the Legs
- Crochet the Tail
- Attach the Head to the Body
- Attach the Legs to the Body
- Attach the Arms to the Body
- Attach the Tail to the Body
- Attach the Belly to the Body
- Crochet or Attach the Mane
Crochet Video Tutorials
- Magic ring
- Slip stitch closed
- Chain 5 start
- Crochet Nose to Snout
- Crochet Ears to Head
- Invisible finish
- Ultimate finish
- Perfect Arm Base
- Perfect Leg Base
- Lion Mane – Individual Strands
- Lion Mane – Loopy / Chained
- Lion Mane – Scallops
- Crochet the Tail Tuft
Assembly Tutorials
- How to attach the head to the body
- How to attach the legs to the body
- How to attach the arms to the body
- How to attach the tail to the body
Size up hook on slip stitch BLO rounds
There are several rounds in this pattern that will instruct you to slip stitch around in the back loop only. Often in a later step, you'll be crocheting into the exposed front loops created by slip stitching into the back loop. Slip stitches often turn out tighter than regular single crochets and that can make them difficult to work into later on, so you may want to consider sizing up to a 4.0mm (G) hook for all slip-stitched BLO rounds (this does not apply to BLO rounds done in single crochet).
Jogless BLO rounds & color changes
Be sure to check out my tutorial on how to create jogless BLO rounds. I also use this technique when changing colors before or after a BLO round. The video explains how to "loop-under" and chain 1 before starting the round. If changing colors, simply complete the chain with the new color, and tighten the strands of both colors down before proceeding.
Snout & Head: Round 8 – Additional Stitches
Snout & Head: Round 9 – Marking Stitches for Attaching the Nose
Snout & Head: Round 10 – Crochet Nose to Snout
Snout & Head: Round 14 – Marking Stitches for the Eyes
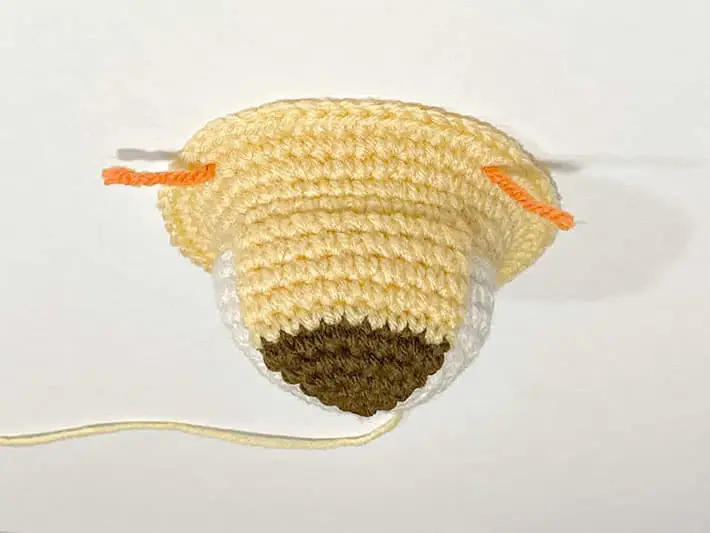
Snout & Head: Round 20 – Marking Stitches for the Ears
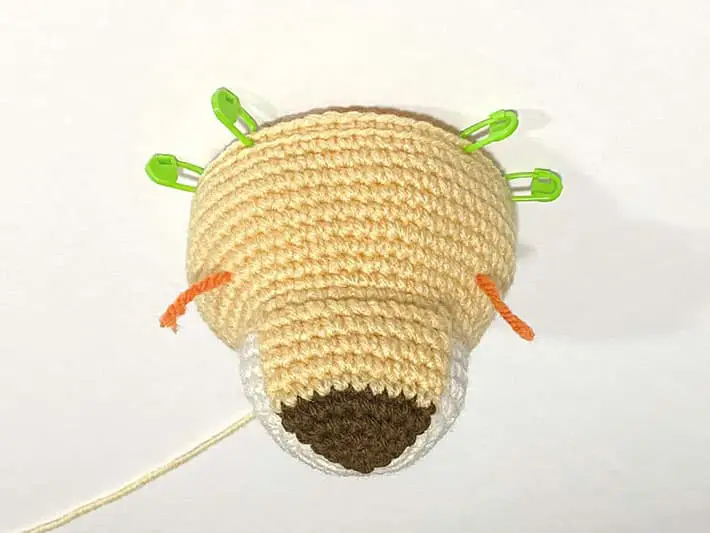
Snout & Head: Round 21 – Crochet Ears to Head
How to Indent the Eyes
How to Crochet the Tail Tuft
Choose Your Mane Style
20. BLO: sc in each st around [60] You are now going to mark 4 stitches in round 20 (the round you just completed) to show where you should attach the ears in round 21. See "Snout & Head: Round 20 – Marking Stitches for the Ears" in the Notes section for details and a video tutorial. 21. sc in each st around, attaching the ears where marked [60] 22 – 24. sc in each st around [60]
25. BLO: sc 4, dec, *sc 8, dec* 5 times, sc 4 [54]
26. *sc 7, dec* [48] … Follow all rounds before and after these alterations as the pattern is written.
Instructions
Nose
- With brown yarn:01. start 6 sc into a magic ring [6]02. *sc, inc* [9]03. sc, inc, *sc 2, inc* 2 times, sc [12]04. *sc 3, inc* [15]05. sc, inc, *sc 2, inc* 4 times, sc [20]
Ears (make 2)
- With yellow yarn:01. start 6 sc into a magic ring [6]02. inc in each st around [12]03. *sc, inc* [18]04. sc, inc, *sc 2, inc* 5 times, sc [24]05. *sc 3, inc* [30]06. sc in each st around [30]07. *sc 3, dec* [24]08. sc, dec, *sc 2, dec* 5 times, sc [18]09. *sc, dec* [12]
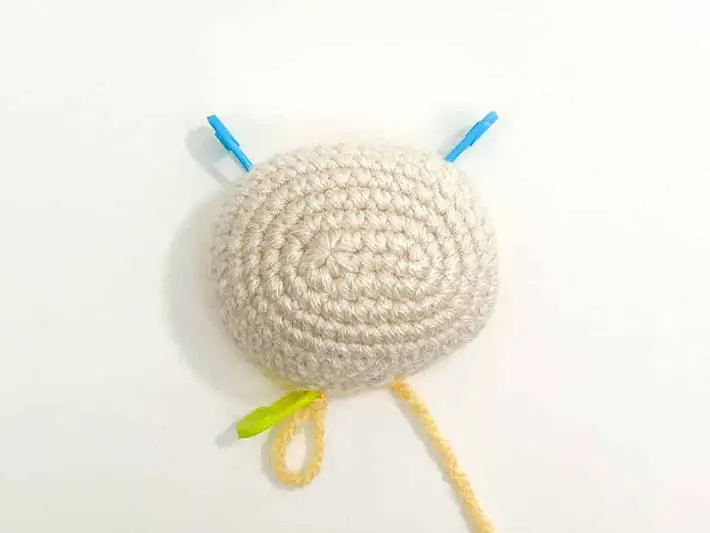
Snout & Head
- With cream yarn:01. Chain 5 Start: ch5, inc in 2nd ch from hook, sc 2, 5sc in the last ch. Continue on the other side of the chain base, sc 2, 3sc in the last ch [14]02. inc, sc 4, *inc* 3 times, sc 4, *inc* 2 times [20]03. inc, sc 6, *inc* 2 times, sc, inc, sc 6, *inc* 2 times, sc [26]04. inc, sc 8, *inc, sc* 2 times, inc, sc 8, *inc, sc* 2 times [32]05. sc 14, *inc* 2 times, sc 14, *inc* 2 times [36]06 - 08. sc in each st around [36]
Body
- With yellow yarn: 01. start 6 sc into a magic ring [6] 02. inc in each st around [12] 03. *sc, inc* [18] 04. sc, inc, *sc 2, inc* 5 times, sc [24] 05. *sc 3, inc* [30] 06. sc 2, inc, *sc 4, inc* 5 times, sc 2 [36] 07. *sc 5, inc* [42] 08. sc 3, inc, *sc 6, inc* 5 times, sc 3 [48] 09. *sc 7, inc* [54] 10. sc 4, inc, *sc 8, inc* 5 times, sc 4 [60] 11 – 17. sc in each st around [60] 18. sc 4, dec, *sc 8, dec* 5 times, sc 4 [54] 19. sc in each st around [54] 20. *sc 7, dec* [48] 21. sc in each st around [48] 22. sc 3, dec, *sc 6, dec* 5 times, sc 3 [42] 23 – 24. sc in each st around [42] 25. *sc 5, dec* [36] 26 – 27. sc in each st around [36] 28. sc 2, dec, *sc 4, dec* 5 times, sc 2 [30] 29 – 30. sc in each st around [30] 31. *sc 3, dec* [24]
Belly
- With cream yarn: 01. Chain 5 start: ch5, inc in 2nd ch from hook, sc 2, 5sc in the last ch. Continue on the other side of the chain base, sc 2, 3sc in the last ch [14] 02. inc, sc 4, *inc* 3 times, sc 4, *inc* 2 times [20] 03. inc, sc 6, *inc* 2 times, sc, inc, sc 6, *inc* 2 times, sc [26] 04. inc, sc 8, *inc, sc* 2 times, inc, sc 8, *inc, sc* 2 times [32] 05. inc, sc 10, inc, sc 2, inc, sc, inc, sc 10, inc, sc 2, inc, sc [38] 06. inc, sc 12, *inc, sc 2* 2 times, inc, sc 12, *inc, sc 2* 2 times [44] 07. inc, sc 14, inc, sc 3, inc, sc 2, inc, sc 14, inc, sc 3, inc, sc 2 [50]
Arms (make 2)
Legs (make 2)
Tail
- With yellow yarn:01. start 6 sc into a magic ring [6]02 - 08. sc around [6]