
I first had the idea to make a set of six custom safari amigurumi animals for my nephew, Charlie, in February of 2017. Two months later I had patterns created for a lion, hippo, zebra and giraffe, but I was intimidated by the thought of making an elephant and monkey and went on to create many other animal patterns in the interim.
Here we are over a year later with lots of practice and new skills under my belt, and I’m finally completing the safari set. 🙂 I’ll be publishing the monkey pattern next week!


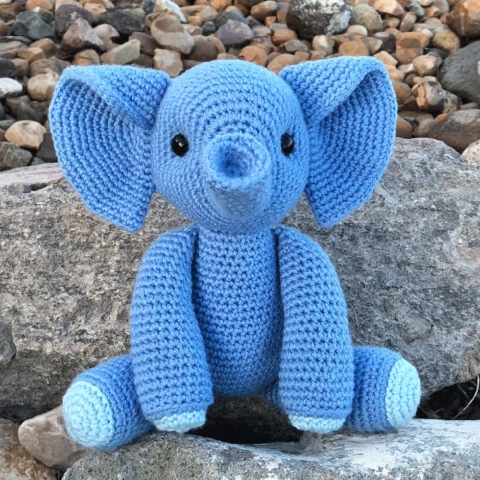
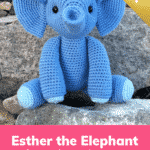
Esther the Elephant
Height: 13.5" standing
Skill level: Intermediate
Ravelry: Esther the Elephant
Esther the Elephant is certainly adorable, but don't flatter her too much – an elephant never forgets, and she's already got a big head!
Skill level: Intermediate
Ravelry: Esther the Elephant
Esther the Elephant is certainly adorable, but don't flatter her too much – an elephant never forgets, and she's already got a big head!
Supplies
Yarn (acrylic, weight 4)
- Medium Blue (2 skeins Mary Maxim Starlette - Medium Blue)
- Light Blue (1 skein Mary Maxim Starlette - Soft Blue)
Notes
Abbreviations
General Instructions
Regarding stitch markers


 Note: The photos above show a fox, but the technique is the same for all of my patterns.
The pattern indicates to insert 4 different stitch markers in various places besides the one you use to track the beginning/end of each round.
I recommend using strands of yarn in 3 different colors as your stitch markers: Two strands in color 1 (blue) to mark where you will place each eye, Two strands color 2 (pink) to mark where you will start attaching each ear, and one long strand in color 3 (green) to track the beginning/end of each round.
The photos above demonstrate how to mark a stitch while crocheting a round: lay your strand of yarn acting as a marker over your working yarn and the stitch you'll be working into, then complete the stitch as normal.
You'll essentially be weaving the long strand in color 3 through your work with each round. On odd rounds you'll be laying the strand back-to-front, and on even rounds you'll be laying the strand front-to-back.
The advantage of using this technique is you'll have the beginning of every single round marked, which makes it much easier to find your place if you make a mistake. That said, It's perfectly fine to use a regular ol' safety pin-like marker to keep track of your rounds instead. 🙂
Note: The photos above show a fox, but the technique is the same for all of my patterns.
The pattern indicates to insert 4 different stitch markers in various places besides the one you use to track the beginning/end of each round.
I recommend using strands of yarn in 3 different colors as your stitch markers: Two strands in color 1 (blue) to mark where you will place each eye, Two strands color 2 (pink) to mark where you will start attaching each ear, and one long strand in color 3 (green) to track the beginning/end of each round.
The photos above demonstrate how to mark a stitch while crocheting a round: lay your strand of yarn acting as a marker over your working yarn and the stitch you'll be working into, then complete the stitch as normal.
You'll essentially be weaving the long strand in color 3 through your work with each round. On odd rounds you'll be laying the strand back-to-front, and on even rounds you'll be laying the strand front-to-back.
The advantage of using this technique is you'll have the beginning of every single round marked, which makes it much easier to find your place if you make a mistake. That said, It's perfectly fine to use a regular ol' safety pin-like marker to keep track of your rounds instead. 🙂
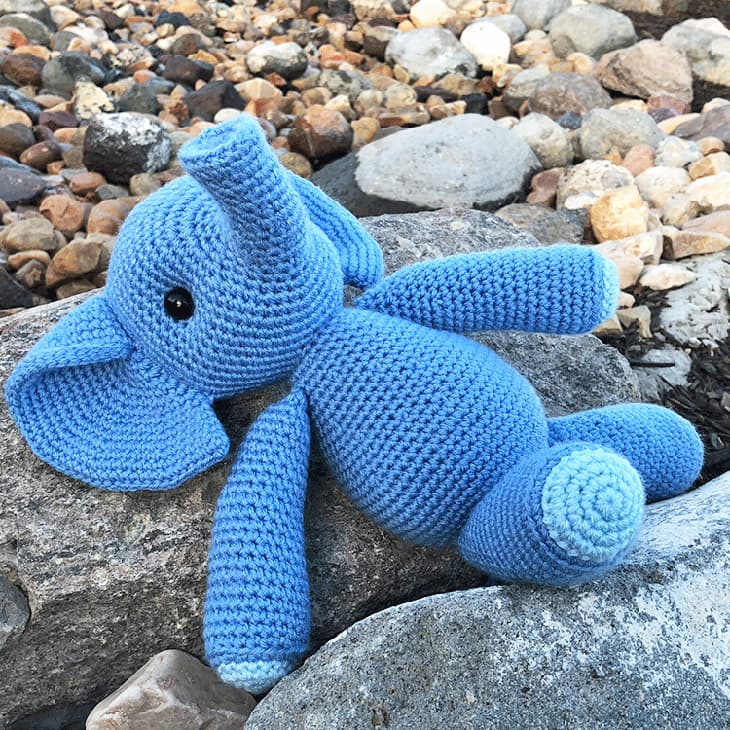
Recommended Sequence Here are the steps to create your elephant, in order:
Crochet Video Tutorials
Assembly Tutorials
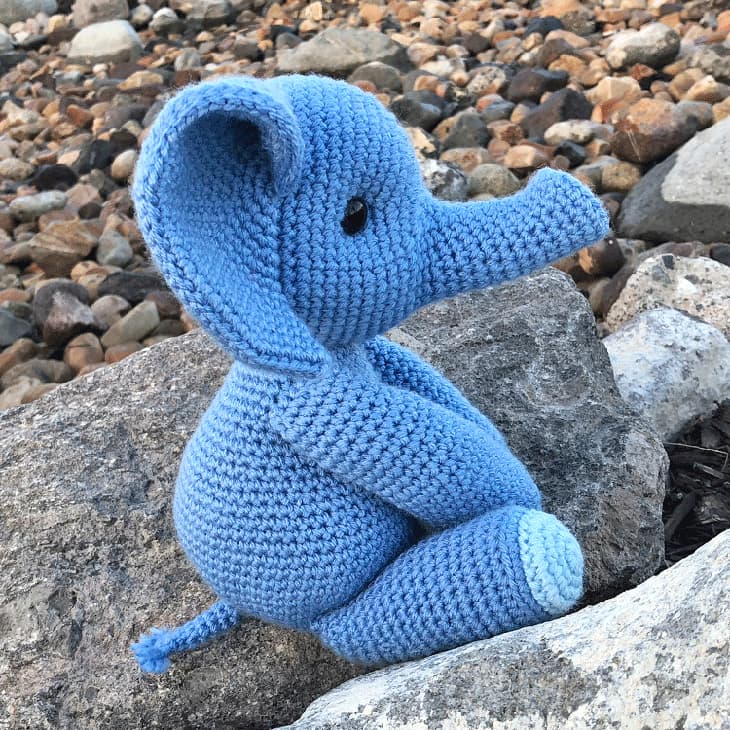
The trunk
You may need to twist the trunk a bit to get it straight on the face – this is normal. 🙂
How to Indent the Eyes
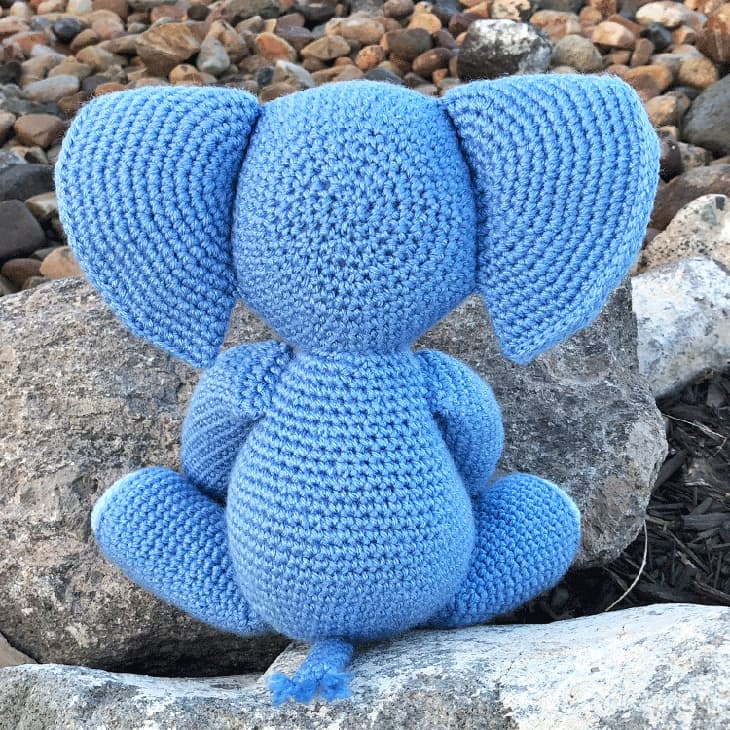
The ears
Here are the next steps to get your ears to look like the picture at the top of the pattern (click to view images at full size): Step 1 – Fold in half and slip stitch closed – your ear will now be shaped like a taco Step 2 – Fold the top point of your "taco" to touch the starting magic ring Step 3 – Begin securing together by stitching through the magic ring Step 4 – stitch all the way up, then tighten up your stitches


How to Crochet the Tail Tuft
- ch – chain
- slst – slip stitch
- sc – single crochet
- inc – complete two single crochets within the same stitch
- dec – combine two stitches into one with an invisible decrease
- BLO – crochet in the back loop only
- *sc x* – repeat the instructions between asterisks(*) the indicated number of times. If the pattern doesn't tell you how many times to repeat, then repeat the sequence until you reach the end of the round.
General Instructions
- Work all stitches in both loops unless the pattern instructs otherwise.
- This pattern is worked in one continuous spiral. Do not join rounds unless the pattern indicates otherwise (in other words, do not slip stitch and chain to start a new round).
Regarding stitch markers
Note: The photos above show a fox, but the technique is the same for all of my patterns.
The pattern indicates to insert 4 different stitch markers in various places besides the one you use to track the beginning/end of each round.
I recommend using strands of yarn in 3 different colors as your stitch markers: Two strands in color 1 (blue) to mark where you will place each eye, Two strands color 2 (pink) to mark where you will start attaching each ear, and one long strand in color 3 (green) to track the beginning/end of each round.
The photos above demonstrate how to mark a stitch while crocheting a round: lay your strand of yarn acting as a marker over your working yarn and the stitch you'll be working into, then complete the stitch as normal.
You'll essentially be weaving the long strand in color 3 through your work with each round. On odd rounds you'll be laying the strand back-to-front, and on even rounds you'll be laying the strand front-to-back.
The advantage of using this technique is you'll have the beginning of every single round marked, which makes it much easier to find your place if you make a mistake. That said, It's perfectly fine to use a regular ol' safety pin-like marker to keep track of your rounds instead. 🙂
Recommended Sequence Here are the steps to create your elephant, in order:
- Crochet the Trunk & Head
- Crochet the Ears
- Crochet the Body
- Crochet the Arms
- Crochet the Legs
- Crochet the Tail
- Attach the Head to the Body
- Attach the Legs to the Body
- Attach the Arms to the Body
- Attach the Tail to the Body
Crochet Video Tutorials
- Magic ring
- Slip stitch closed
- Invisible finish
- Ultimate finish
- Perfect Arm Base
- Perfect Leg Base
- Crochet the Tail Tuft
Assembly Tutorials
- How to attach the head to the body
- How to attach the legs to the body
- How to attach the arms to the body
- How to attach the tail to the body
The trunk
You may need to twist the trunk a bit to get it straight on the face – this is normal. 🙂
How to Indent the Eyes
Note: This video shows a unicorn, but the technique is the same for all of my patterns.
Cut a strand of yarn approximately 18" long. Tie a large, secure knot in one end and thread the other end through your yarn needle.
Insert your needle through the back opening of the head and sew between the two spots where you'll be placing your safety eyes (marked with strands of yarn).
Pull your strand of yarn taut, which will create indents. Fasten off with a knot and hide your yarn tail inside the head.
The ears
Here are the next steps to get your ears to look like the picture at the top of the pattern (click to view images at full size): Step 1 – Fold in half and slip stitch closed – your ear will now be shaped like a taco Step 2 – Fold the top point of your "taco" to touch the starting magic ring Step 3 – Begin securing together by stitching through the magic ring Step 4 – stitch all the way up, then tighten up your stitches


How to Crochet the Tail Tuft
Note: I'm in the process of updating the tail style for all of my patterns, but haven't had a chance to take new elephant photos yet. I recommend using the new style as shown in the video.
With medium blue yarn, create a slip knot on your hook. slst into the first stitch, chain 6, then slst into the same stitch.
Repeat this process in the 2 remaining stitches across: slst into the next stitch, chain 6, then slst into the same stitch.
Fasten off and hide the yarn tails inside the work with a yarn needle.
Instructions
Trunk & Head
- With medium blue yarn:
01. start 6 sc into a magic ring [6]
02. *sc, inc* [9]
03. sc, inc, *sc 2, inc* 2 times, sc [12]
04. *sc 3, inc* [15]
05. sc 2, inc, *sc 4, inc* 2 times, sc 2 [18]
06. BLO: sc in each st around [18]
07. sc in each st around [18]
08. *sc 2, dec* 3 times, *sc, inc* 3 times [18]
09. sc 17, inc [19]
10. *sc 2, dec* 3 times, sc, *sc, inc* 3 times [19]
11. sc in each st around [19]
12. *sc 2, dec* 3 times, sc, *sc, inc* 3 times [19]
13. sc 9, inc, sc 9 [20]
14. *sc 2, dec* 3 times, sc, *sc, inc* 3 times, sc [20]
15. sc 19, inc [21]
16. *sc 2, dec* 3 times, inc, *sc, inc* 3 times, sc 2 [22]
17. sc 21, inc [23]
18. *sc 2, dec* 3 times, *sc, inc, sc* 3 times, inc, sc [24]
19. *sc* 12 times, *inc* 12 times [36]
20. *sc 5, inc* [42]
21. sc 3, inc, *sc 6, inc* 5 times, sc 3 [48]
22. *sc 7, inc* [54]
23. sc 4, inc, *sc 8, inc* 5 times, sc 4 [60]
24. sc in each st around [60]
25. sc 26, insert marker color 1 into next sc (27th st from start of round), sc 29, insert marker color 1 into next sc (57th st from start of round), sc 3 [60]
26 - 30. sc in each st around [60]
31. sc 35, insert marker color 2 into next sc (36th st from start of round), sc 13, insert marker color 2 into next sc (50th st from start of round), sc 10 [60]
32 - 34. sc in each st around [60]
35. sc 4, dec, *sc 8, dec* 5 times, sc 4 [54]
36. *sc 7, dec* [48]
37. sc 3, dec, *sc 6, dec* 5 times, sc 3 [42]
38. *sc 5, dec* [36]
39. sc 2, dec, *sc 4, dec* 5 times, sc 2 [30]
Push the tip of the trunk inside the rest of the trunk so it's indented like the photos. Stuff head ¾ full. Sew between the two spots marked with your color 1 markers to create indents for the eyes (see instructions at the bottom of the pattern). The markers are where you will place the eyes. Insert eyes and secure backings.
40. *sc 3, dec* [24]
41. sc, dec, *sc 2, dec* 5 times, sc [18]
42. *sc, dec* [12]
Finish stuffing.
43. dec in each st around [6]
Close with an ultimate finish.
Ears (make 2)
- With medium blue yarn:
01. start 6 sc into a magic ring [6]
02. inc in each st around [12]
03. *sc, inc* [18]
04. sc, inc, *sc 2, inc* 5 times, sc [24]
05. *sc 3, inc* [30]
06. sc 2, inc, *sc 4, inc* 5 times, sc 2 [36]
07. *sc 5, inc* [42]
08. sc 3, inc, *sc 6, inc* 5 times, sc 3 [48]
09. *sc 7, inc* [54]
10. sc 4, inc, *sc 8, inc* 5 times, sc 4 [60]
11. *sc 9, inc* [66]
12. sc 5, inc, *sc 10, inc* 5 times, sc 5 [72]
13. *sc 11, inc* [78]
14. sc 6, inc, *sc 12, inc* 5 times, sc 6 [84]
Fasten off and leave a very long tail for sewing (I'd recommend about 5 feet for the yarn tail, or about the length of your arm span). See "notes" section for instructions on how to fold and secure the ears.
Attach the left ear starting in the left stitch marked with color 2, and each of the next 14 stitches down the round (down the left side of the head).
Attach the right ear starting in the right stitch marked with color 2, and each of the next 14 stitches up the round (down the right side of the head).
Body
- With medium blue yarn:
01. start 6 sc into a magic ring [6]
02. inc in each st around [12]
03. *sc, inc* [18]
04. sc, inc, *sc 2, inc* 5 times, sc [24]
05. *sc 3, inc* [30]
06. sc 2, inc, *sc 4, inc* 5 times, sc 2 [36]
07. *sc 5, inc* [42]
08. sc 3, inc, *sc 6, inc* 5 times, sc 3 [48]
09. *sc 7, inc* [54]
10. sc 4, inc, *sc 8, inc* 5 times, sc 4 [60]
11 - 17. sc in each st around [60]
18. sc 4, dec, *sc 8, dec* 5 times, sc 4 [54]
19. sc in each st around [54]
20. *sc 7, dec* [48]
21. sc in each st around [48]
22. sc 3, dec, *sc 6, dec* 5 times, sc 3 [42]
23 - 24. sc in each st around [42]
25. *sc 5, dec* [36]
26 - 27. sc in each st around [36]
28. sc 2, dec, *sc 4, dec* 5 times, sc 2 [30]
29 - 30. sc in each st around [30]
31. *sc 3, dec* [24]
Fasten off and leave a long tail for sewing. Stuff firmly with fiber fill.
Arms (make 2)
Legs (make 2)
Switch to medium blue yarn:05. BLO: slst in each st around [24]06. BLO: *sc 3, inc* [30]07. BLO: sc in each st around [30]08 - 10. sc in each st around [30]11. sc 14, dec, sc 14 [29]12. sc 27, dec [28]13. sc 13, dec, sc 13 [27]14. sc 25, dec [26]15. sc 12, dec, sc 12 [25]16. sc 23, dec [24]17. sc 11, dec, sc 11 [23]18. sc 21, dec [22]19. sc 10, dec, sc 10 [21]20. sc 19, dec [20]21. sc 9, dec, sc 9 [19]22. sc 17, dec [18]23. *sc 7, dec* [16]24. *sc 2, dec* [12]
Tail
- With medium blue yarn:01. start 6 sc into a magic ring [6]02 - 08. sc around [6]