
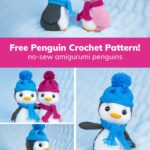
This free crochet penguin pattern is my first non-mammal design!
For a long time, I stuck to designing patterns for animals/dolls that have arms and legs because I love when things are matchy-matchy (though I definitely take it too far sometimes – just ask my husband what it’s like going with me to Target 😂).

I recently did a poll in my Facebook group, Crochet with Jess Huff, to see which Christmas patterns my members would most like to see. Aside from Santa Claus, a penguin was the most popular answer.

I hesitated to break the mold that I’d stuck to for so long, but decided, “Hey, why not?”
My favorite part of designing this penguin crochet pattern was making the little toes and feet. 🥰 It was a nice change of pace after doing the same old limbs for so long.

I named this free amigurumi pattern “Peter the Penguin” after my nephew.
Thank goodness Peter’s name starts with a “P” so I could stick to my alliteration trend. 😜 When Peter was a little boy, he was obsessed with penguins. I’m pretty sure he owned at least a dozen penguin stuffed animals and plushies.
He would frequently peep and waddle around the house, pretending to be a baby penguin. It was adorable!
Fast forward several years, and Peter is now a preteen. He’s been kind enough to pass on some of his collection to my toddler, so the love of all things penguin remains alive and well among the Huffs.


My little boy was thrilled to receive his very own crocheted penguin.
He even made the penguin a little nest in the bottom drawer of his night stand, and sleeps with it every night. 🥺 I hope this pattern brings joy to the penguin lover in your life too! ❤️
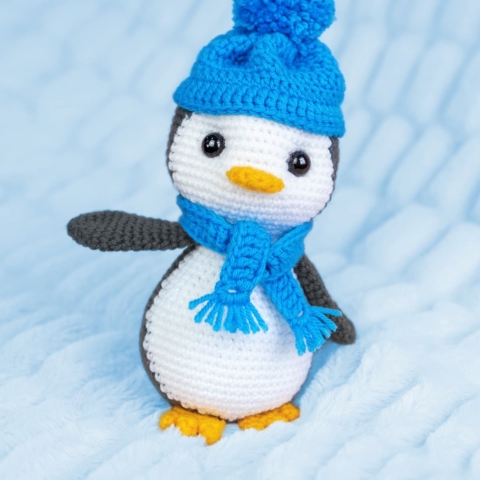
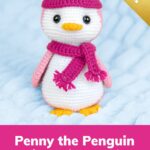
Peter the Penguin
Skill level: Intermediate-Advanced
Terms: US 🇺🇸Who’s black & white and cute all over? Peter the Penguin! He loves telling jokes to break the ice, but he’s also shy and might get cold feet.
Supplies
Yarn (acrylic, weight 4) – 165 total yards
- Black – 100 yards (I used Red Heart Super Saver – Black)
- White – 35 yards (I used Red Heart Super Saver – White)
- Yellow – 3 yards (I used Red Heart Super Saver – Saffron)
- Blue – 27 yards (I used Impeccable Yarn – Clear Blue)
Notes
- ch – chain
- slst – slip stitch
- sc – single crochet
- inc – complete two single crochets within the same stitch
- dec – combine two stitches into one with an invisible decrease
- dc – double crochet
- tr – treble crochet
- BLO – crochet in the back loop only
- *sc x* – repeat the instructions between asterisks(*) the indicated number of times.
- (sc x) – attach a body part while completing the stitches inside parentheses as instructed by the pattern.
General Instructions
- This pattern is worked in one continuous spiral.
- Use a stitch marker to keep track of where one round ends and the next begins. I prefer to place my stitch marker in the last stitch of the round.
Recommended Sequence
Here are the steps to create your penguin, in order:
- Crochet the Feet
- Crochet the Beak
- Crochet the Wings
- Crochet the Body & Head
- Make the Pom-Pom for the Hat
- Crochet the Hat
- Crochet the Hat Trim
- Crochet the Scarf
Crochet Video Tutorials
Making the Feet
Attaching the Feet
Attaching the Wings
Attaching the Beak
Marking Stitches for the Eyes
Indenting the Eyes
Making the Pom-Pom
Making the Hat
Instructions
Feet (make 2)
Tip: The feet are made with a technique that may not be suitable for beginners. If you're getting frustrated, you can use the beak portion of the pattern (next section below) to make beginner-friendly feet. To view a video tutorial, see "Making the Feet" in the Notes section of the pattern. With yellow yarn, make 3 toes: 01. start 4 sc into a magic ring [4]02. sc in each st around [4]At the end of Toes 1 & 2, fasten off, leaving a 5 inch tail. At the end of Toe 3, do not fasten off. Next, we'll combine all 3 toes into one large round to create the rest of the foot. 03. Crochet into the first 2 stitches of Toe 2. Crochet around all 4 stitches of Toe 1. Crochet into the remaining 2 stitches of Toe 2. Crochet around all 4 stitches of Toe 3. [12] 04. sc in each st around [12] Now crochet until you reach the edge of the foot (for me, this was 4 additional single crochets). Fasten off, leaving a tail of 12 inches. Close up the holes between the toes using the 5 inch tails. Hide the tails inside the work. Do not stuff the foot. Pinch the final round together and slip stitch closed. Your foot is now ready to attach while crocheting the body at a later step.
Beak
With yellow yarn: 01. start 6 sc into a magic ring [6]02. inc in each st around [12]03. sc in each st around [12] Do not stuff. Fasten off, leaving a 8” tail. Pinch the final round together and slip stitch closed. Hide the tail inside the work. Your beak is now ready to attach while crocheting the head at a later step.
Wings (make 2)
With black yarn: 01. start 6 sc into a magic ring [6]02. inc in each st around [12]03. *sc, inc* 6 times [18]04. sc, inc, *sc 2, inc* 5 times, sc [24]05 – 06. sc in each st around [24]07. sc 5, dec, sc 10, dec, sc 5 [22]08. *sc 9, dec* 2 times [20]09. sc 4, dec, sc 8, dec, sc 4 [18]10. sc in each st around [18]11. *sc 7, dec* 2 times [16]12 – 14. sc in each st around [16]15. *sc 2, dec* 4 times [12]16. sc in each st around [12] Do not stuff. Fasten off, leaving an 18” tail. Pinch the final round together and slip stitch closed. Your wing is now ready to attach while crocheting the body at a later step.
Body & Head
The body and head will be crocheted together as one piece. We'll start at the bum and finish at the top of the head. B = Black | W = White 01. B: start 6 sc into a magic ring [6]02. inc in each st around [12]03. *sc, inc* 6 times [18]04. sc, inc, *sc 2, inc* 5 times, sc [24]05. *sc 3, inc* 6 times [30]06. sc 2, inc, *sc 4, inc* 5 times, sc 2 [36]We'll be attaching the feet as we crochet the next round of the body. To view a video tutorial, see "Attaching the Feet" in the Notes section of the pattern. 07. Attach the first foot: (sc 5, inc), sc in the next st, Attach the second foot: (sc 4, inc, sc), sc 4, inc, *sc 5, inc* 3 times [42] 08. sc 3, inc, W: sc 6, inc, B: *sc 6, inc* 4 times, sc 3 [48]09. sc 3, W: sc 4, inc, sc 7, B: inc, *sc 7, inc* 4 times [54]10. sc 2, W: sc 2, inc, sc 8, inc, sc 4, B: sc 4, inc, *sc 8, inc* 3 times, sc 4 [60]11. sc 2, W: sc 19, B: sc 39 [60]12. sc, W: sc 21, B: sc 38 [60]13. W: sc 23, B: sc 37 [60]14. W: sc 24, B: sc 36 [60]15 – 16. W: sc 25, B: sc 35 [60]17. W: sc 26, B: sc 34 [60]18. W: sc 4, dec, *sc 8, dec* 2 times, sc, B: sc 7, dec, *sc 8, dec* 2 times, sc 4 [54]19. W: sc 24, B: sc 30 [54]20. sc, W: sc 6, dec, sc 7, dec, sc 6, B: sc, dec, *sc 7, dec* 3 times [48]21. sc, W: sc 21, B: sc 26 [48]22. sc, W: sc 2, dec, *sc 6, dec* 2 times, sc 2, B: sc 4, dec, *sc 6, dec* 2 times, sc 3 [42]23 – 24. sc 2, W: sc 18, B: sc 22 [42]25. sc 2, W: sc 3, dec, sc 5, dec, sc 6, B: dec, sc 4, dec, *sc 5, dec* 2 times [36]26 – 27. sc 3, W: sc 15, B: sc 18 [36]28. sc 3, W: dec, sc 3, dec, sc 4, dec, sc 2, B: sc 2, dec, *sc 4, dec* 2 times, sc 2 [30] We'll be attaching the wings as we crochet the next two rounds of the body. To view a video tutorial, see "Attaching the Wings" in the Notes section of the pattern.29. sc 4, W: sc 11, B: sc 14, Start attaching the first wing: (sc) [30] 30. Finish attaching the first wing: (sc 5), W: sc 9, B: Attach the second wing: (sc 6), sc 10 [30] Stuff the body. Now we're moving on to the head: 31. sc 5, W: sc 10, B: sc 15 [30]32. sc 2, inc, sc 2, W: sc 2, inc, sc 4, inc, sc 3, B: sc, inc, *sc 4, inc* 2 times, sc 2 [36]33. sc 5, inc, W: *sc 5, inc* 2 times, sc, B: sc 4, inc, *sc 5, inc* 2 times [42]34. sc 3, inc, sc 3, W: sc 3, inc, sc 6, inc, sc 4, B: sc 2, inc, *sc 6, inc* 2 times, sc 3 [48]35. sc 7, inc, W: *sc 7, inc* 2 times, sc 2, B: sc 5, inc, *sc 7, inc* 2 times [54]36. sc 4, inc, sc 3, W: sc 5, inc, sc 8, inc, sc 6, B: sc 2, inc, *sc 8, inc* 2 times, sc 4 [60]37. sc 9, W: sc 23, B: sc 28 [60]38. sc 9, W: sc 24, B: sc 27 [60]We'll be attaching the beak as we crochet the next round of the head. To view a video tutorial, see "Attaching the Beak" in the Notes section of the pattern. 39. sc 9, W: sc 9, Attach the beak: (sc 6), sc 9, B: sc 27 [60] 40 – 41. sc 10, W: sc 23, B: sc 27 [60]42. sc 11, W: sc 22, B: sc 27 [60] Marking Stitches for the Eyes: Insert two strands of yarn 14 stitches apart between rounds 41 & 42. These markers will show you where to place your safety eyes at a later step. For additional details and a photo, see "Marking Stitches for the Eyes" in the Notes section of the pattern. 43. sc 12, W: sc 21, B: sc 27 [60]44. sc 12, W: sc 20, B: sc 28 [60]45. sc 13, W: sc 19, B: sc 28 [60]46. sc 4, dec, sc 7, W: sc, dec, sc 8, dec, sc 6, B: sc 2, dec, *sc 8, dec* 2 times, sc 4 [54]47. sc 7, dec, sc 4, W: sc 3, dec, sc 7, dec, sc 2, B (for remainder of piece): sc 5, dec, *sc 7, dec* 2 times [48] Leaving Exposed Front Loops for the Hat: In round 48 we’re going to crochet into the back loop only. At a later step, we’ll crochet into the exposed front loops to create the hat. 48. BLO: sc 3, dec, *sc 6, dec* 5 times, sc 3 [42]49. Both loops (for remainder of piece): *sc 5, dec* 6 times [36]50. sc 2, dec, *sc 4, dec* 5 times, sc 2 [30] Stuff head ¾ full and create indents for the eyes. Insert your safety eyes and secure the backings. For additional details and a video tutorial, see "Indenting the Eyes" in the Notes section of the pattern. 51. *sc 3, dec* 6 times [24]52. sc, dec, *sc 2, dec* 5 times, sc [18] Finish stuffing. 53. *sc, dec* 6 times [12]54. *dec* 6 times [6] Fasten off, leaving a tail of about 8 inches. Close with an Ultimate Finish, then hide the tail inside the work.
Hat Pom-Pom
I used a Clover Pom-Pom Maker to create this piece. To view a video tutorial, see "Making the Pom-Pom" in the Notes section of the pattern. If you don't have a pom-pom maker, you can crochet a ball to use instead using the instructions below. With blue yarn: 01. start 6 sc into a magic ring [6]02. inc in each st around [12]03. *sc, inc* 6 times [18]04. sc, inc, *sc 2, inc* 5 times, sc [24]05. sc in each st around [24]06. sc, dec, *sc 2, dec* 5 times, sc [18]07. *sc, dec* 6 times [12] Stuff the ball. 08. *dec* 6 times [6] Fasten off, leaving a tail of about 10 inches. Close with an Ultimate Finish, and leave the tail so you can use it to attach the ball to the hat at a later step.
Hat
To add the hat, we'll crochet into the exposed front loops from round 48 of the Body & Head. Hold your penguin right side up, and insert your hook through each exposed loop bottom-to-top. To view a video tutorial, see "Making the Hat" in the Notes section of the pattern. With blue yarn: 01. sc in each of the exposed front loops on the head. BLO: slst to join. [48] Leaving Exposed Front Loops for the Hat Trim: In round 2 we’re going to crochet into the back loop only. At a later step, we’ll crochet into the exposed front loops to create the trim on the hat. 02. ch 2, BLO: dc in each st around, Both loops: slst to join [48]03 – 06. ch 2, dc in each st around, slst to join [48] Fasten off, leaving a 18” tail. Do not stuff the hat. Thread the end of the tail through a yarn needle and weave it between every stitch in the final round. Cinch the round together, then attach the pom-pom at the top.
Hat Trim
The trim will be worked into the exposed front loops from round 2 of the hat. Hold your penguin upside down and insert your hook through each exposed loop top-to-bottom. With blue yarn: 01. ch 3, tr in each st around, slst to join [48] Fasten off, secure with a knot, and hide the yarn tail inside the work.
Scarf
With blue yarn: 01. ch 63, tr in 4th ch from hook, tr in each remaining ch [60] Add fringe to each end of the scarf if desired, then wrap it around your penguin's neck.